Why Pink and White Christmas Nails Are Trending This Season!
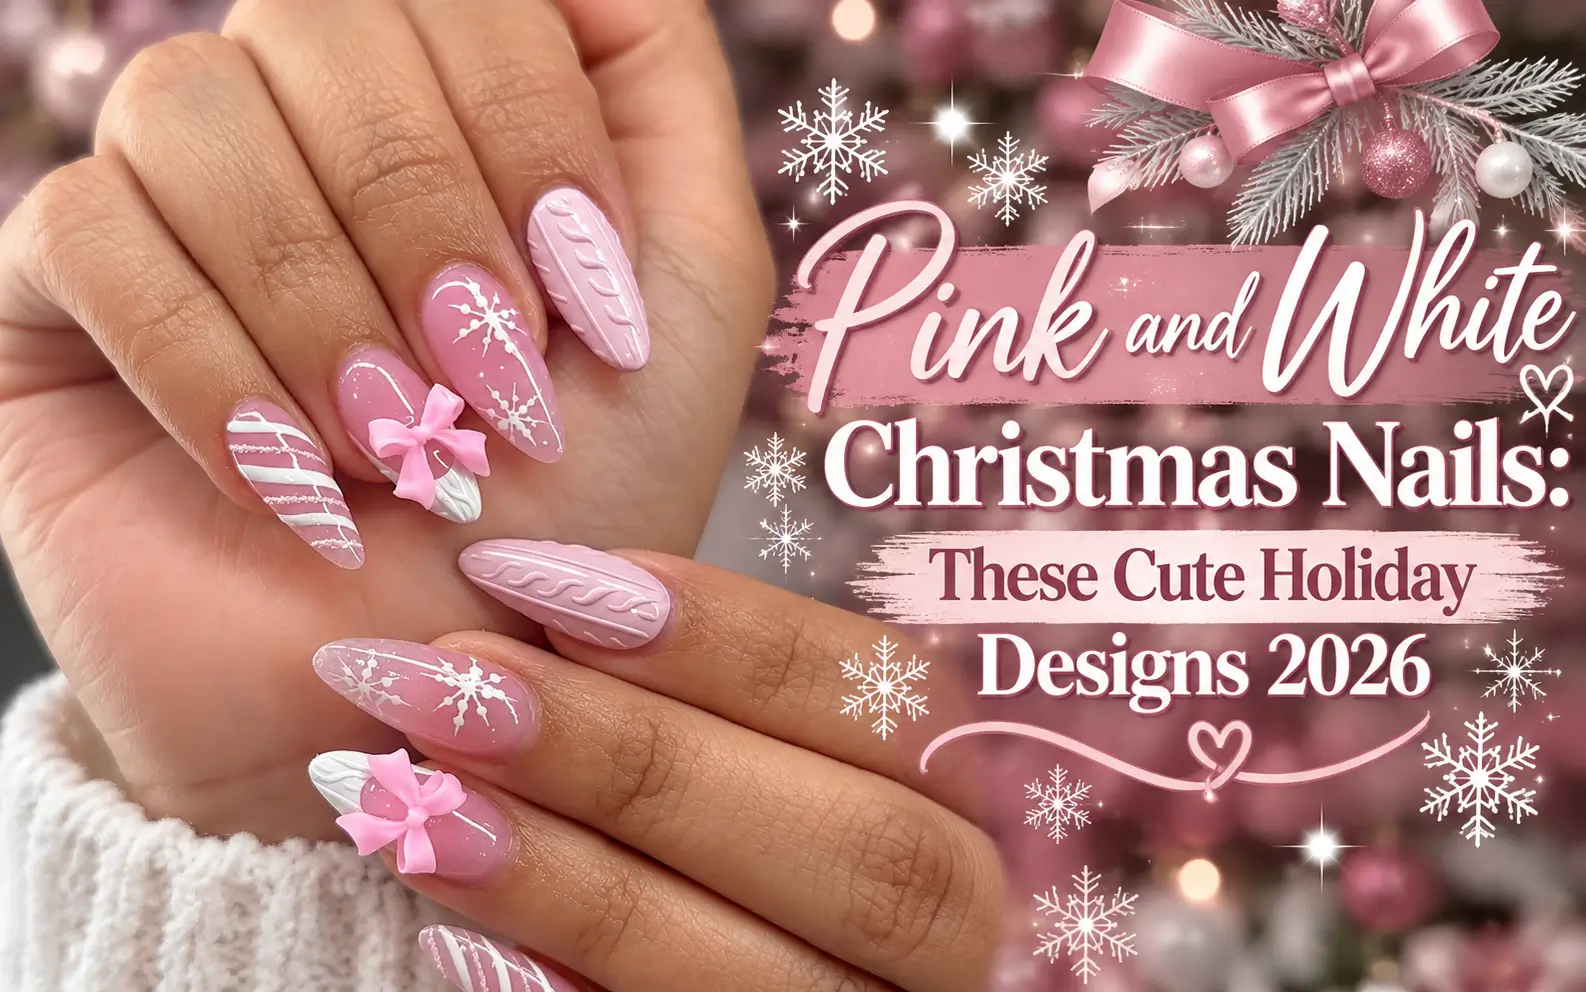
Christmas nails do not have to rely on traditional red and green to feel festive. Pink and White Christmas Nails bring a softer look to the season, combining blush tones, crisp white details, glitter, bows, snowflakes, candy cane stripes, gingerbread accents, and cozy sweater textures. The color pairing feels sweet and feminine while still giving you plenty of room to create detailed holiday nail art.
This season, the trend is especially easy to personalize. You can keep the look simple with glossy pink nails and delicate snowflakes, or make it more decorative with raised bows, textured designs, sparkling accents, and gift wrap inspired details. Almond, square, and longer nail shapes all work beautifully with this color combination.
The ideas ahead show just how many ways you can style pink and white for Christmas. From subtle party ready sparkle to detailed festive artwork, these designs offer plenty of inspiration for your next holiday manicure.
16+ Pink and White Christmas Nails
1. Pink and White Christmas Nails With a Snowflake and Bow
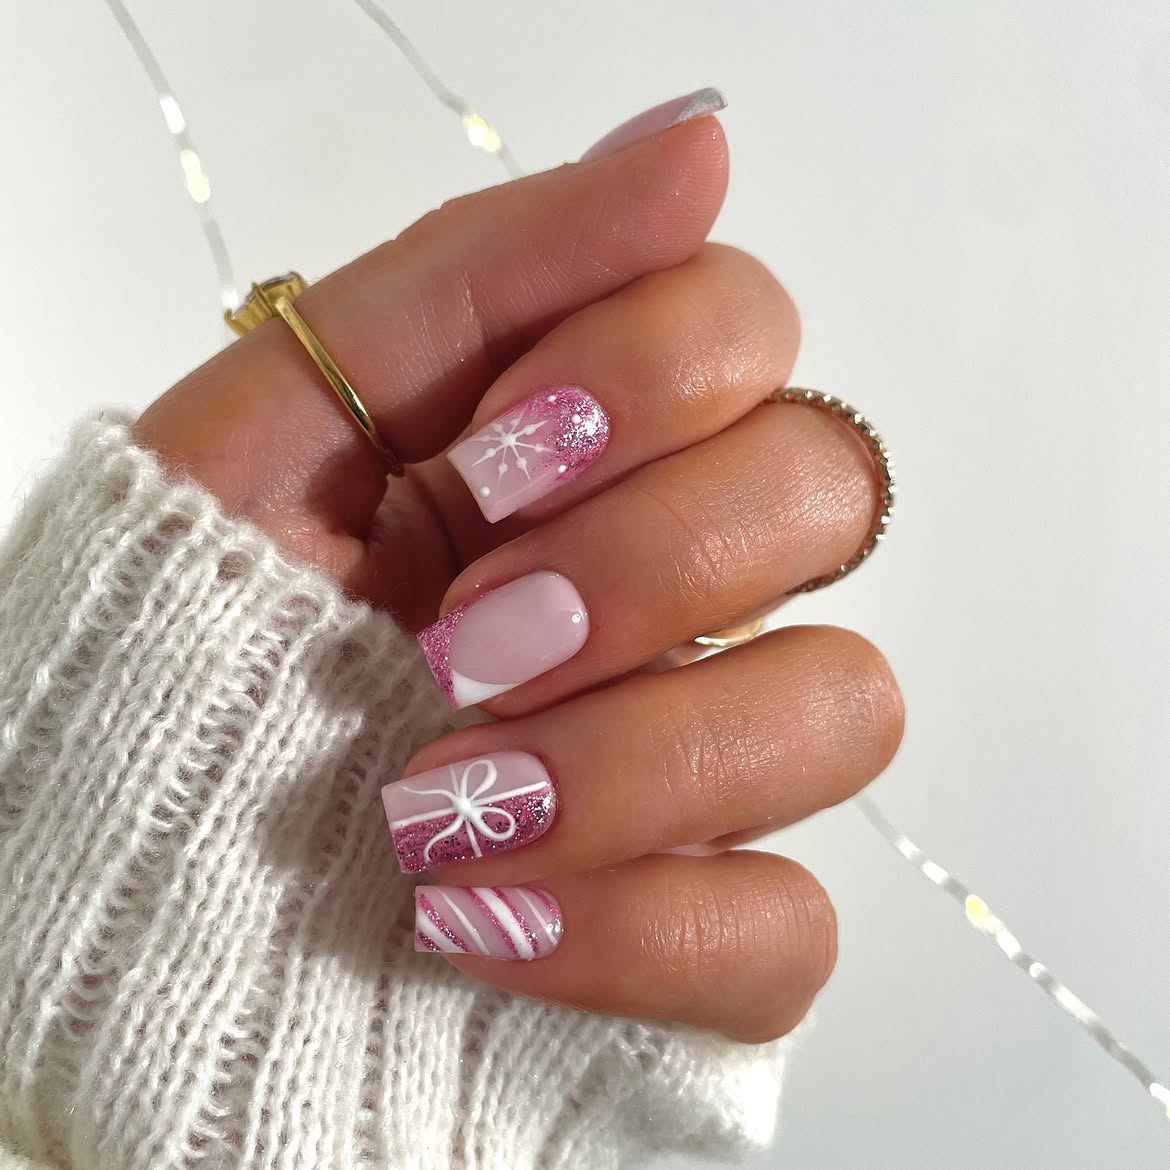
Soft pink gives this square shaped set a gentle base, while white details make each nail feel like part of the same Christmas design. The snowflake sits over a patch of pink sparkle. A thin white bow turns the next accent nail into a wrapped gift, and the little finger has diagonal stripes like a candy cane.
For a similar look, keep the base a pale, milky pink. Place the detailed art on two or three nails, then use pink glitter near the edges to connect the designs. The curved white detail on the middle nail gives your eye a place to rest between the snowflake, bow, and stripes.
A simple placement plan
❄️
Index
White snowflake over pink sparkle
✨
Middle
Milky pink with a curved white corner
🎀
Ring
Fine white bow above pink glitter
🍬
Little finger
Diagonal white and pink stripes
2. Gingerbread and Pink Glitter on Almond Christmas Nails
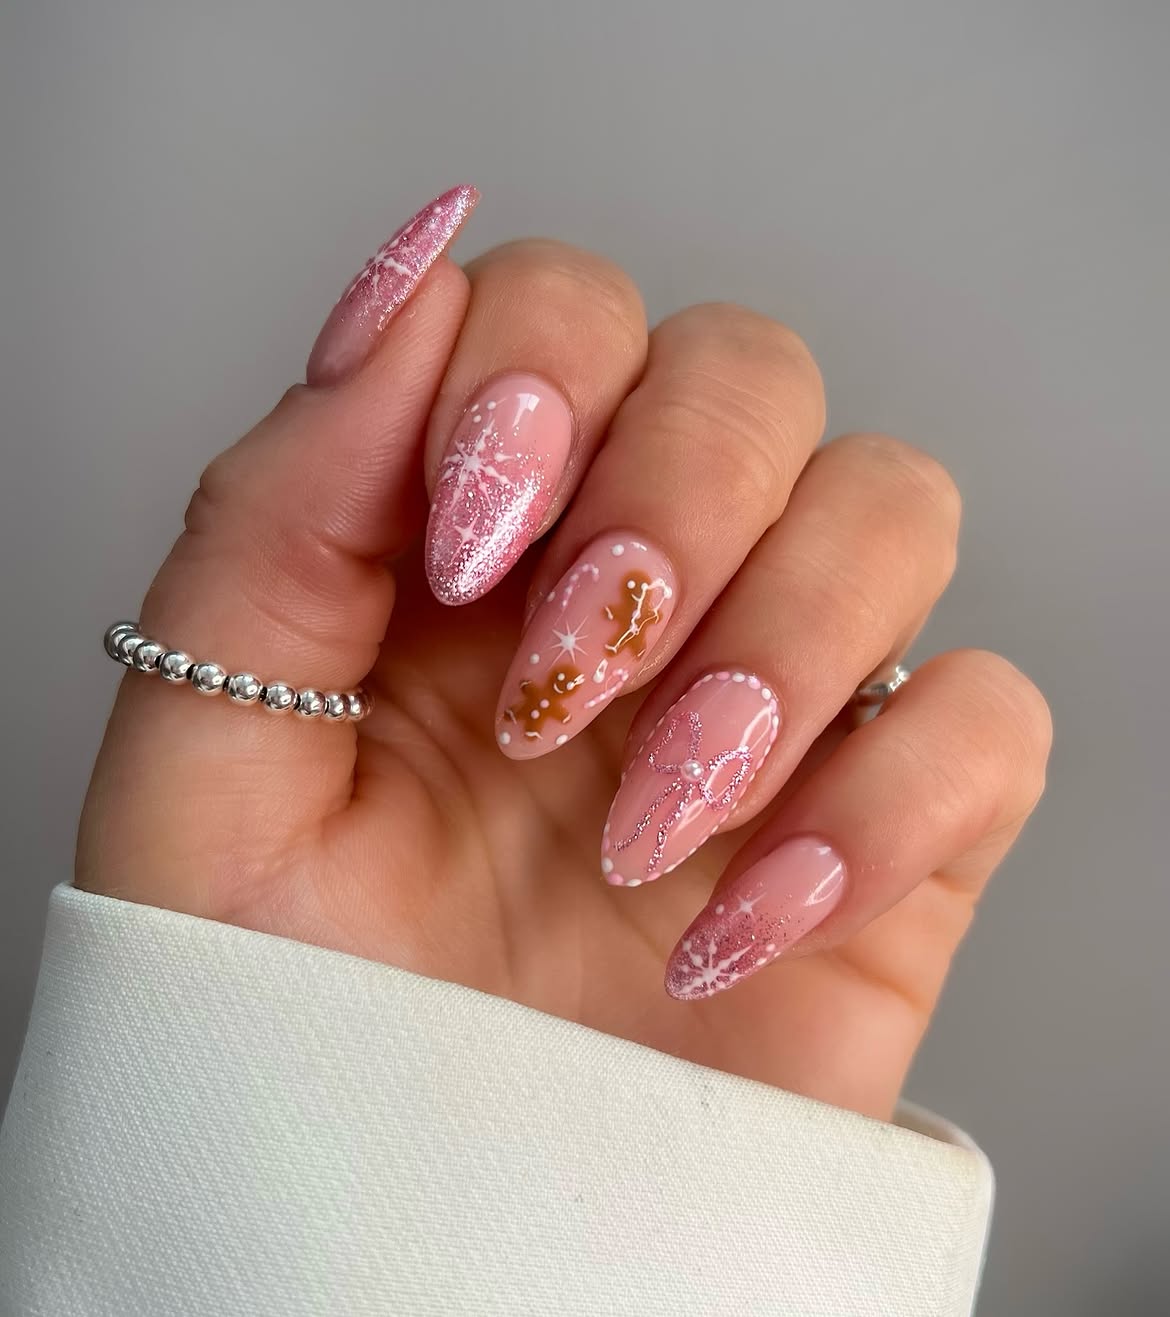
The little gingerbread figures make this set playful, while the soft pink base and long almond shape keep it delicate. They sit on one nail among tiny white dots, a star, and a small candy cane detail.
Each of the other nails has a different job:
- Pink glitter gathers near the tips, with white snowflakes drawn over it.
- A fine glitter bow and a pearl detail give one nail its own focal point.
- Small white dots carry across the set, so the designs still feel connected.
If you want this look, ask for the gingerbread art on just one nail. That leaves enough room for the snowflakes and bow to stand out.
💡 Quick tip
Leave some soft pink visible near the base of the nails. The open space helps the glitter tips and small Christmas details show clearly.
3. Red Bows and Candy Stripes on Pink and White Christmas Nails
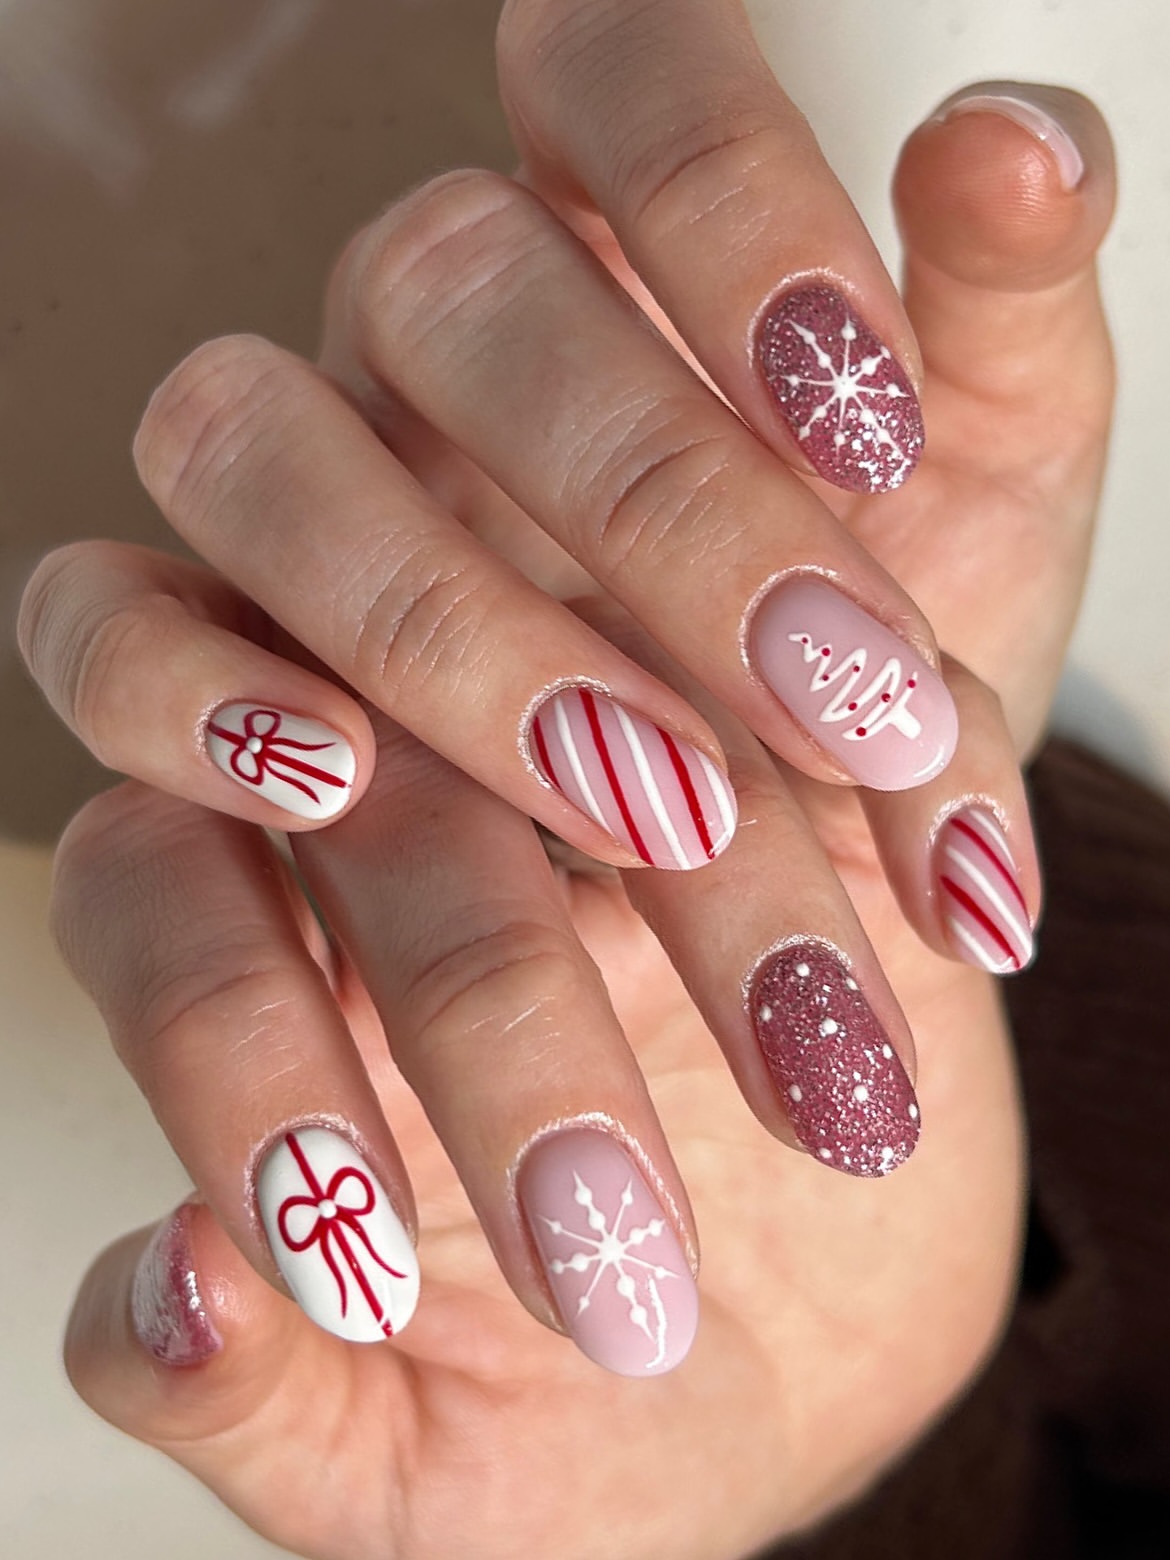
A few thin red lines give this pink and white set its Christmas feel. They form bows on white nails and diagonal candy stripes on others. The softer nails carry white snowflakes, a small white tree with red dots, and rose pink glitter.
To recreate the mix:
- Start with pale pink and white nails.
- Add red bows and stripes to the white nails.
- Place the tree and snowflakes on pink, then use a couple of full glitter nails for shine.
The short rounded shape helps the different patterns sit together without looking crowded.
For a more glamorous Christmas manicure, explore these 15 White and Gold Christmas Nails featuring elegant details, shimmering accents, and timeless holiday inspiration.
4. Raised White Sweater Tips on Long Pink Christmas Nails
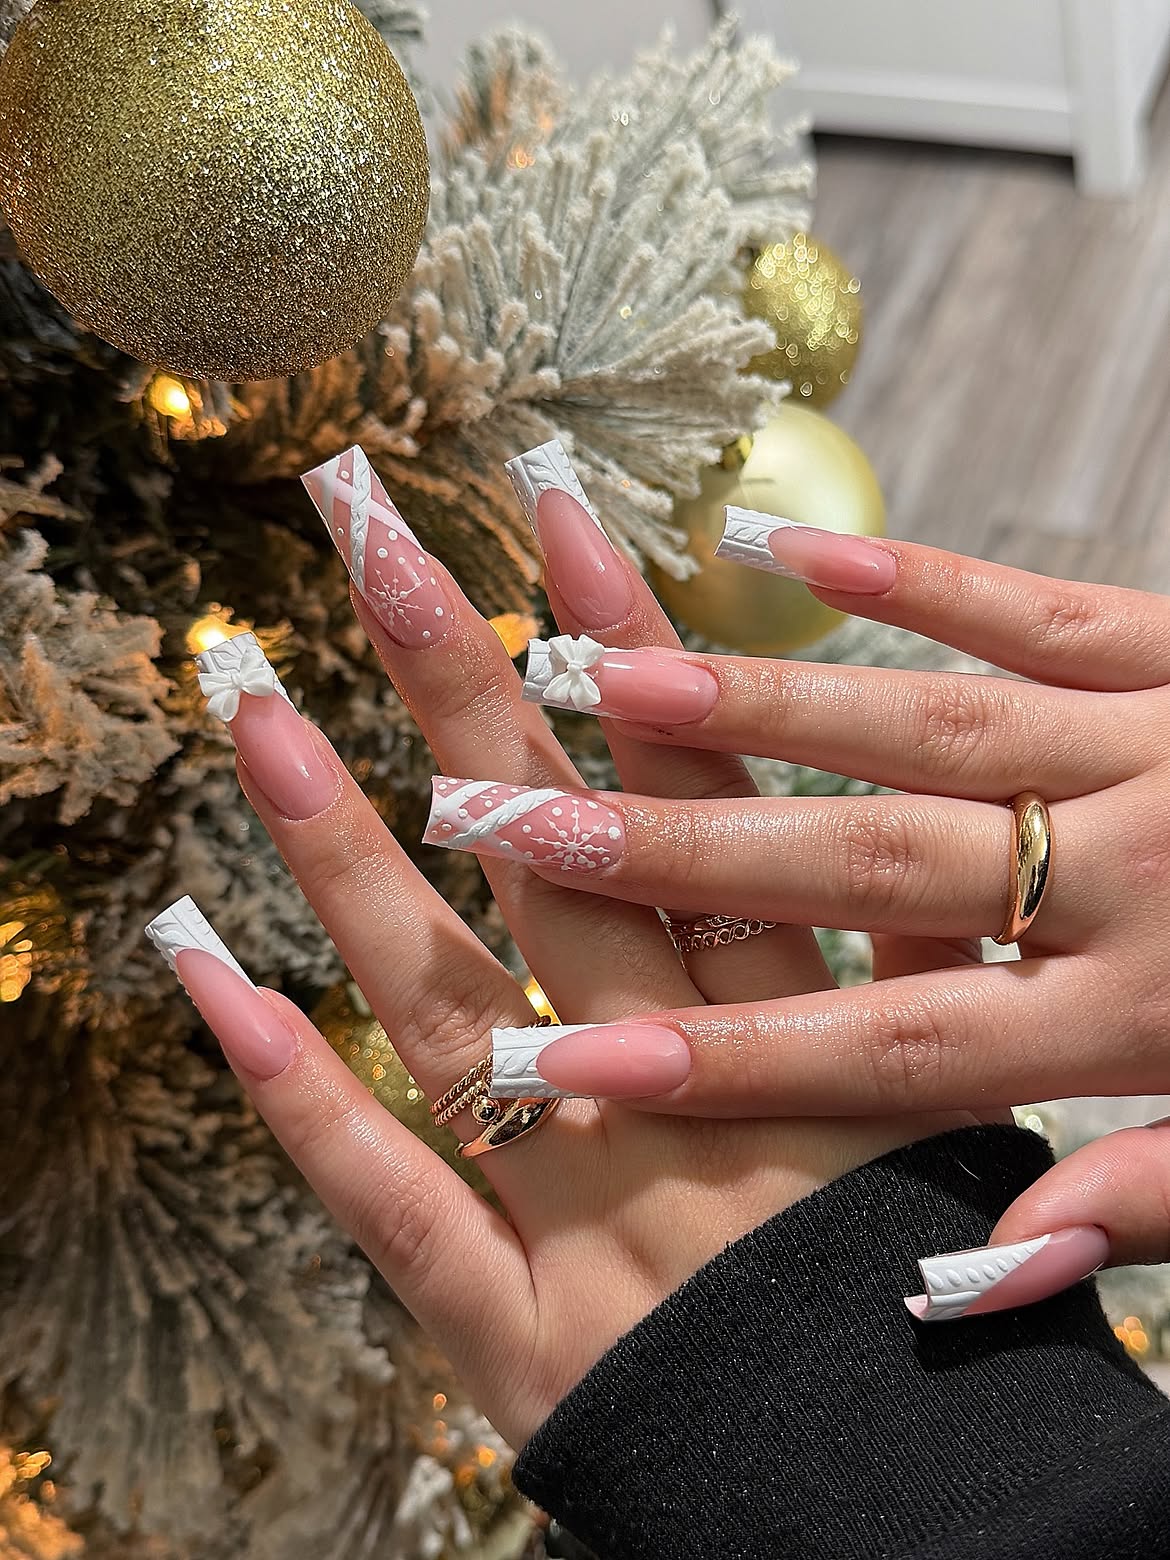
Texture is the main detail in this set. The long square nails have soft pink centers and raised white patterns along their tips. Small sculpted bows make a few nails look like wrapped gifts, while white snowflakes and dots fill selected pink sections.
What makes the design work:
- The pink centers stay open, giving the thick white tips room to stand out.
- The bows appear on only a few nails, so each one catches your eye.
- A diagonal textured band carries the white pattern onto the pink snowflake nails.
If you take this design to a nail appointment, point out the raised texture. Smooth white tips would give you a different result.
How to plan the details
Keep the center of each long nail soft pink.
Add raised white patterns near the square tips.
Finish selected nails with small bows, snowflakes, and dots.
5. Soft Pink Ribbons on Flared Christmas Nails
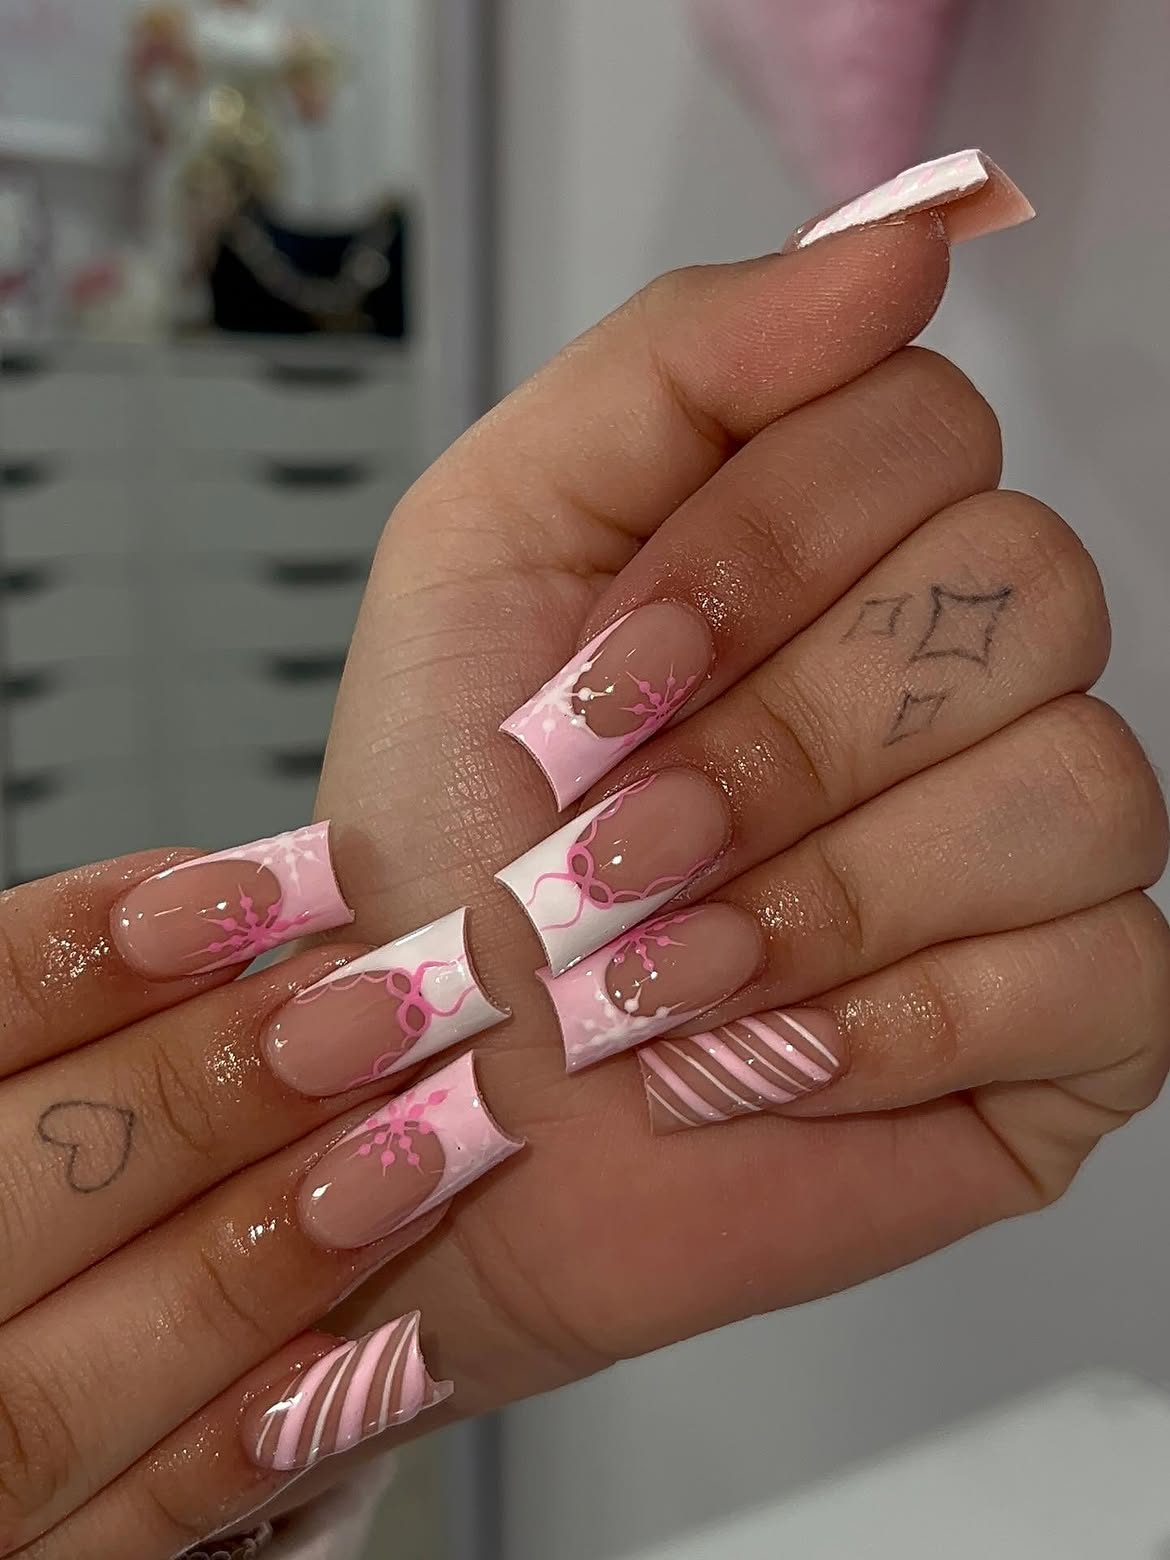
Here, the nail shape is part of the design. The long tips widen at the ends, making room for curved pale pink and white bands. Sheer nude pink stays visible through the middle, while fine pink ribbons and small snowflakes sit near the edges. Two striped nails carry the pattern across both hands.
The detail to copy is the open center. If the colored bands reach too far inward, the ribbon lines may get lost. Show your nail artist this design from the top and side so the widened shape is clear. Keep the pink lines thin and the white sections clean for the same soft look.
| Detail in the design | What to ask for |
|---|---|
| Widened tips | A long flared shape with room for art at the ends |
| Open pink centers | Keep the pale bands close to the tips |
| Ribbon and snowflake art | Use fine pink and white lines near the edges |
| Striped accent nails | Repeat the diagonal stripes on both hands |
6. Pearly Pink Glitter Nails for Christmas Parties
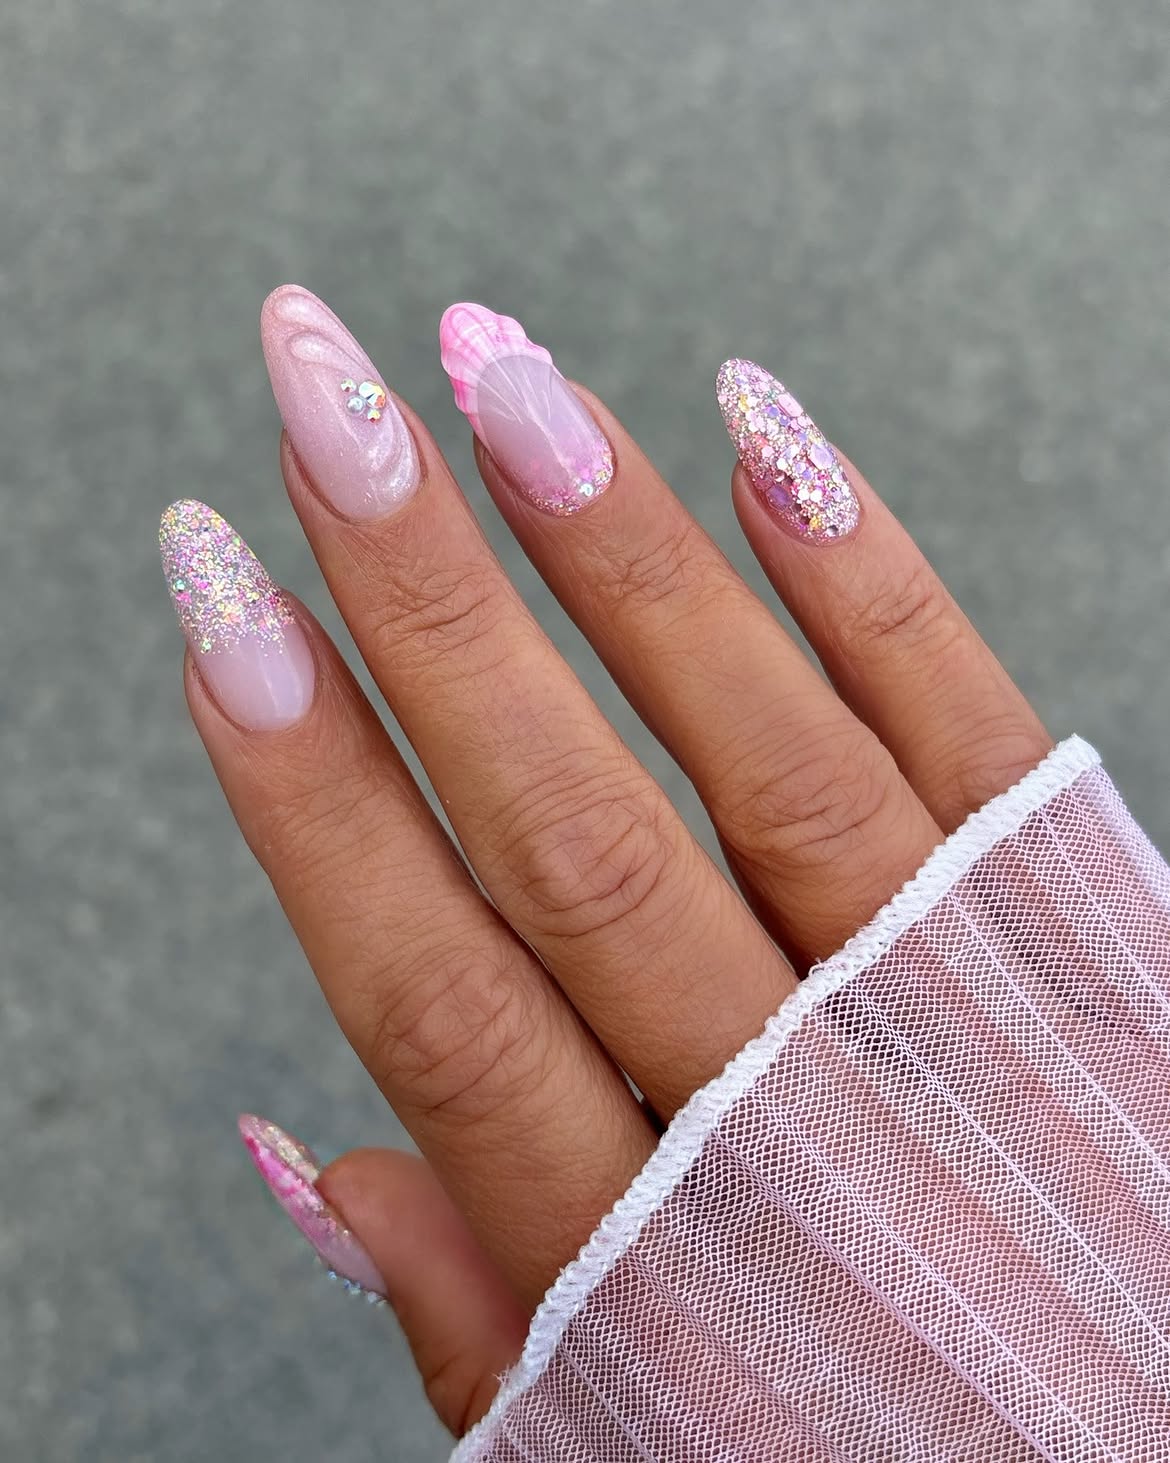
Shine carries this design. The almond nails mix soft pink, pearly swirls, fine white lines, and dense iridescent glitter. One nail has a small cluster of reflective gems. Another has a wavy pink edge that stands out from the smoother nails around it.
For a similar look, put the strongest glitter on one or two nails and leave the pearly designs lighter. That gives each finish space to show. The design has no painted Christmas characters or symbols, so the pale colors and sparkle do the seasonal work. It could also suit an event after Christmas without changing the design.
Pair fine pearly shimmer on the pale pink nails with larger reflective pieces on the glitter nails. The change in sparkle size helps both finishes show.
7. A Statement Pink Bow With White Snowflake Nails
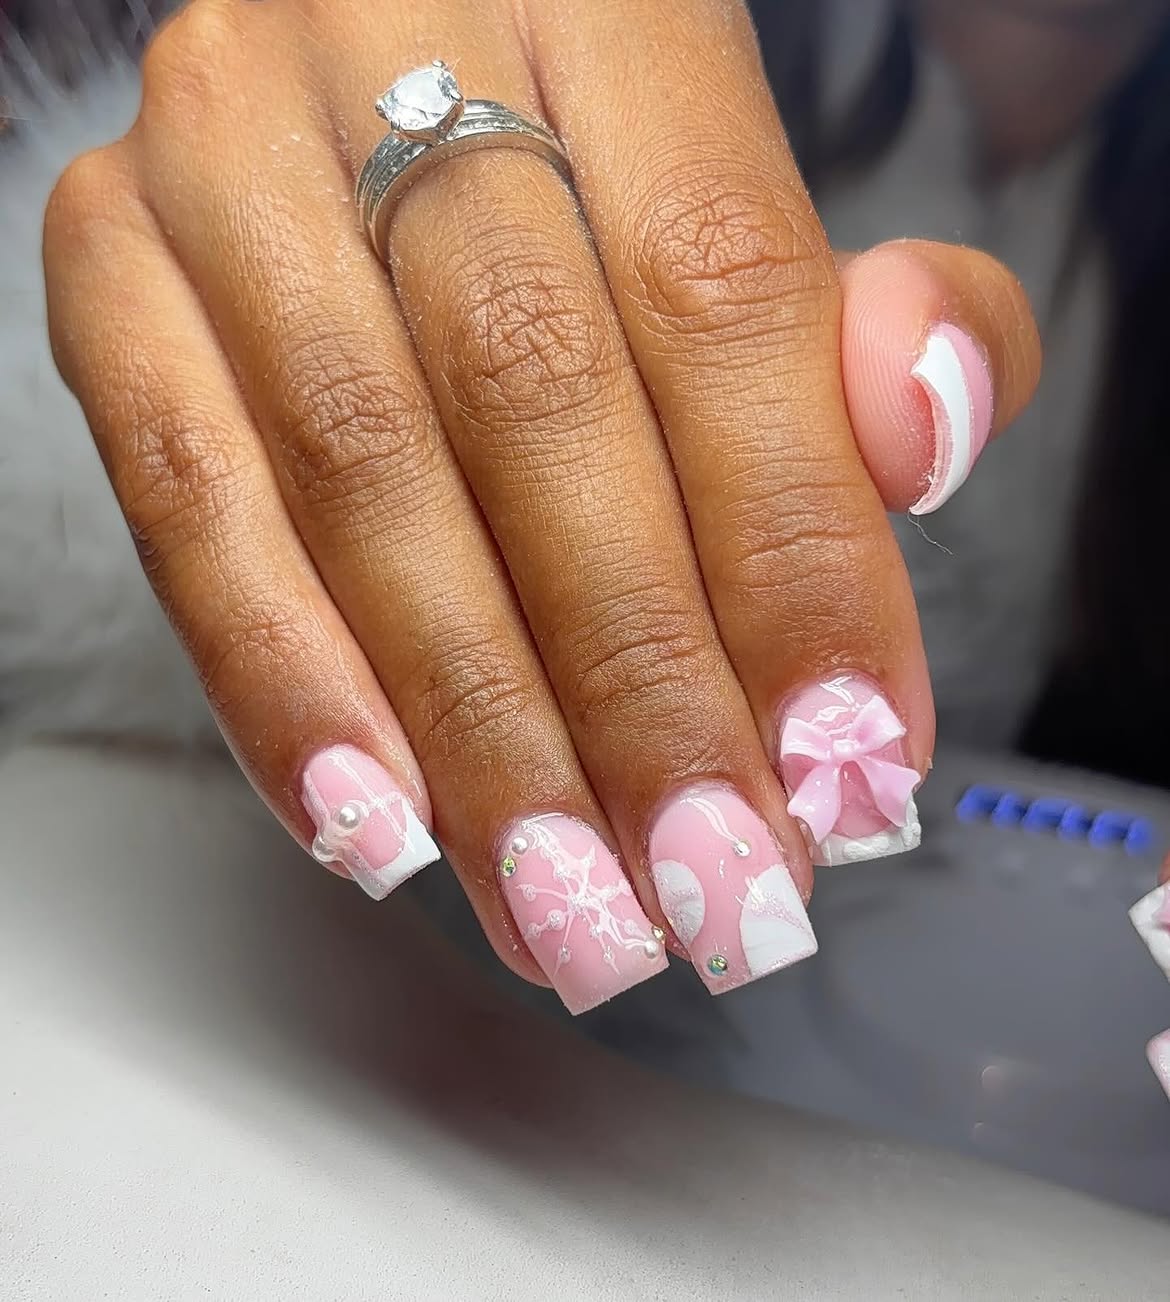
The large raised bow catches your eye first. It sits on one short square nail, while the others use pale pink, white tips, a snowflake, and small reflective gems. The bow gets plenty of space because the nearby nails keep their details smaller.
Why the pieces fit together:
- White tips give the pink bow a clear edge.
- The snowflake carries the Christmas detail onto another nail.
- Tiny gems add a little shine without changing the soft color palette.
For your own version, choose the bow finger first. Place the snowflake on a nearby nail and keep the remaining art light, so the bow stays the main feature.
Use one large raised bow as the main detail.
Add smaller snowflake art and gems on the other nails.
Let pale pink show around the painted details.
Keep the tallest decoration on a single nail.
8. Pink Glitter Gift Wrap With White French Tips
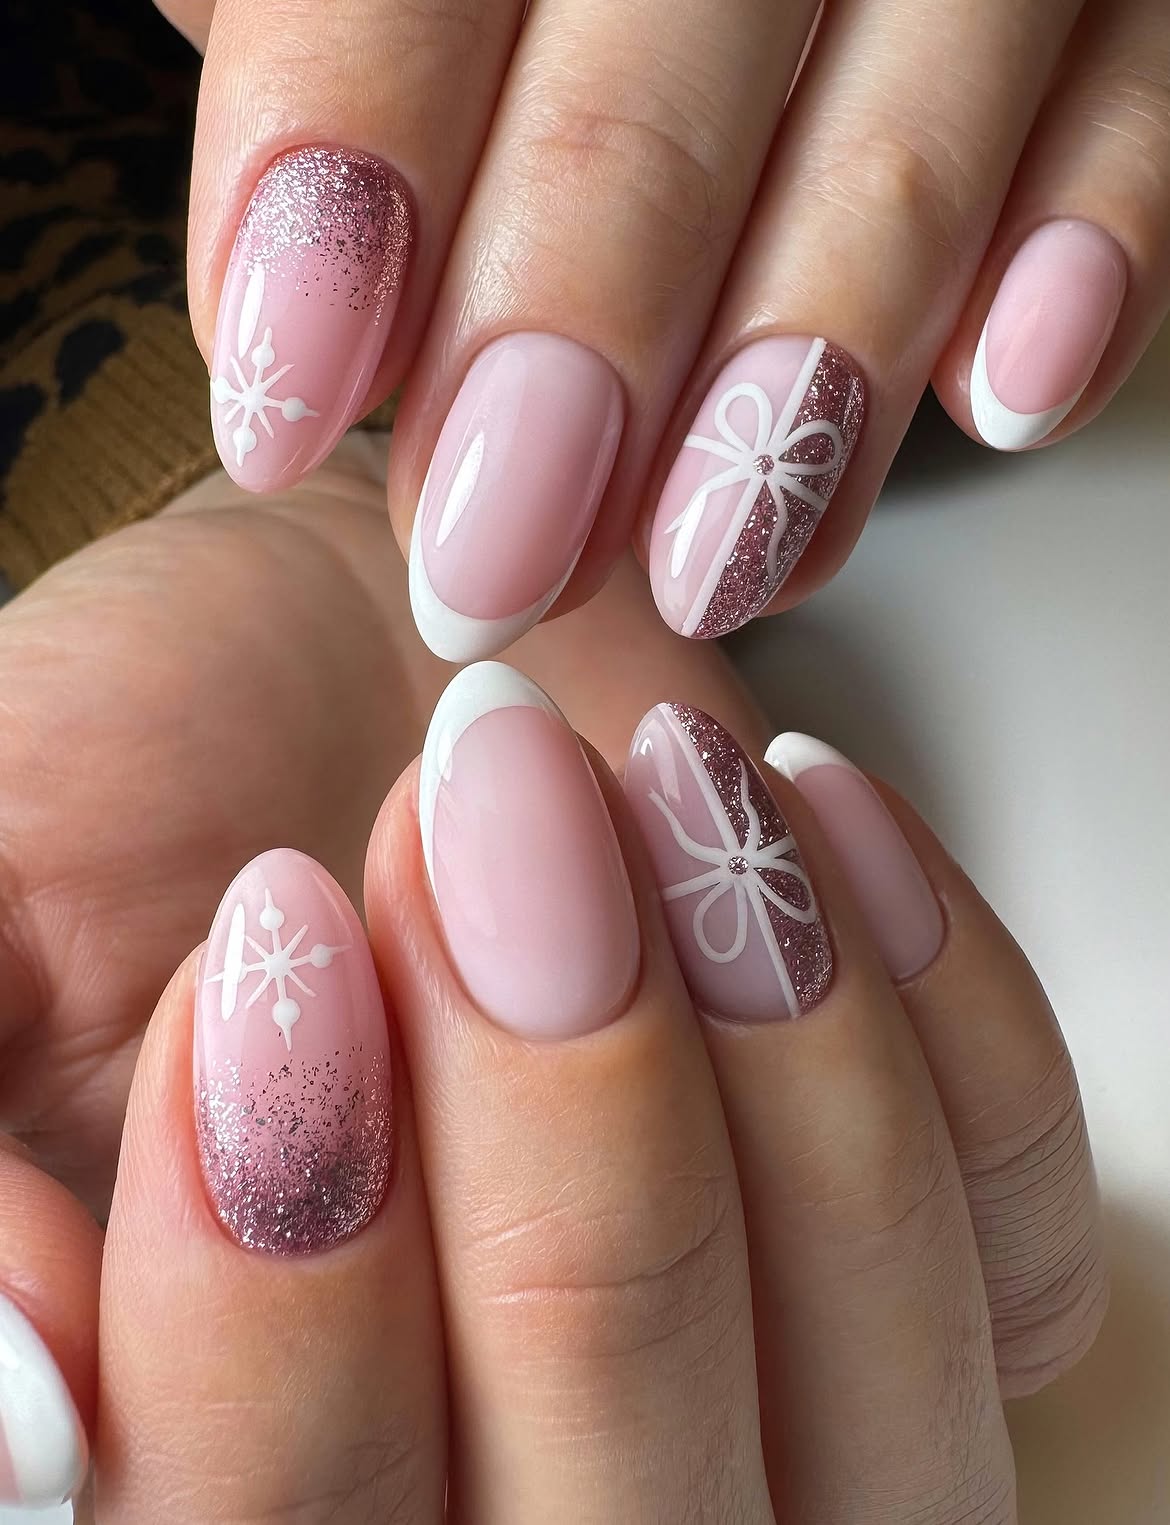
The plain white French tips give this manicure a quiet spot between the decorated nails. Across both hands, rose pink glitter fades into a soft pink base beneath white snowflakes. Another nail has a diagonal glitter section crossed by a fine white bow, like gift ribbon.
The balance: The French tips repeat the white without adding more drawings. The glitter fades from different ends on the two snowflake nails, so the hands feel connected without looking exactly alike.
For a similar set, start with the same blush pink base throughout. Keep the French curves crisp, place the bow over a diagonal glitter section, and let the glitter fade on the snowflake nails.
Details to show your nail artist
9. Pink Snowflakes and Bow Details on White Tip Christmas Nails
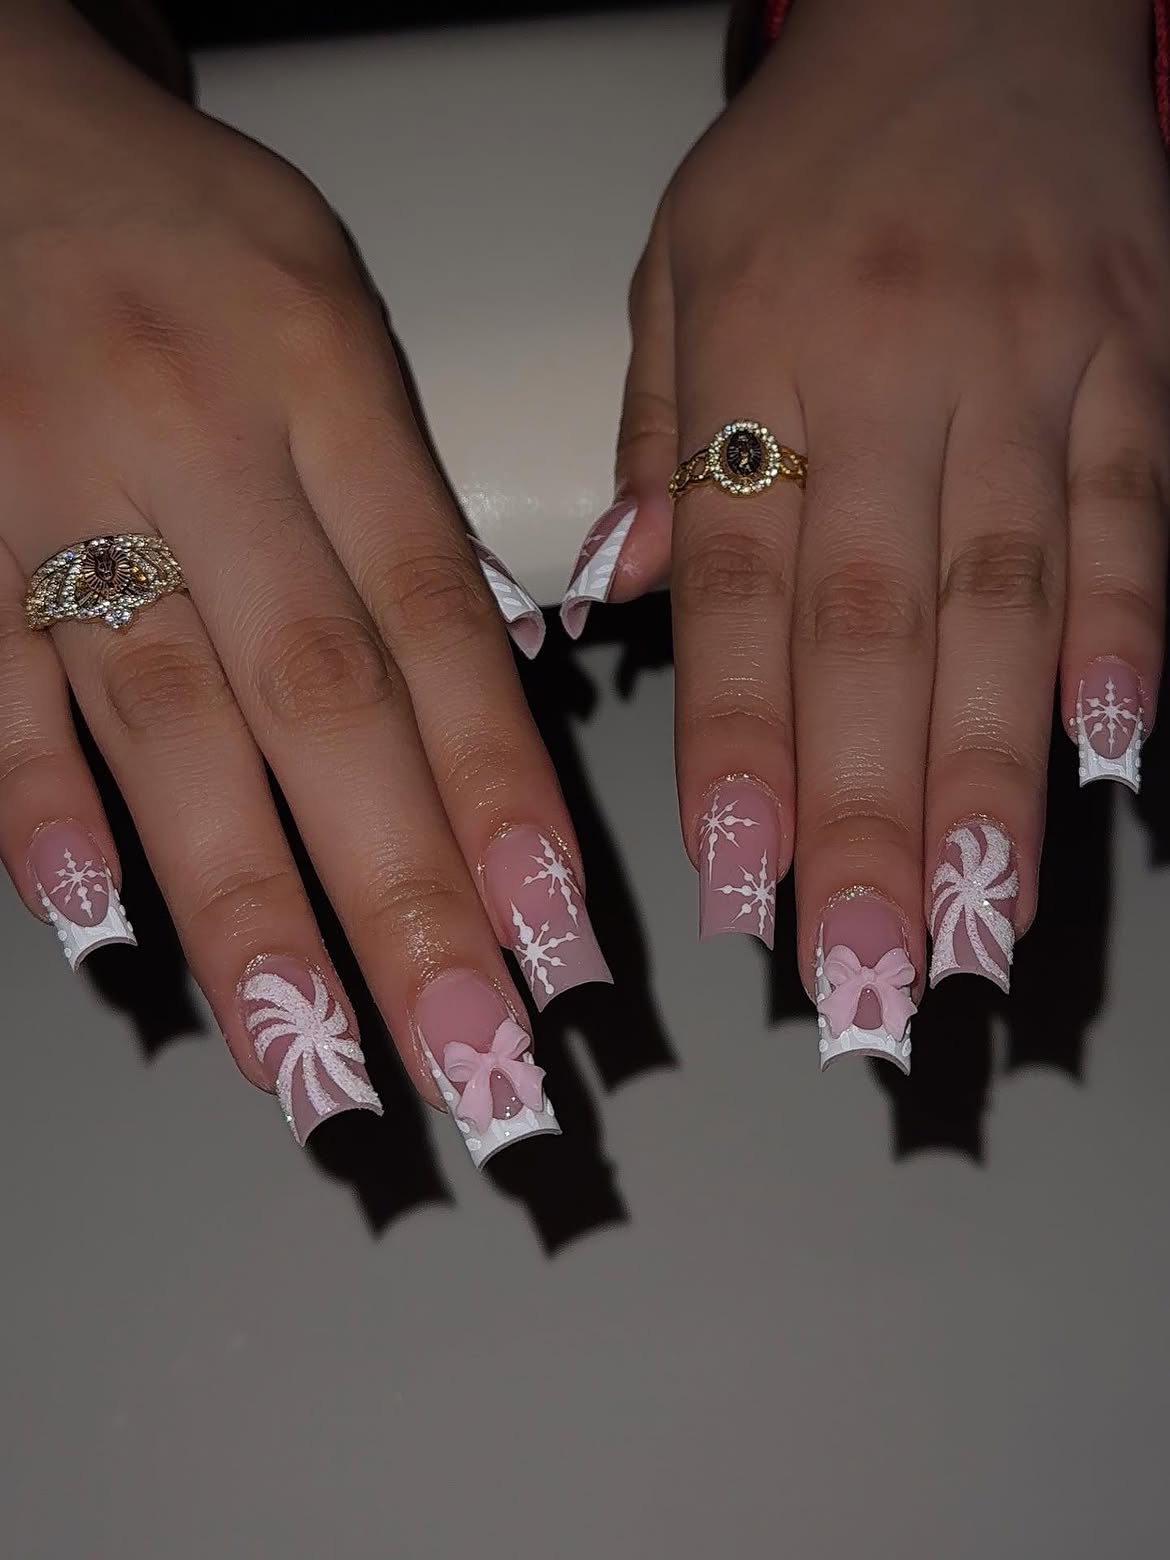
A soft pink base makes these long square nails feel sweet, while the white tip work gives the set a crisp Christmas finish. The snowflakes are painted directly over the pink sections, with tiny dots adding extra detail around them. Two nails feature larger bow designs, and another uses a rounded swirl pattern that looks playful beside the snowflake art.
The strongest detail is the mix of fine painted lines and raised looking bow accents. Keeping the pink visible across the center of each nail helps the white artwork stay easy to notice. Small reflective details near the tips also catch the light without taking away from the main patterns.
What makes this set stand out
If you want something beyond traditional Christmas colors, these 16 Black Christmas Nail Designs offer chic, dramatic ideas with glitter, snowflakes, bows, and more.
10. Pink Bow and Candy Cane Details on Soft Christmas Nails
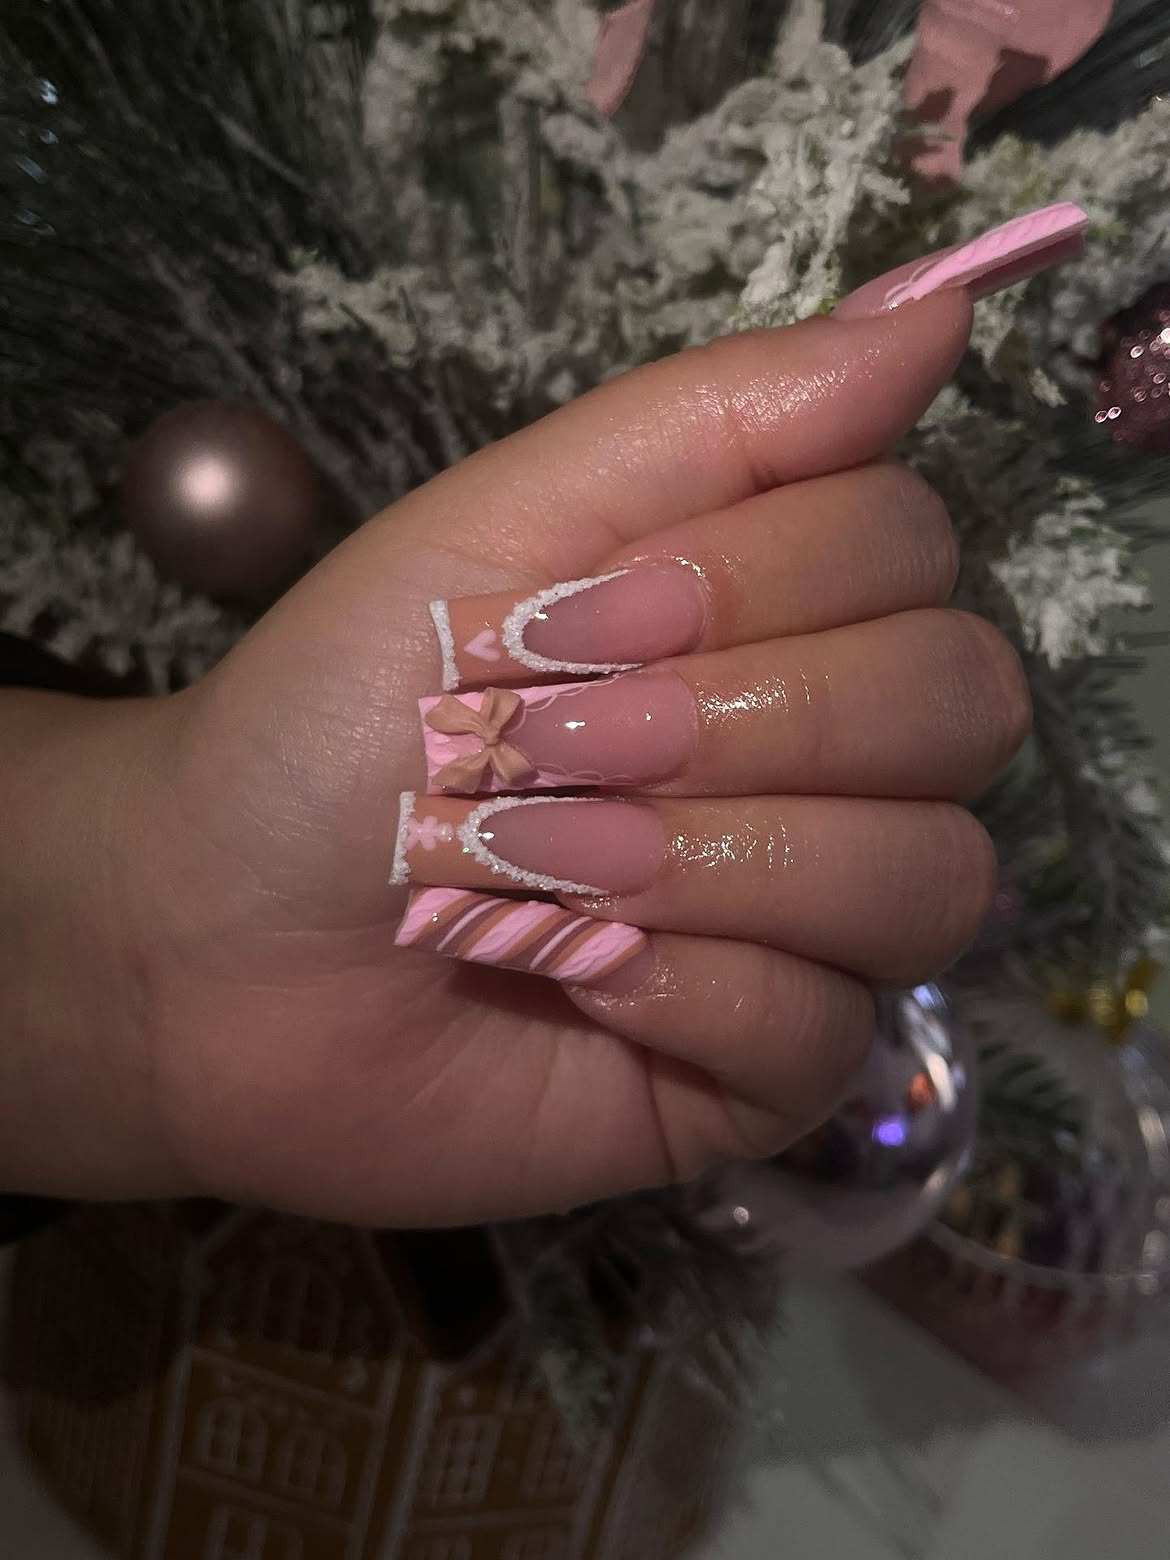
The soft pink base keeps this long square set delicate, while the white textured tips give it a clear Christmas feel. One nail carries a raised pink bow, another uses diagonal pink and white stripes that resemble a candy cane, and a small snowflake detail brings in another seasonal touch.
The white border around the French style is especially noticeable. It creates a slightly textured look against the glossy pink base and helps the decorated nails feel connected. The bow works best as the main focal point, while the striped nail adds movement without making every finger heavily decorated.
Keep the details balanced
Keep the main base soft pink and glossy.
Use one raised bow as the standout decoration.
Avoid filling every nail with large decorations.
Do not let the stripes compete with the bow.
11. Pink and White Christmas Nails With Gift Wrap and Candy Cane Details
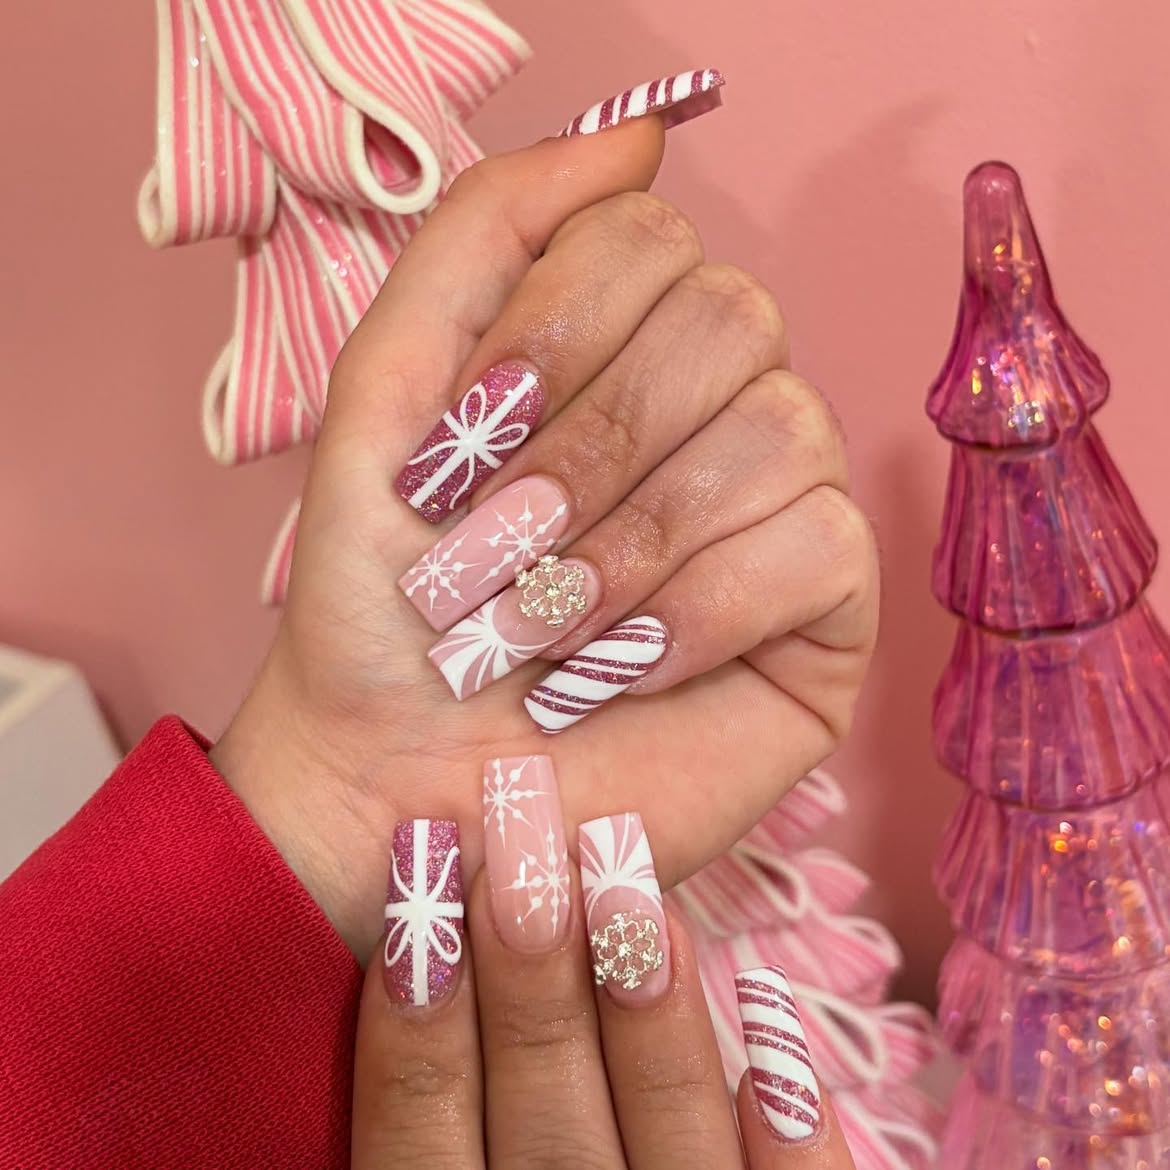
This set leans into the gift wrapping side of Christmas with a soft pink base, crisp white ribbon details, and sparkling accents. The long square nails give each design plenty of room, so the snowflakes, wrapped gift patterns, and candy cane stripes can stay clear instead of feeling crowded.
The white ribbon motif is repeated across several nails, creating a strong connection between the different designs. Pink glitter appears on a few darker nails, while the lighter pink nails carry delicate snowflakes and a small cluster of gold toned embellishment. The result feels festive without relying on a traditional red and green palette.
A simple way to balance the set
💡 Quick Tip
Let the gift wrap and candy cane patterns appear on only a few nails, then use softer snowflake details and pink glitter between them. This keeps the long square shape looking detailed while giving each Christmas pattern enough space to stand out.
12. Pink Snowflake and Glitter Stripe Christmas Nails
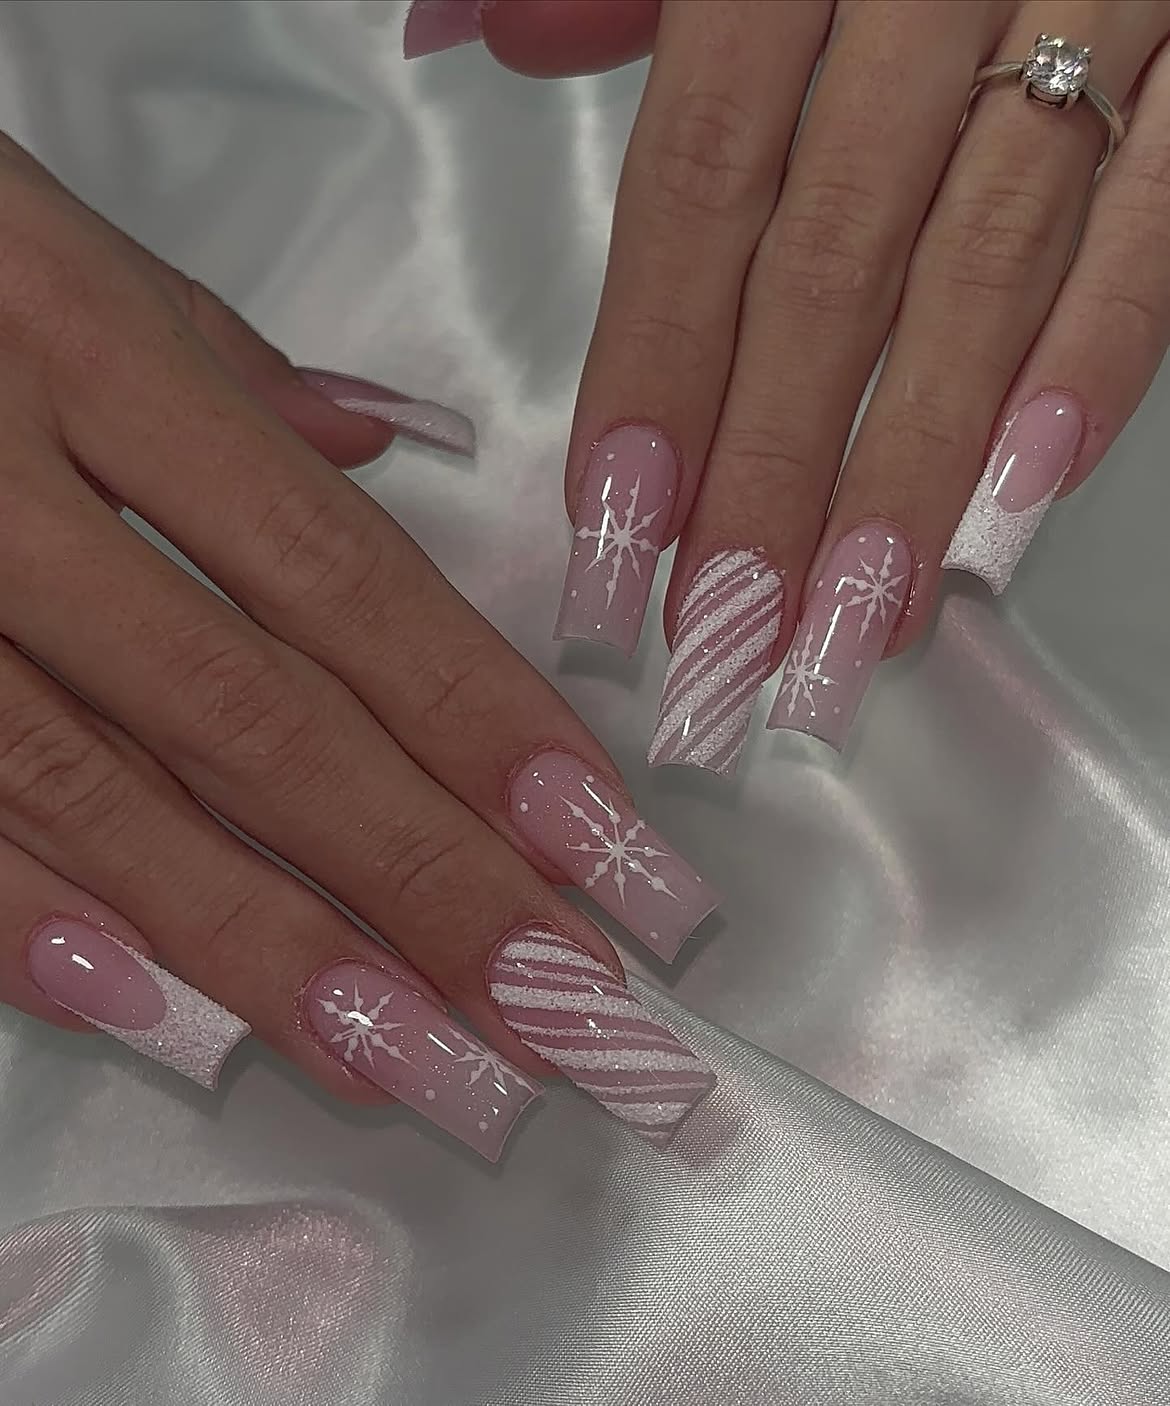
Soft pink and white come together in this long square set with a clean, frosty look. Most of the nails have a glossy pink base with delicate white snowflakes, while the accent nails use diagonal white and glitter stripes for a candy inspired finish. A white textured French tip appears on a few nails, adding another layer without changing the soft color palette.
The snowflake details stay fine and open, so they do not overwhelm the nail length. Meanwhile, the striped accent gives the manicure a stronger focal point and breaks up the repeated snowflake pattern. This layout also leaves enough pink showing through to keep the overall design light.
How to build this look
Start with a glossy soft pink base across the long square nails.
Paint fine white snowflakes on several nails, keeping the lines delicate and spaced out.
Reserve one or two accent nails for diagonal white stripes with fine pink glitter between the lines.
Finish selected nails with crisp white textured French tips to tie the whole Christmas design together.
13. Pink Glitter and Gingerbread Accents on Almond Christmas Nails
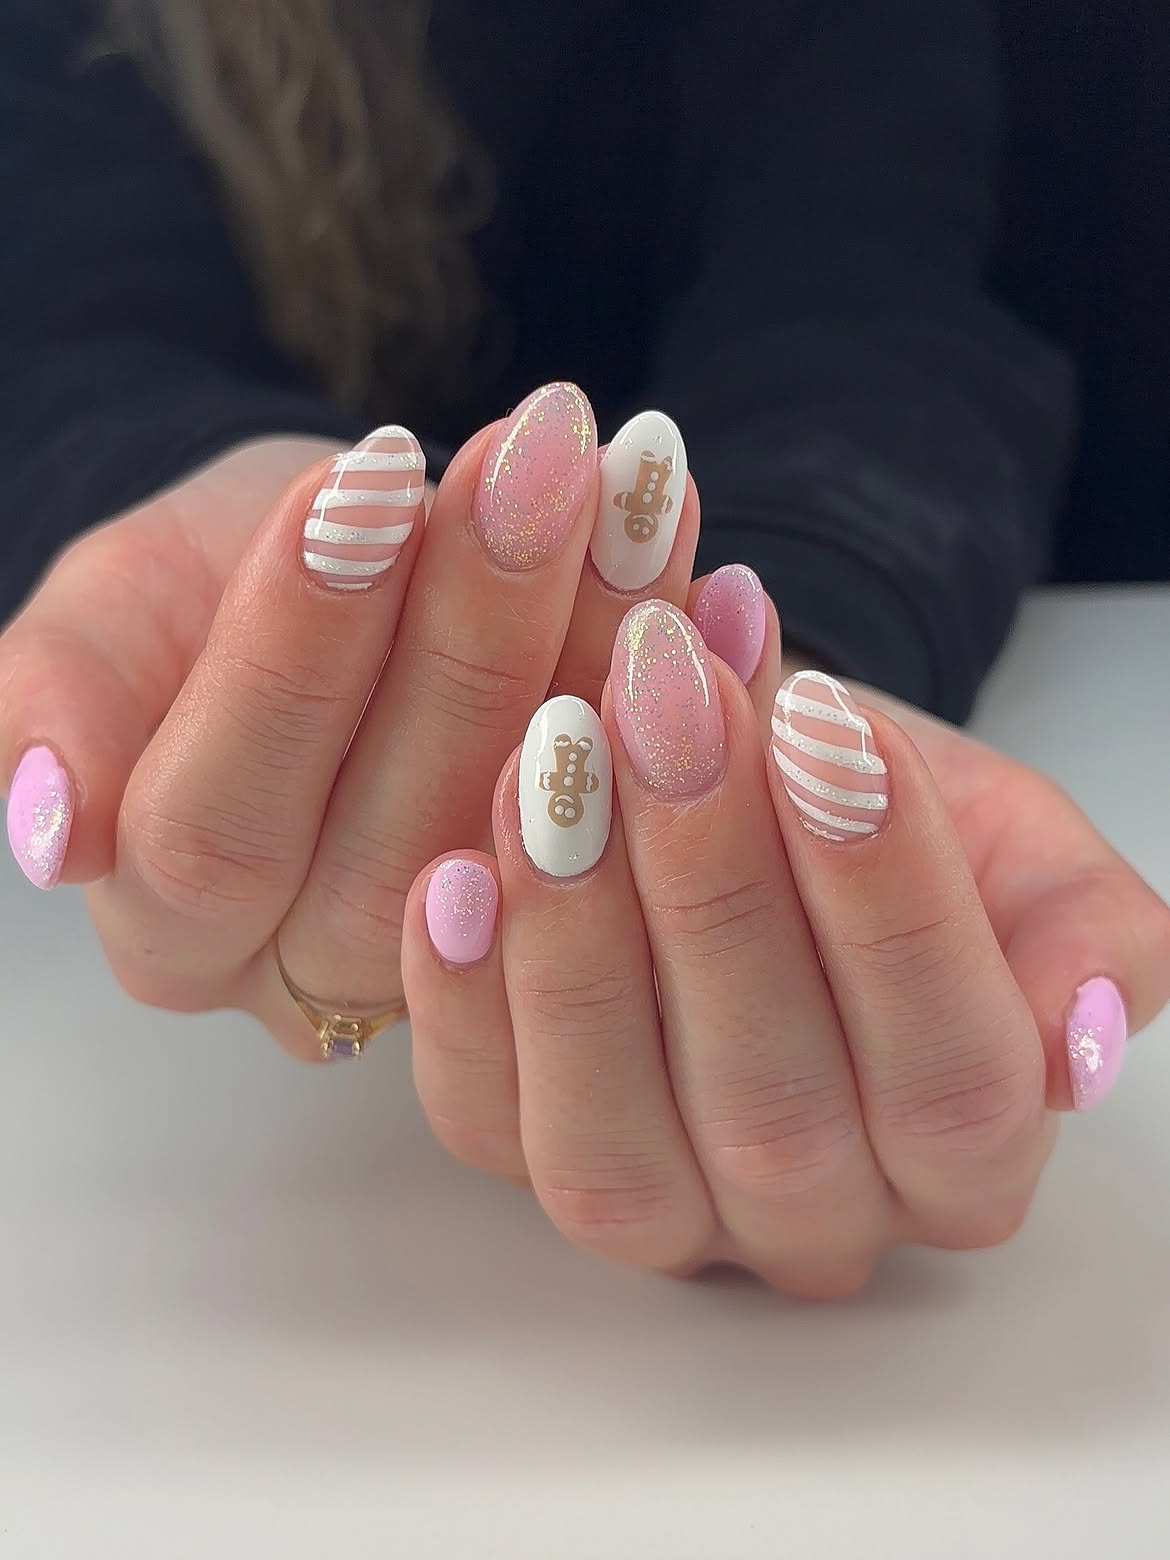
Pastel pink meets creamy white in this almond shaped Christmas set, with soft glitter bringing a little extra sparkle to the mix. The standout details are the tiny gingerbread figures on white nails, while other fingers use curved candy cane style stripes over the pink base.
The rounded almond shape keeps the playful artwork looking soft instead of heavy. I also like how the glitter is used in two ways. Some nails have a full pink shimmer, while the striped nails use glitter mainly between the white lines, giving the pattern more dimension. A small amount of gold sparkle around the edges adds warmth without changing the main pink and white color story.
For a similar manicure, keep the gingerbread figures small and place them on just one or two accent nails. Let the striped nails carry the stronger pattern, then use simple pink glitter nails between them for balance.
14. Pink Bow, Snowflake and Sweater Texture Christmas Nails
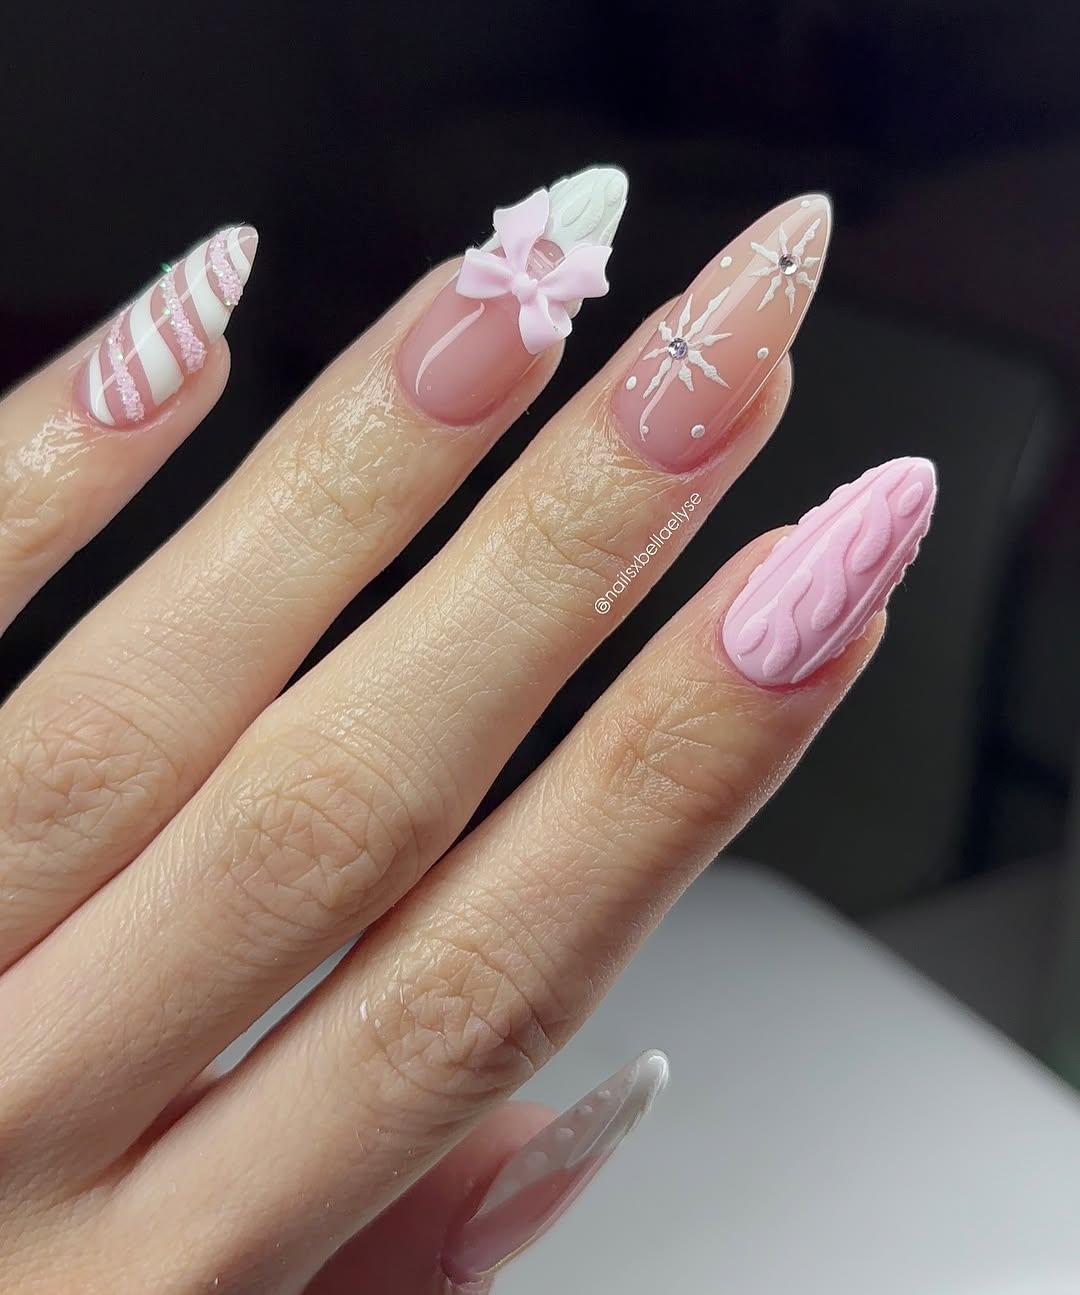
Soft pink takes the lead in this pointed Christmas set, but the details give each nail its own role. One nail uses white and pink candy cane stripes with a little sparkle between the lines. Another has a large raised pink bow over a pale base, while the snowflake nail adds a fine white pattern with a small crystal at the center.
The textured pink nail is the unexpected detail. Its raised, curved pattern gives the manicure a cozy sweater feel and adds dimension beside the flatter painted designs. Together, the mix of stripes, bow, snowflake, and texture keeps the long pointed shape interesting without covering every nail in the same artwork.
Three details worth copying:
The bow: Make this the main statement nail.
The snowflake: Keep the lines thin and add one small crystal.
The sweater texture: Use a raised pink pattern for a cozy finish.
💡 Quick Tip
Keep the raised details concentrated on one or two nails, then use the snowflake and striped designs as lighter accents. On a long pointed shape, that spacing helps the artwork stay clear from a distance.
15. Pink Snowflakes and Raised Sweater Details on Christmas Nails
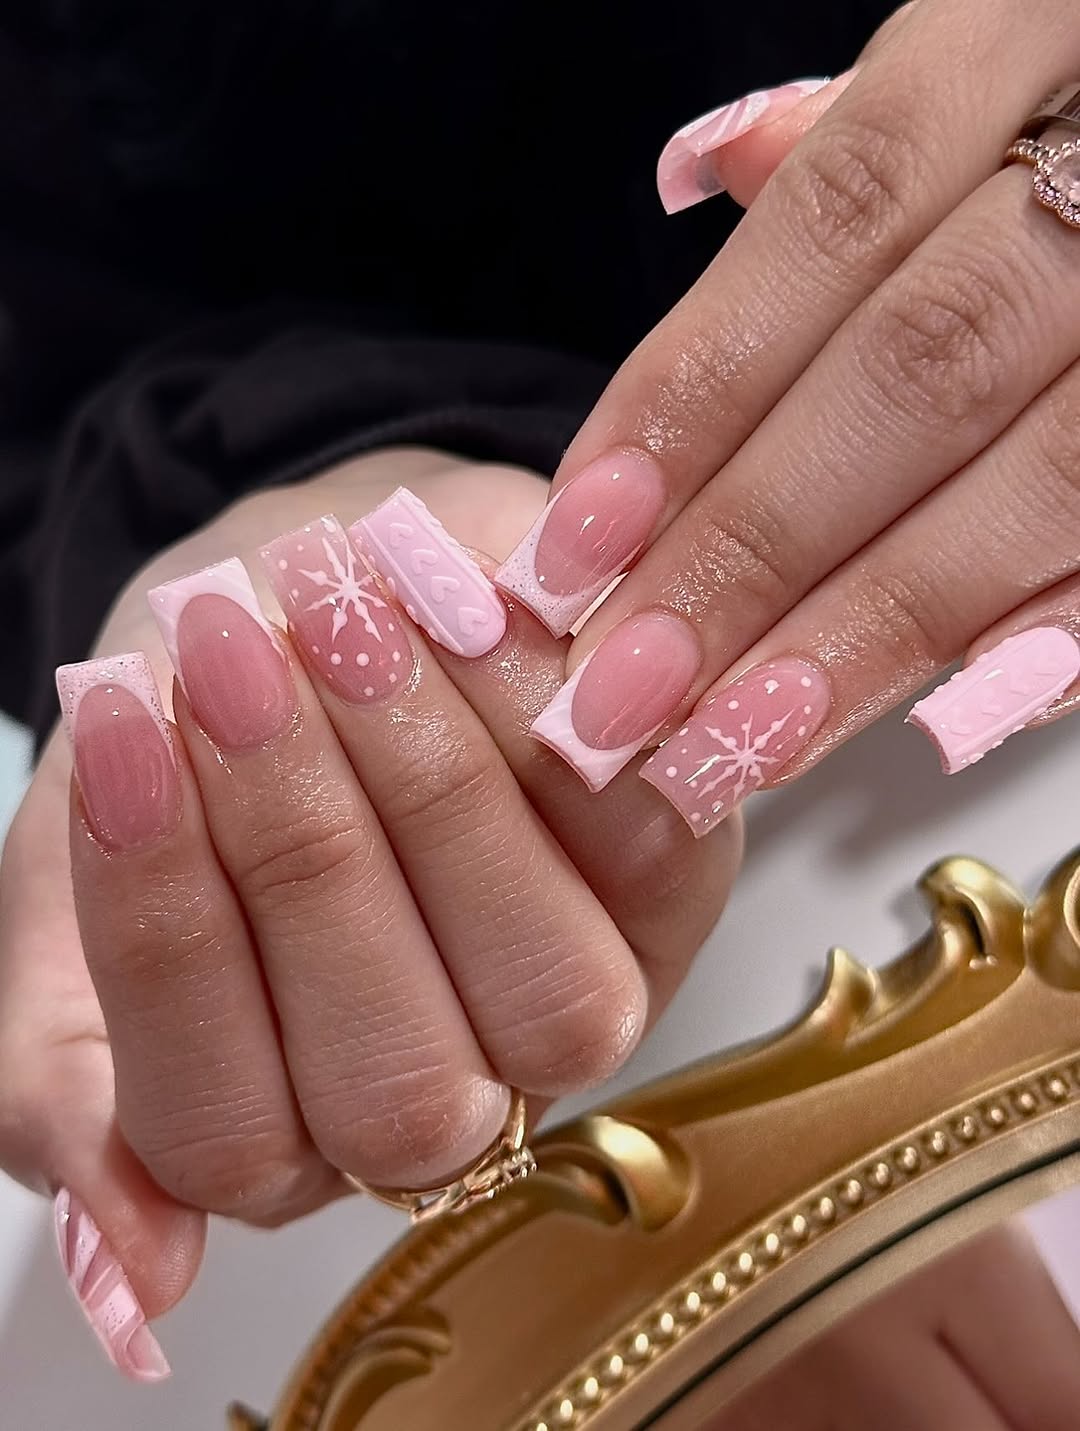
A glossy blush pink base gives this square shaped set a soft starting point, while crisp white French tips bring the Christmas detail into focus. The snowflake accent nail uses fine white lines with tiny dots around the design. Another nail features raised pink patterns that look similar to cozy sweater stitching, giving the manicure a touch of texture.
The design also plays with different tip shapes. Some nails have clean white tips, while the decorated nails carry more of the artwork across the surface. That contrast keeps the set from looking too uniform.
What works here: the snowflake stays delicate, the textured nail provides dimension, and the simple pink nails give the busier details room to breathe. A glossy finish across the set helps the pale colors look polished under light.
Recreate this look
16. Pink and White Christmas Nails With 3D Bows and Sweater Texture
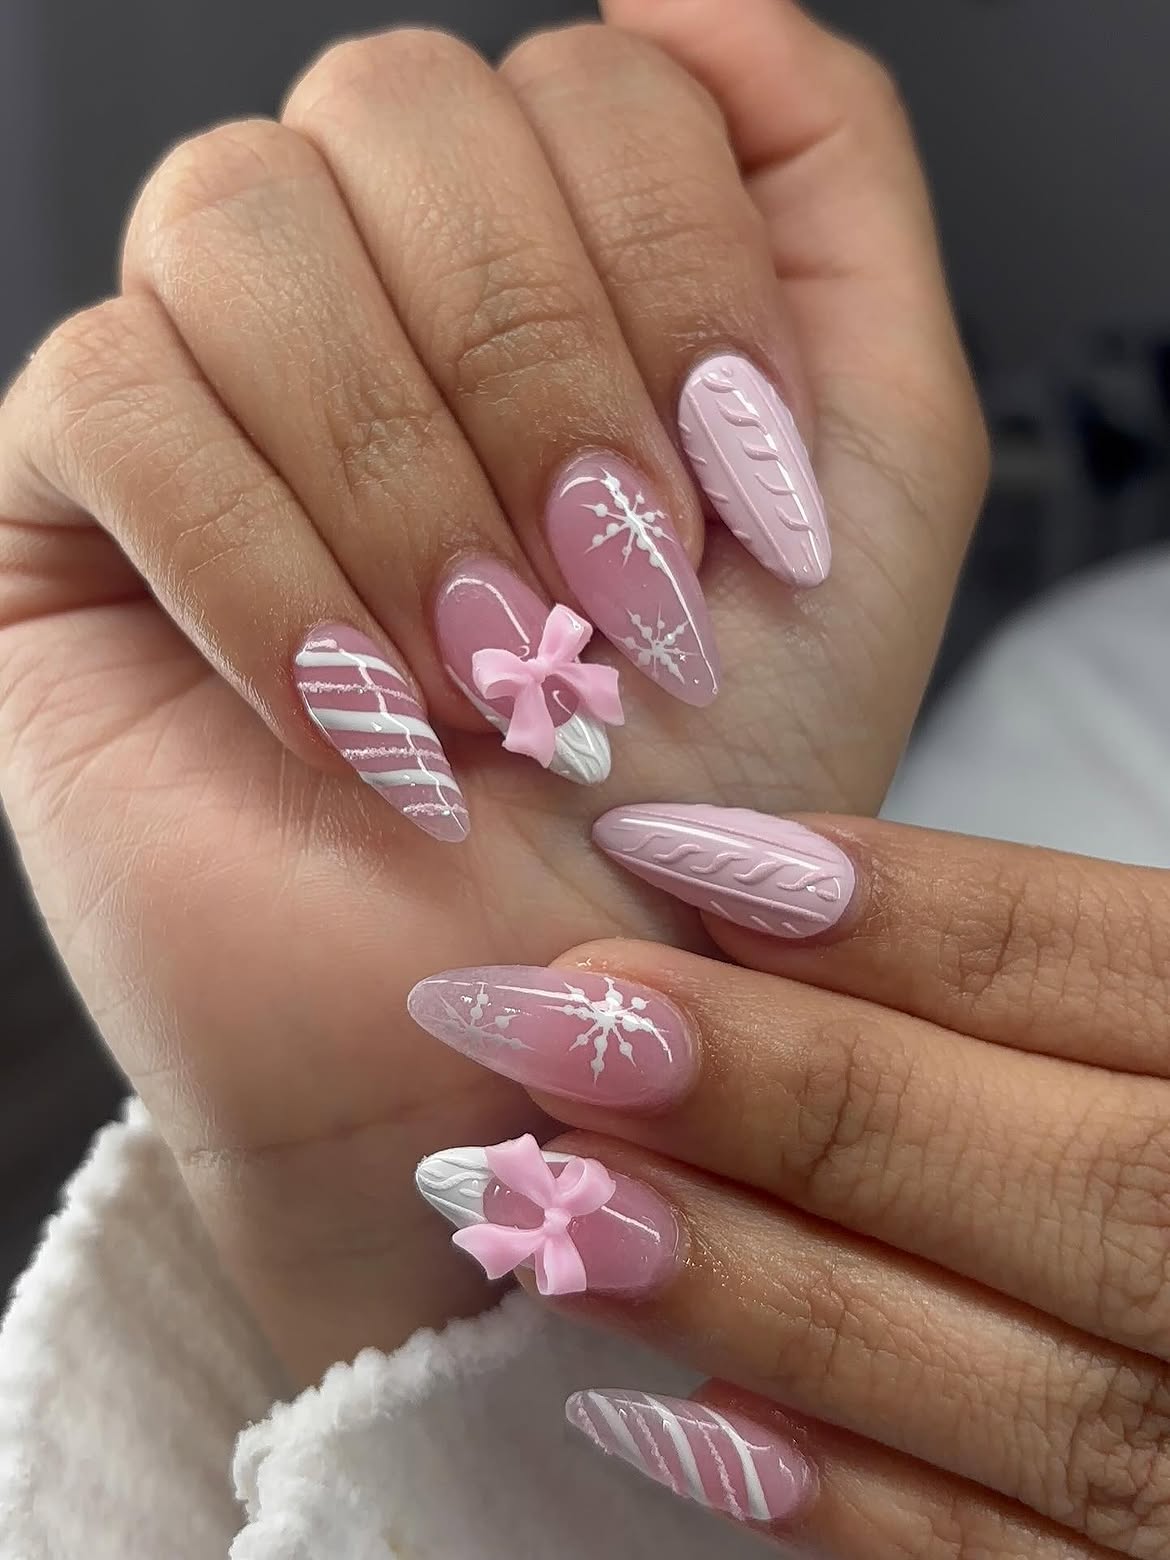
Soft pink, white, and raised details make this almond shaped set feel cozy and festive at the same time. Several nails feature delicate white snowflakes over the pink base, while others use white and pink stripes that resemble candy cane ribbon. The two standout nails have raised pink bows, giving the manicure a playful gift wrapped detail.
The sweater inspired texture is another detail worth noticing. Raised curved lines appear on the pale pink nails, adding dimension without needing a bold color change. Keeping most of the base glossy and soft lets the textured artwork and bows become the focus.
The almond shape also helps the designs look balanced. Fine snowflake lines follow the length of the nails, while the larger bows sit on separate accent nails so the set does not feel too busy.
Choose the details that suit your set
| Design Detail | How It Looks in the Set |
|---|---|
| ❄️ Snowflakes | Fine white lines placed over the soft pink base. |
| 🎀 Raised Bows | Large pink bows create the main statement details. |
| 🍬 Stripes | Pink and white diagonal lines add a candy inspired accent. |
| 🧶 Texture | Raised curved lines bring a cozy sweater inspired finish. |
17. Pink Snowflake and Sugar Stripe Christmas Nails
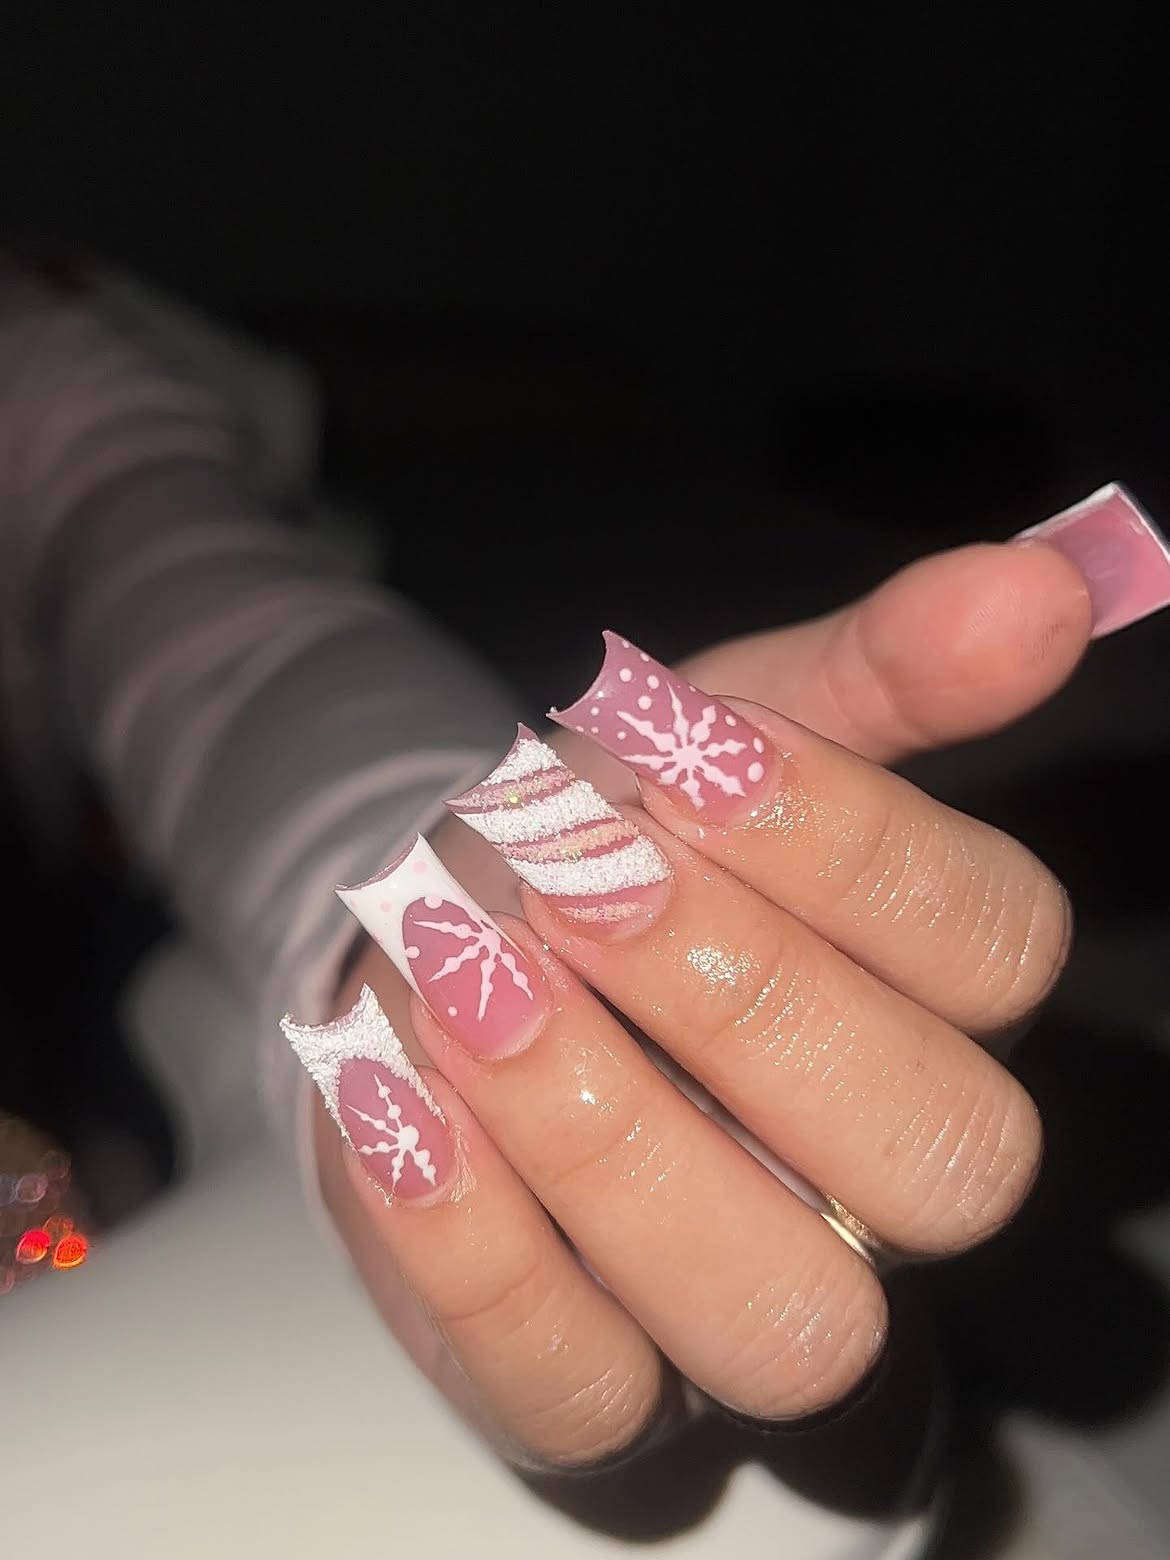
This long square set mixes dusty pink with bright white details for a sweet Christmas look. The snowflake nails stand out with crisp white branches and small dots scattered around the design. Another nail uses wide white glitter stripes over pink, creating a candy cane inspired pattern with plenty of sparkle.
The white accent tips are another detail worth noticing. They frame some of the nails and give the pink base a cleaner finish. One of the snowflake designs also uses a lighter white section near the tip, which helps the artwork stand out against the darker pink underneath.
For a similar set, keep the snowflake designs slightly different from one another instead of copying the same placement on every finger. Use the glitter striped nail as the main sparkle accent, then let the simpler pink nails create breathing room across the set.
The soft pink base keeps the manicure delicate, while white snowflakes and one glitter stripe nail add enough Christmas detail to make the whole set feel festive.