18 Purple and Green Nails Ideas for a Fresh and Stylish Look
Purple and green can look soft, playful, bold, or completely unexpected depending on the shades and nail art you pair together. That range is what makes Purple and Green Nails such a fun color combination to work with. Deep plum beside lime feels graphic and energetic, while lavender with sage or mint creates something much softer.
The designs in this roundup show just how many directions these two colors can take. You will find wavy tips, floral details, glossy color blocks, retro swirls, tiny dots, shimmer, animal print, French tips, and bright neon accents. Some sets cover every nail with color, while others leave plenty of sheer nude space for a lighter finish.
There are also ideas for different moods and nail lengths, including short square styles, almond shapes, simple two color manicures, and detailed statement sets. If you have been saving purple and green combinations but are unsure how to bring them together, these 18 unique designs offer plenty of fresh ways to wear the pairing.
18 Purple and Green Nails Designs 2026
1. Glossy Purple and Green Nails With Playful Swirls
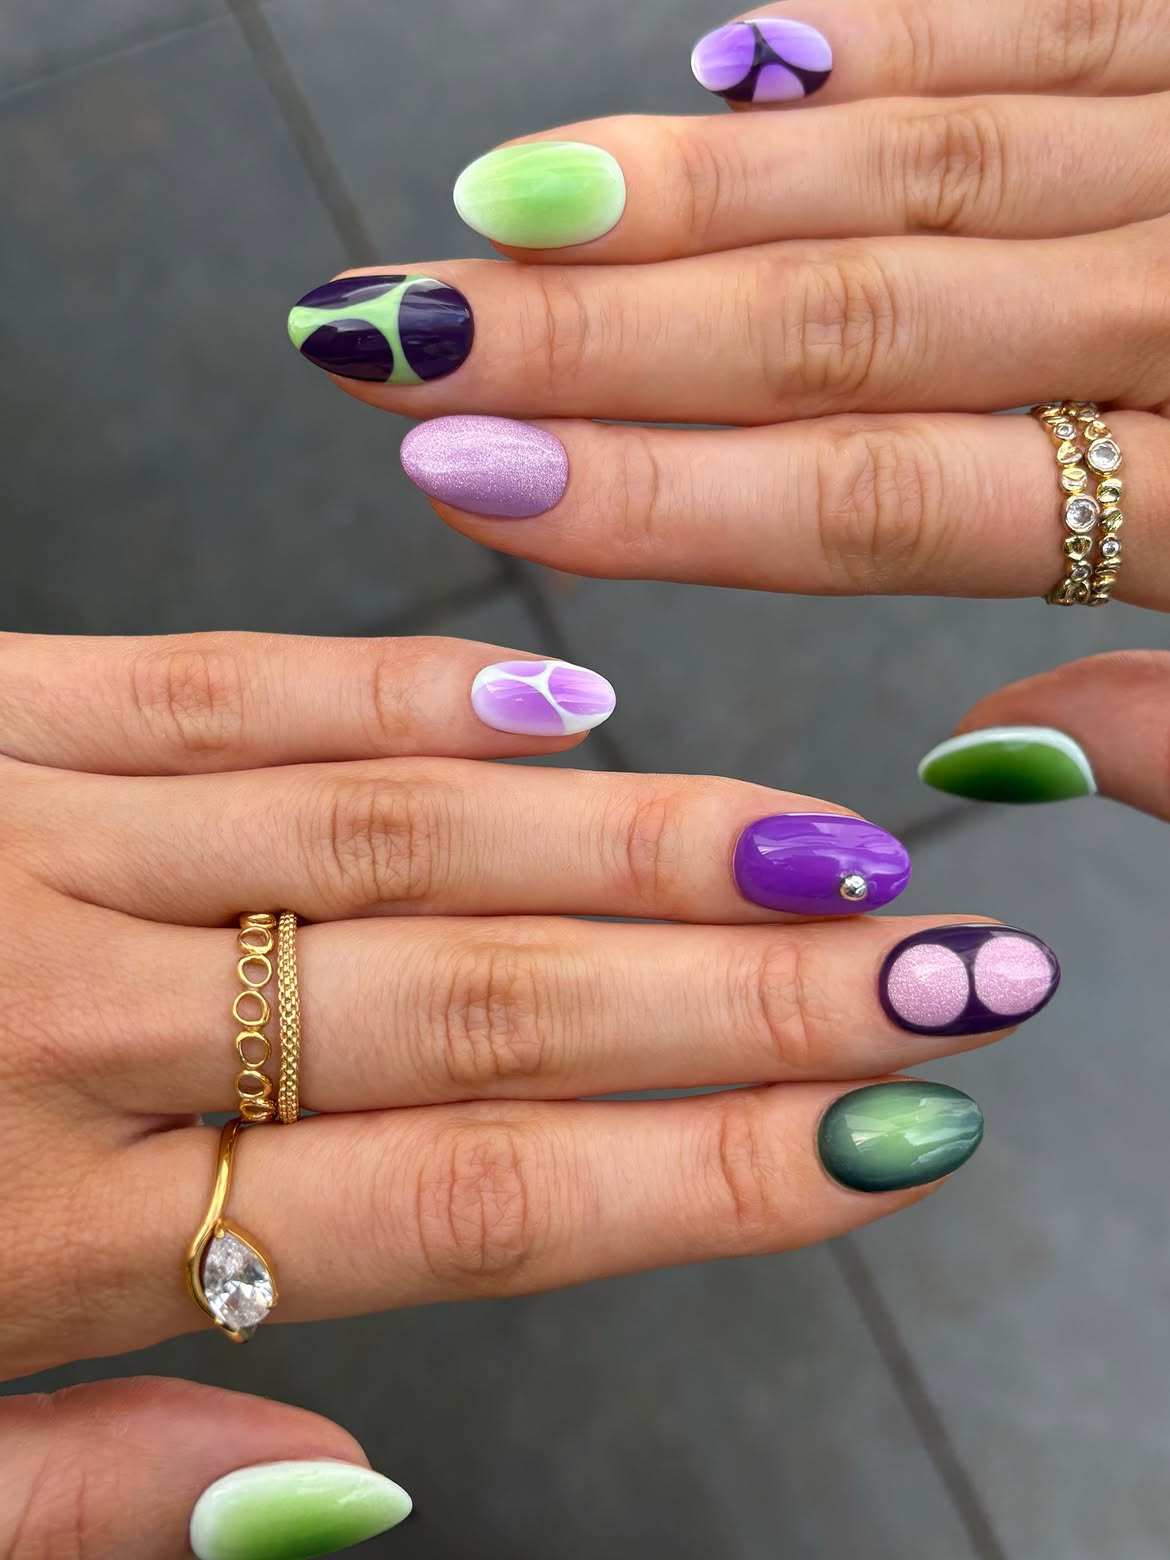
This manicure makes purple and green feel lively by giving nearly every nail its own treatment. Deep plum, bright violet, pale green, lavender, and smoky green all appear together, but the rounded nail shape keeps the mix looking connected.
A few details worth borrowing:
- Use several shades from the same two color families. Light and dark tones give the set more depth.
- Let curved purple and green sections become the main artwork instead of covering every nail with detailed patterns.
- Mix glossy color with a soft shimmer finish to keep the manicure from looking flat.
- A tiny crystal accent on one purple nail adds just enough sparkle without competing with the graphic designs.
- Keep a few nails simpler so the bolder swirls have room to stand out.
The result feels colorful and artsy while still looking coordinated from finger to finger.
2. Bold Purple and Green Nails With a Retro Lava Pattern
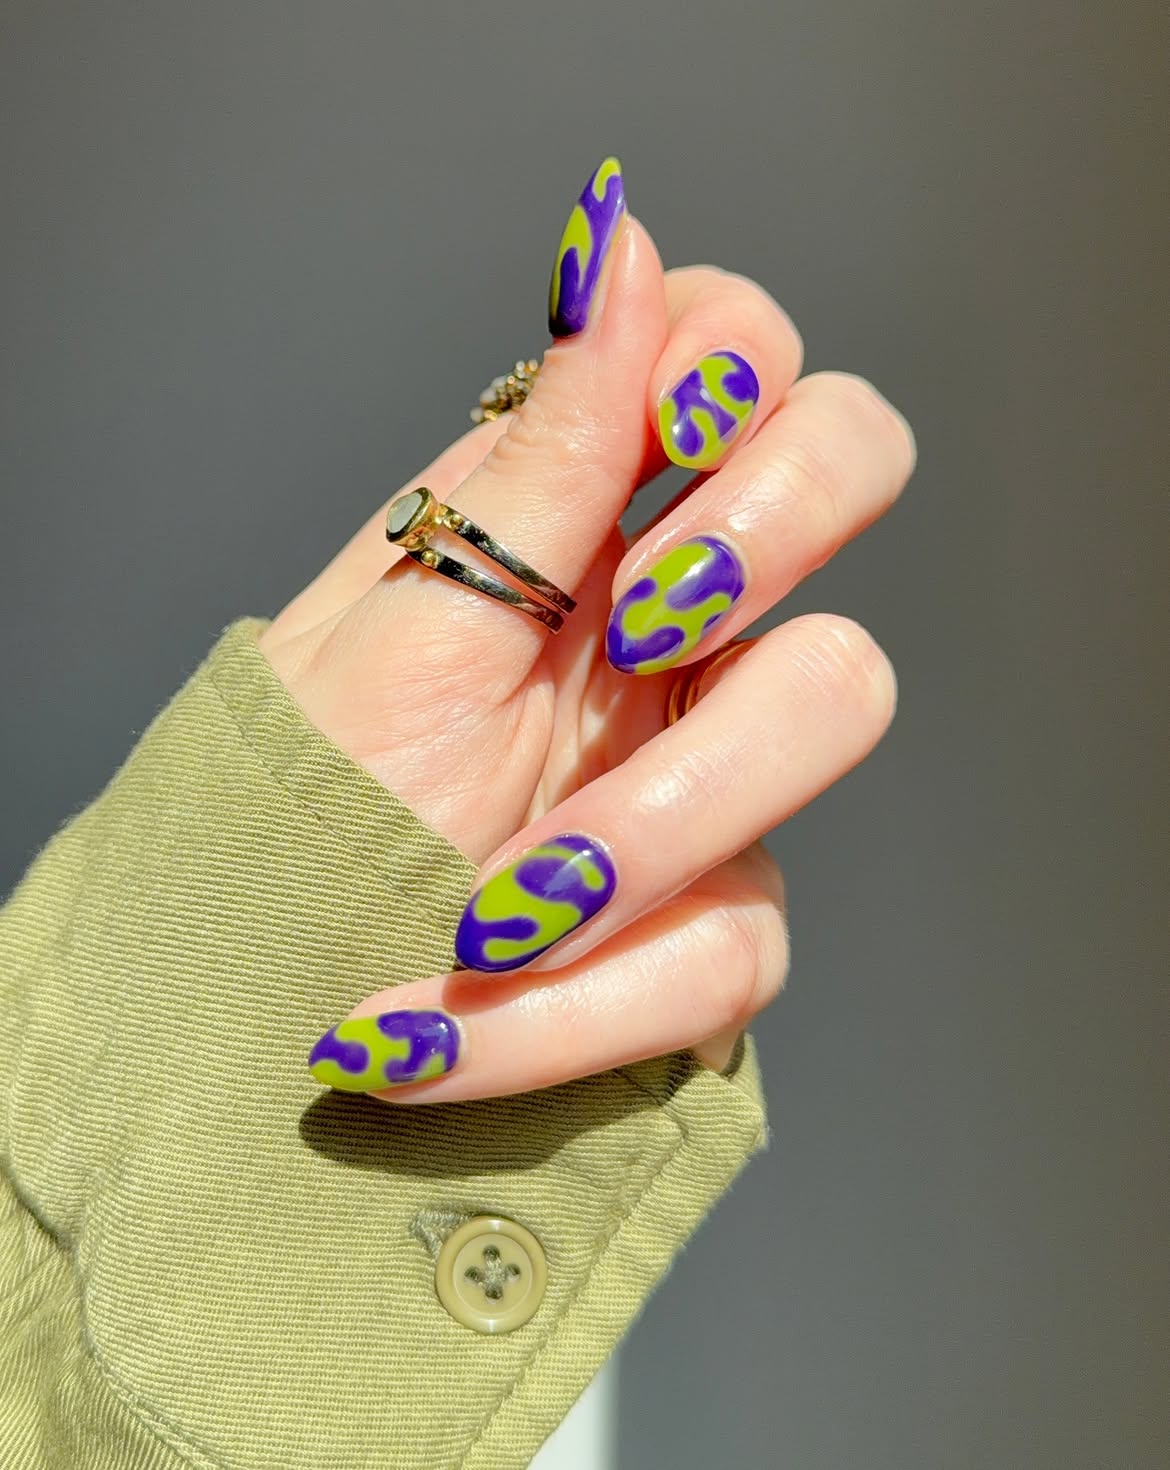
Bold color is doing most of the work here. Instead of mixing many finishes and accents, this set stays focused on one strong idea: a flowing purple and lime pattern repeated across every nail. The almond shape helps the design look sleek, while the glossy top coat keeps the bright colors crisp in direct light.
What makes this one stand out:
- The pattern repeats, but not in a stiff way. Each nail has a similar wavy shape, so the full set feels pulled together.
- The contrast is sharp. Rich purple next to a punchy green gives the manicure a graphic, high energy look.
- The surface stays clean. No extra gems, glitter, or tiny details are needed because the color pairing already carries the design.
- The shape matters. A softly pointed almond nail gives the swirls more movement than a square tip would.
If you want purple and green nails that read more bold than sweet, this direction has a lot of personality without feeling messy.
Repeat one swirl style across the whole set so the nails feel connected.
Use a glossy finish to keep the purple and green looking bright and clean.
Do not add too many extra accents or the pattern can start to feel crowded.
Avoid muddy shades if you want the same crisp, high contrast finish.
3. Mint French Tips With Playful Dot Details
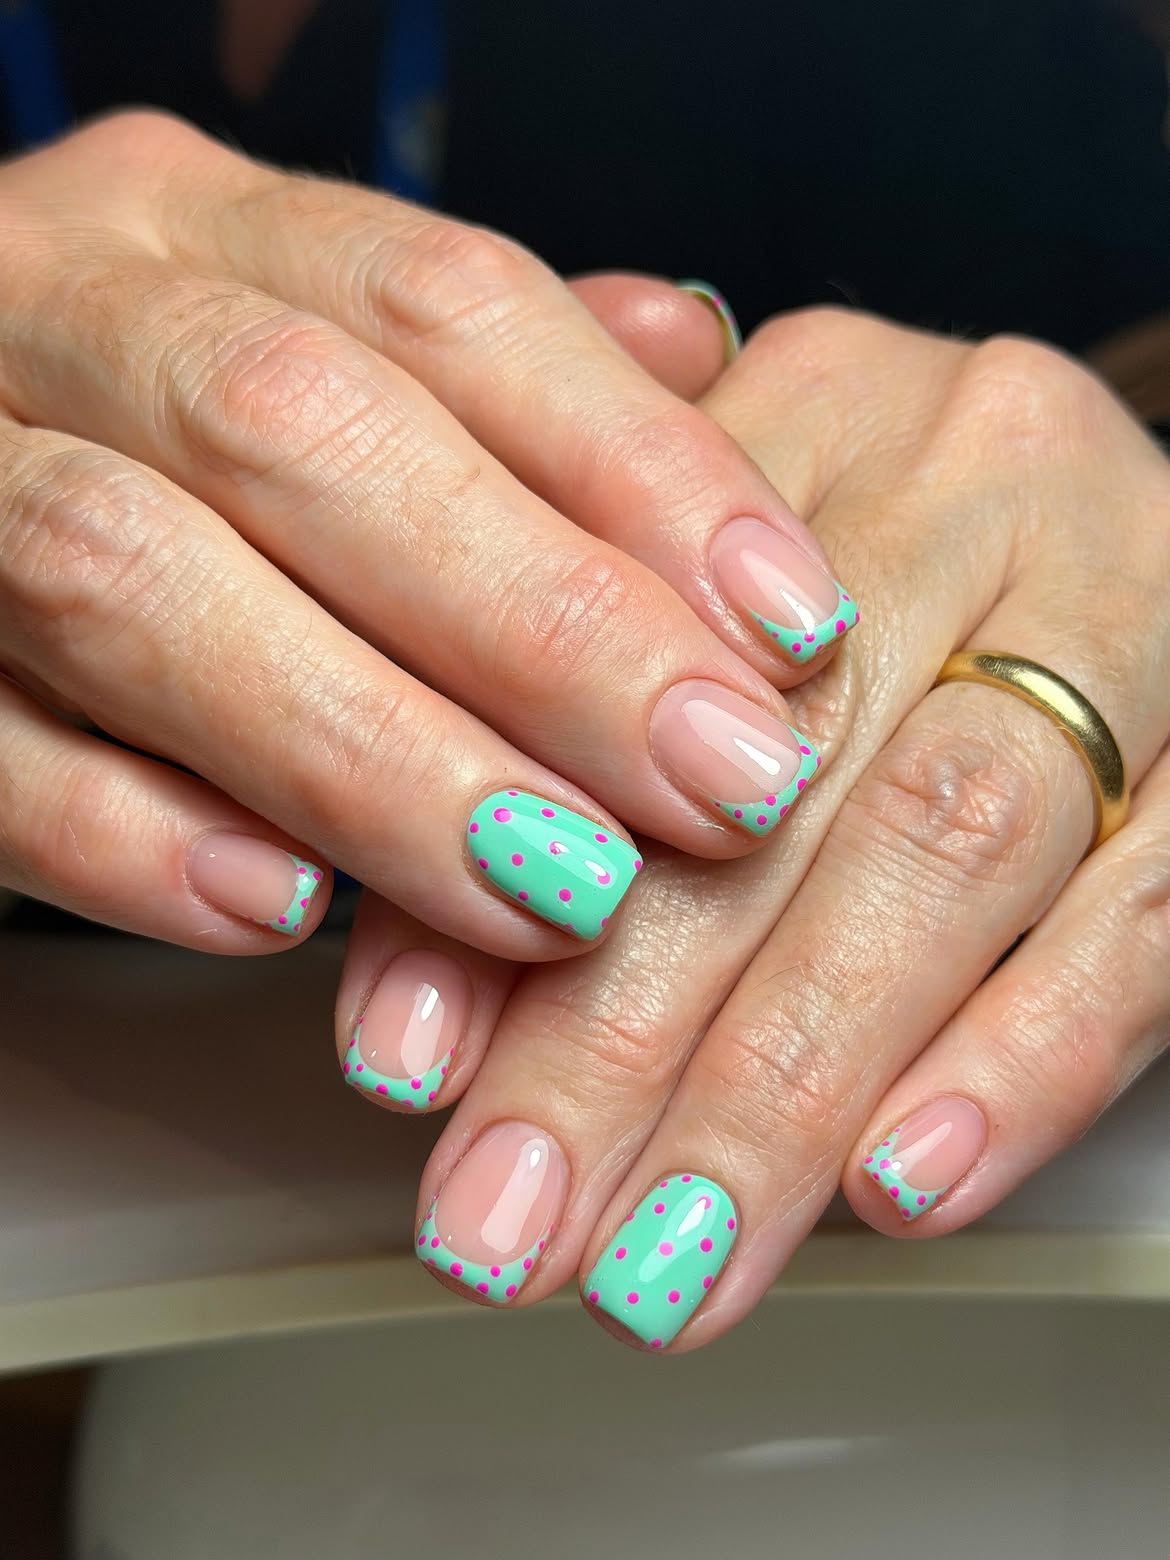
This set uses a soft nude base with mint green tips, then adds tiny bright pink dots for a cheerful finish. Two full mint accent nails break up the French design and keep the manicure from looking too uniform.
For this article, the layout is the useful part to borrow. They itself uses pink rather than purple, so switch those tiny dots to violet, lilac, or deep plum while keeping the mint sections unchanged.
A simple way to recreate the idea:
- Start with a sheer nude base.
- Paint rounded mint tips on most nails.
- Cover one or two nails fully in mint.
- Add small purple dots around the tips and across the solid accent nails.
- Finish with a glossy top coat so the tiny details stay crisp.
The short square shape also suits this design because the dotted tips remain easy to see without needing extra length.
Recreate the color layout
If you love darker color pairings, 16 Black and Green Nails brings a moodier twist with bold contrast, sleek details, and statement worthy designs.
4. Olive Gloss With Iridescent Lilac Waves
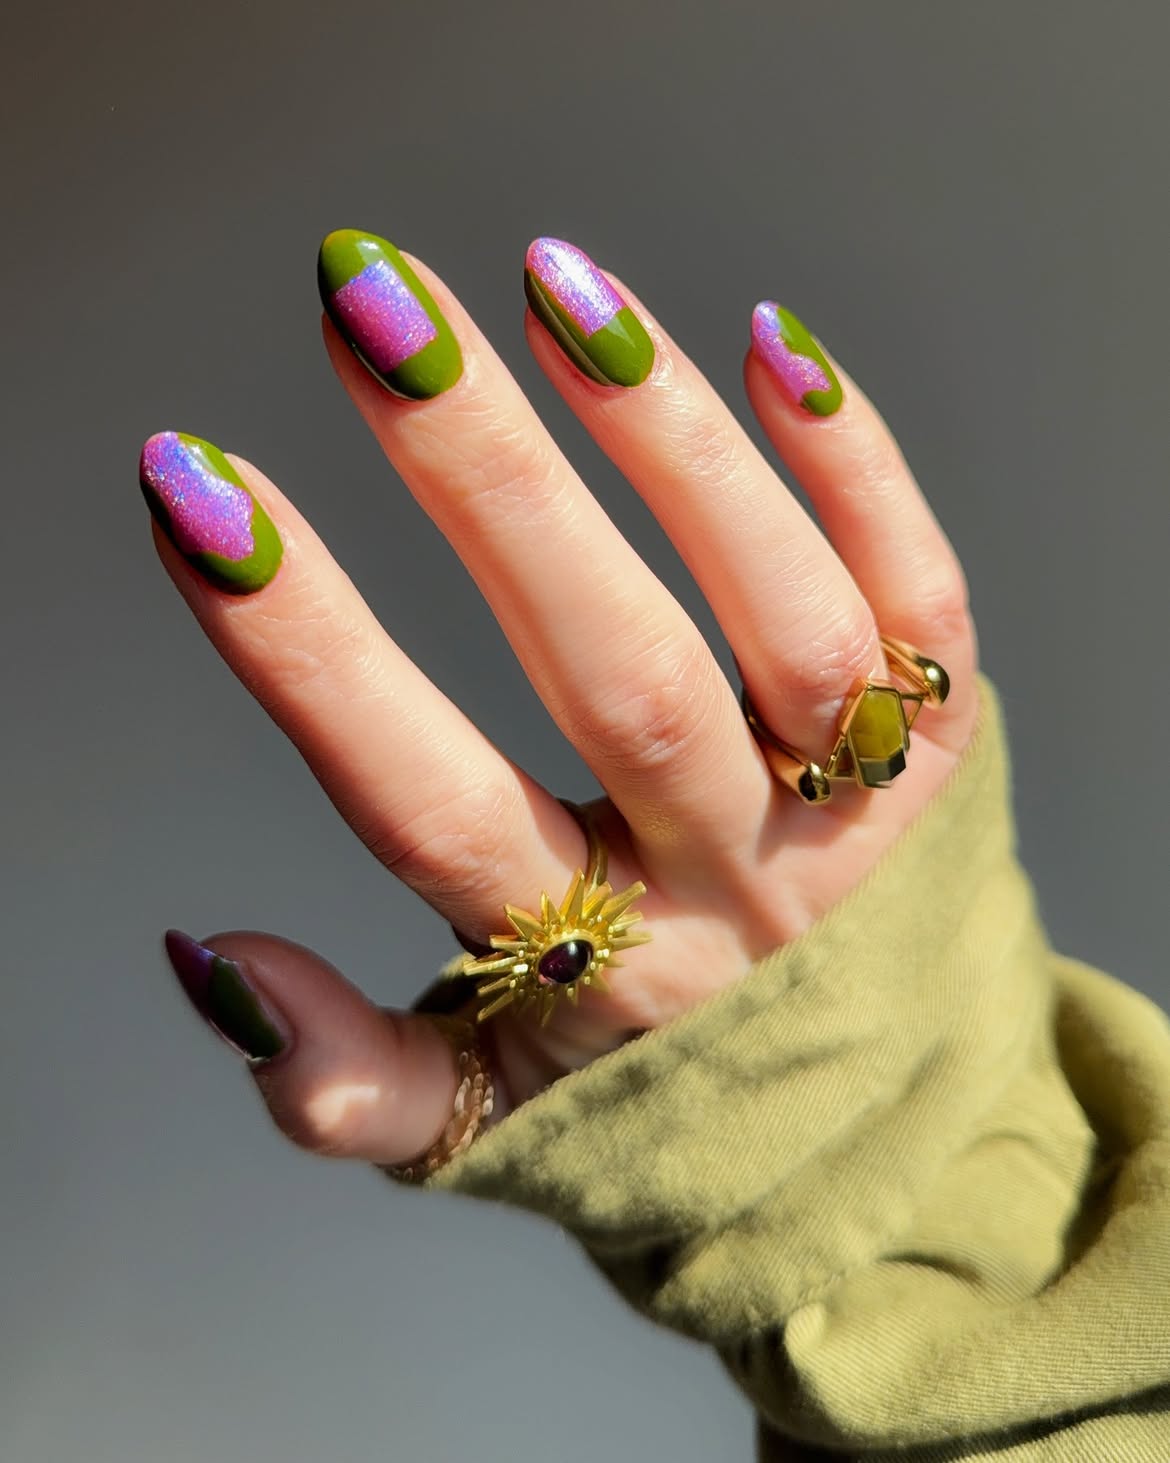
Shimmer changes the mood here. Instead of using a flat purple, this manicure layers a glowing lilac tone over an olive green base, which gives the whole set more depth in bright light.
What stands out most:
- The green is earthy, not neon, so it feels a little richer and more grown up.
- The purple section has a reflective finish that shifts softly as the hand moves.
- The curved border between the two colors keeps the design fluid instead of sharp.
- The almond shape helps the wavy color placement look longer and cleaner.
One reason this look works so well is balance. Every nail follows the same color story, but the purple area sits a little differently each time, so the set stays interesting without looking busy. If you like color but want something smoother and less playful than polka dots or graphic swirls, this one lands in a very nice middle spot.
The earthy green base keeps the shimmer from feeling too sugary, while the lilac wave adds light, contrast, and a polished finish.
5. Soft Lilac Petals With Mint French Tips
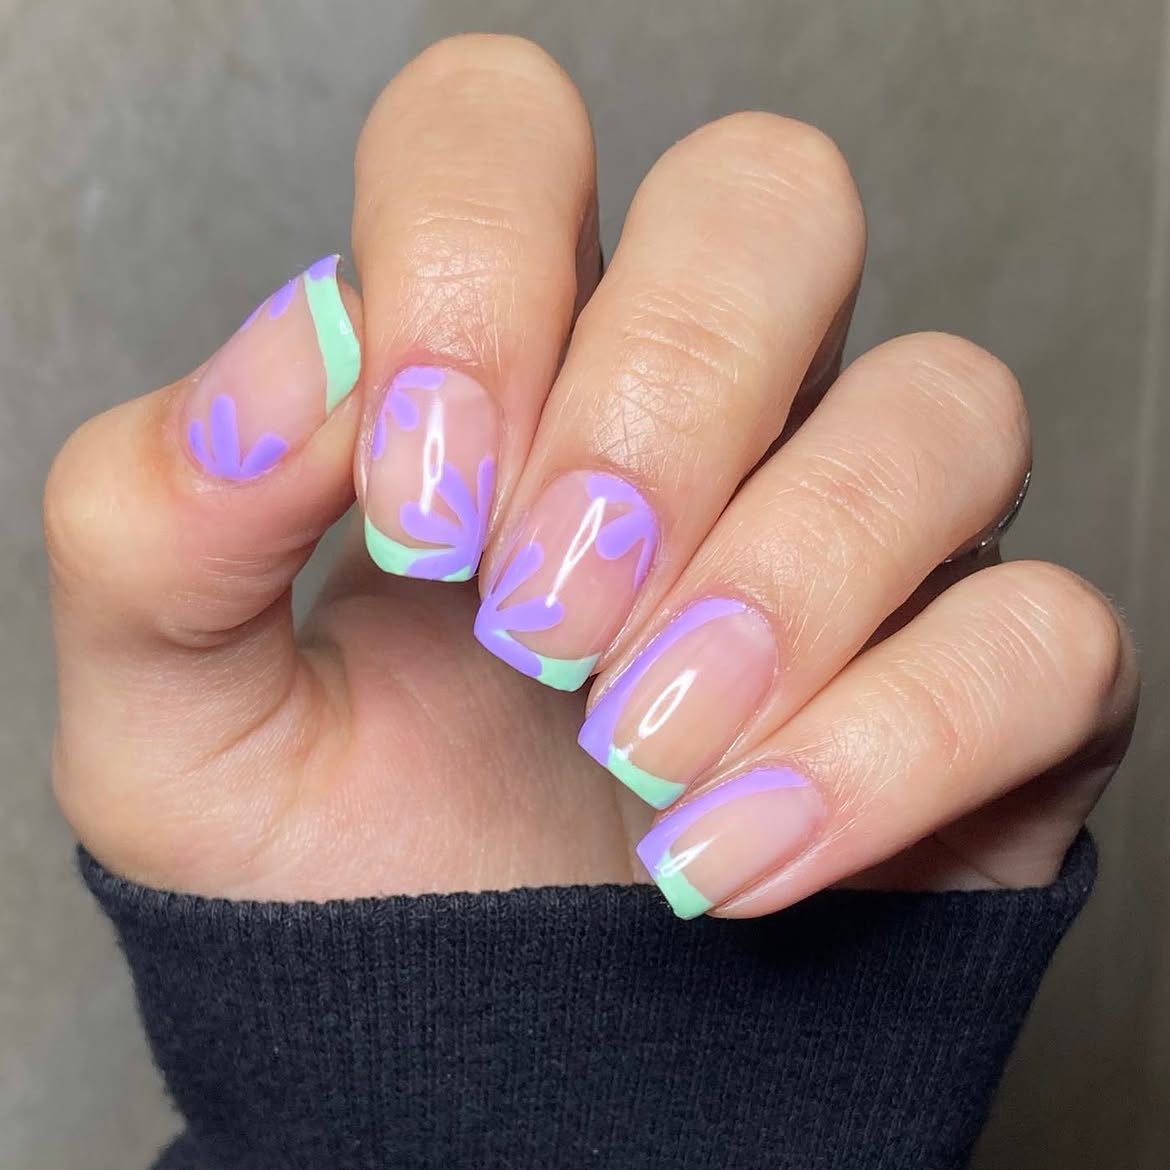
Here the color pairing takes a lighter turn. Instead of going bold or graphic, this set uses a sheer nude base, mint tips, and soft lilac petal shapes that sit partly on the nail bed and partly near the edges. The result feels clean, airy, and a little playful without looking loud.
What works especially well here is the spacing. Not every nail is covered the same way, so the eye gets a mix of plain French tips and small painted details. That keeps the set from feeling too busy.
A few ideas worth borrowing:
- Use a short square shape if you want the design to look neat and modern.
- Keep the base sheer so the mint and lilac stay the focus.
- Let one or two nails carry the petal art, then leave the others simpler.
- Use rounded petal strokes instead of sharp lines if you want a softer finish.
This is a nice choice if you want color, but still want something that feels tidy and easy to wear day to day.
6. Pastel Double French Tips With Tiny Dot Accents
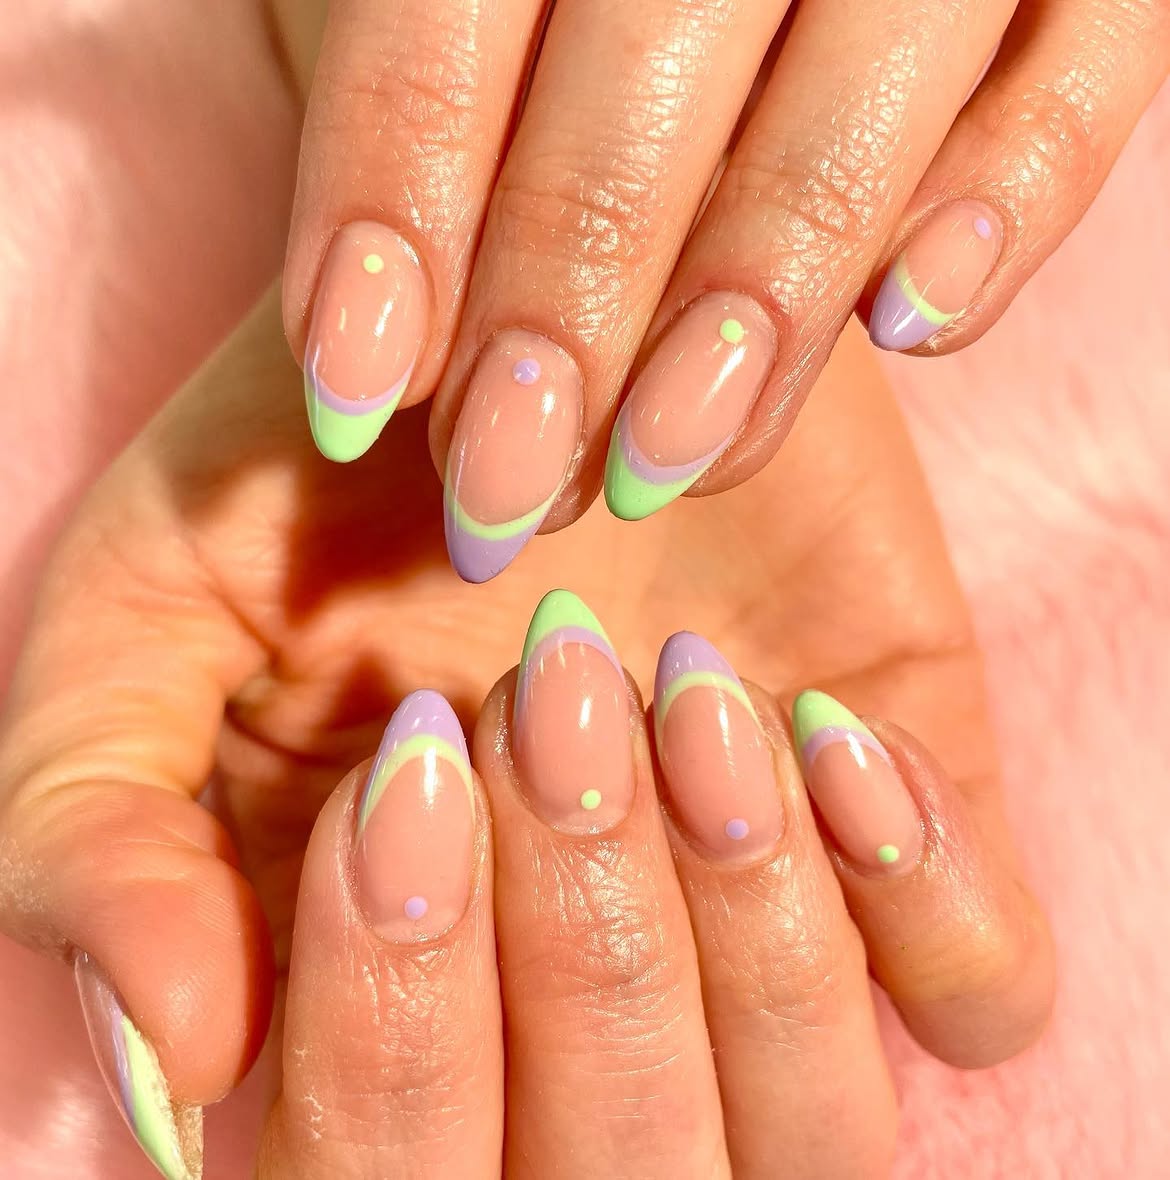
This manicure keeps the color soft and lets the curved tip work become the main detail. A sheer nude base gives the nails a clean backdrop, while pale green and lilac alternate across the almond shaped tips.
The clever part is the layered French effect. Some nails use one pastel shade at the edge with a thin curve of the second color sitting just above it. Others reverse the order, which creates variety without changing the overall idea.
Small green and lilac dots near the cuticle add one more detail, but they stay tiny enough that the tips still get most of the attention.
For a similar finish, keep the pastel shades light, make the curved bands slim, and leave plenty of the natural looking base visible. The longer almond shape gives those sweeping lines enough room to show clearly.
💡 Detail to borrow
Reverse the lilac and green placement from nail to nail. The colors stay consistent, while the changing tip order keeps the manicure from looking repetitive.
7. Alternating Bubble Art on Short Square Nails
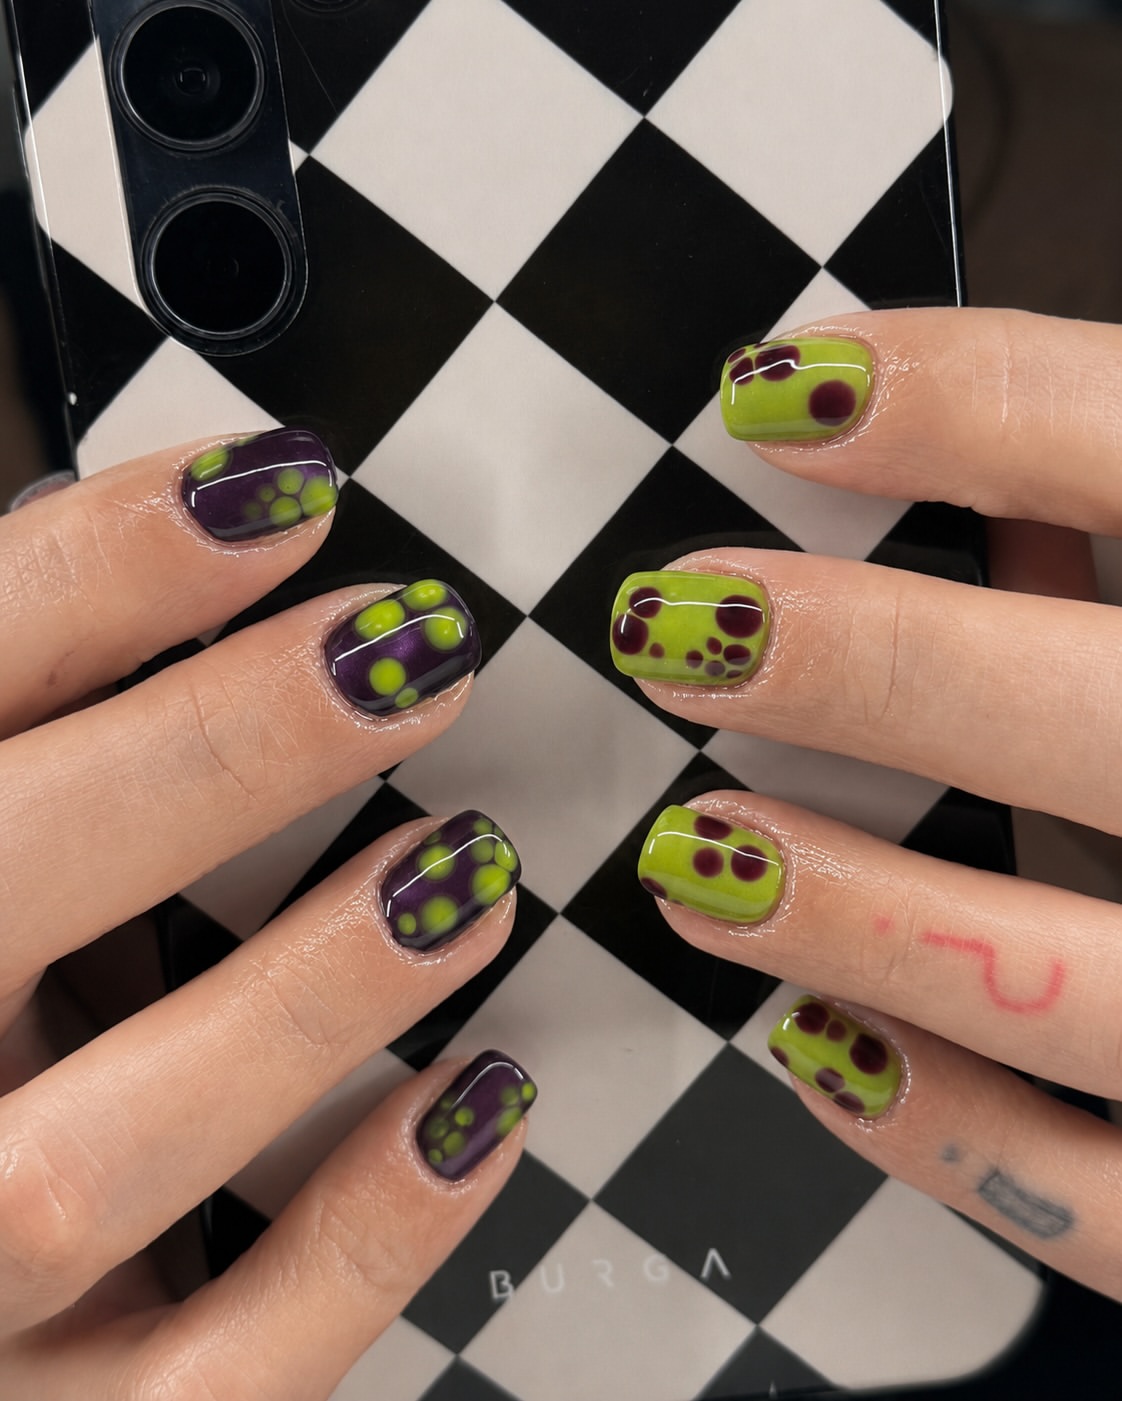
This set leans into contrast. Instead of blending the two colors softly, it flips them from nail to nail so each hand gets a strong back and forth rhythm. Some nails use a deep plum base with lime bubble dots, while others switch to a bright green base with darker round spots.
What gives this look its punch:
- The short square shape keeps the design crisp and graphic.
- Alternating base colors makes the set feel more dynamic than using one main shade on every nail.
- Round dot clusters soften the bold color pairing, so the manicure still feels playful.
- A glossy finish helps the surface look smooth and polished.
The black and white check background in the photo also shows how well this style suits a bolder mood. If you want a set that feels fun, artsy, and a little retro, this is a strong direction to borrow.
| Plum Base Nails | Green Base Nails |
|---|---|
| Deep purple base with bright lime bubble dots | Lime green base with darker plum dots |
| Feels moodier and richer | Feels brighter and more playful |
| Best if you want the darker shade to lead | Best if you want the green to stand out more |
8. Color Block French With Lilac and Lime
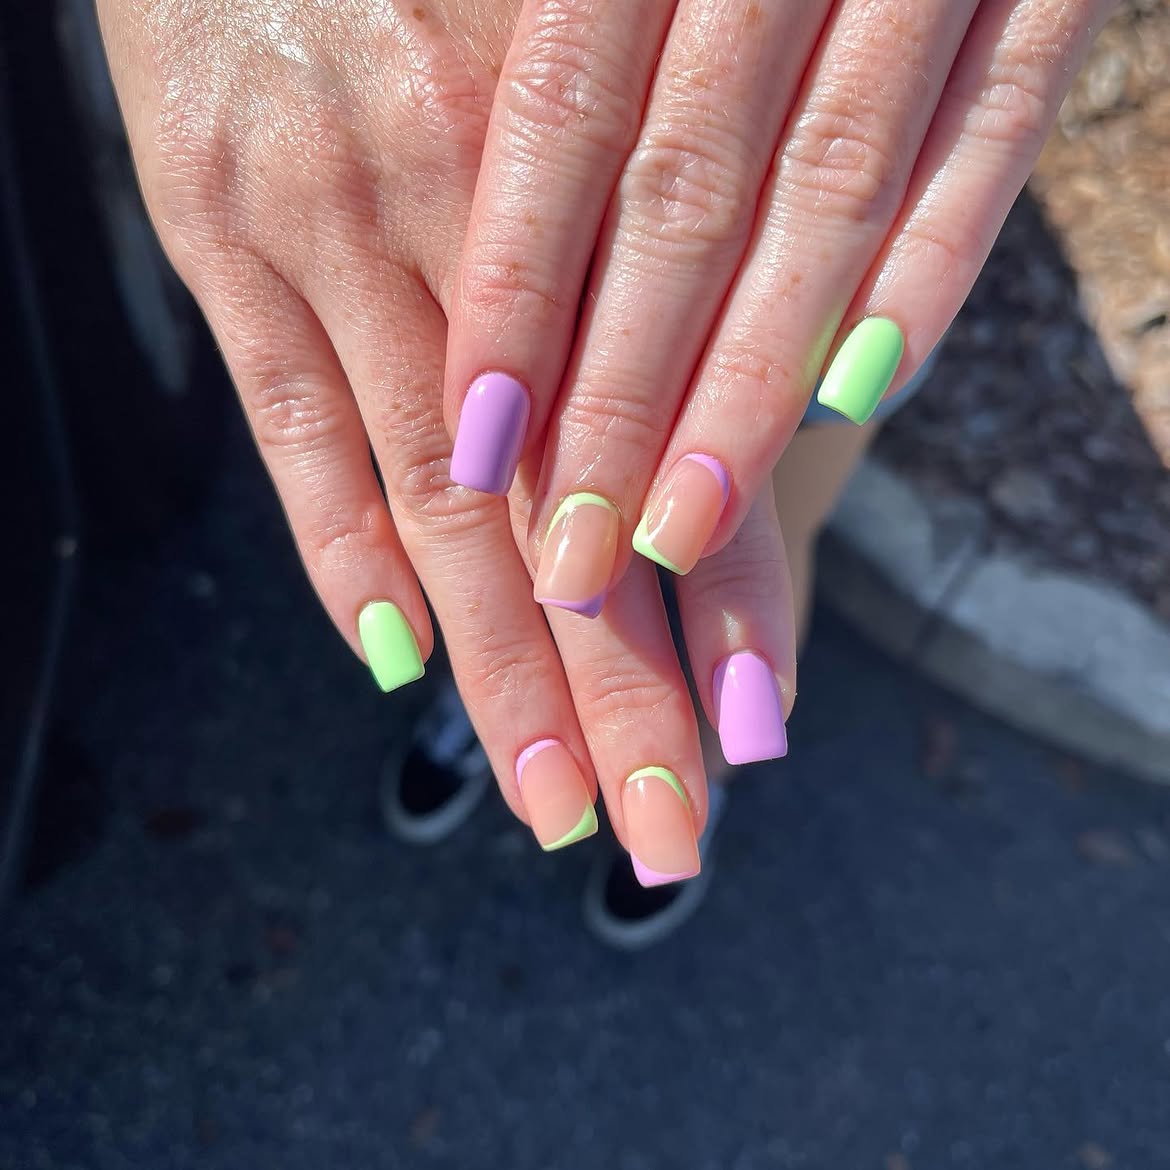
Clean blocks of pastel color make this set feel fresh without adding lots of tiny nail art. Some nails are fully coated in lilac or bright green, while the sheer nude nails use curved side tips and slim bands of color.
The mix works because the placement keeps changing. One nail carries green at the edge, another brings lilac into the same spot, and the solid nails give the eye somewhere to rest.
To borrow the look:
- Begin with a glossy nude base on several nails.
- Paint a few nails completely lilac or green.
- Add curved color along one corner or edge of the nude nails.
- Switch the color placement across the set rather than copying the exact same tip.
- Keep the square shape neat so the curved details contrast with the straight nail edge.
The design has plenty of color, but the open nude sections stop it from feeling overloaded.
Choose a few nails for full lilac and green color.
Leave the remaining nails sheer and add curved color near the tips and sides.
Alternate the two shades across both hands for an easy, balanced finish.
9. Lime Droplets, Lilac Petals, and a Hint of Gold
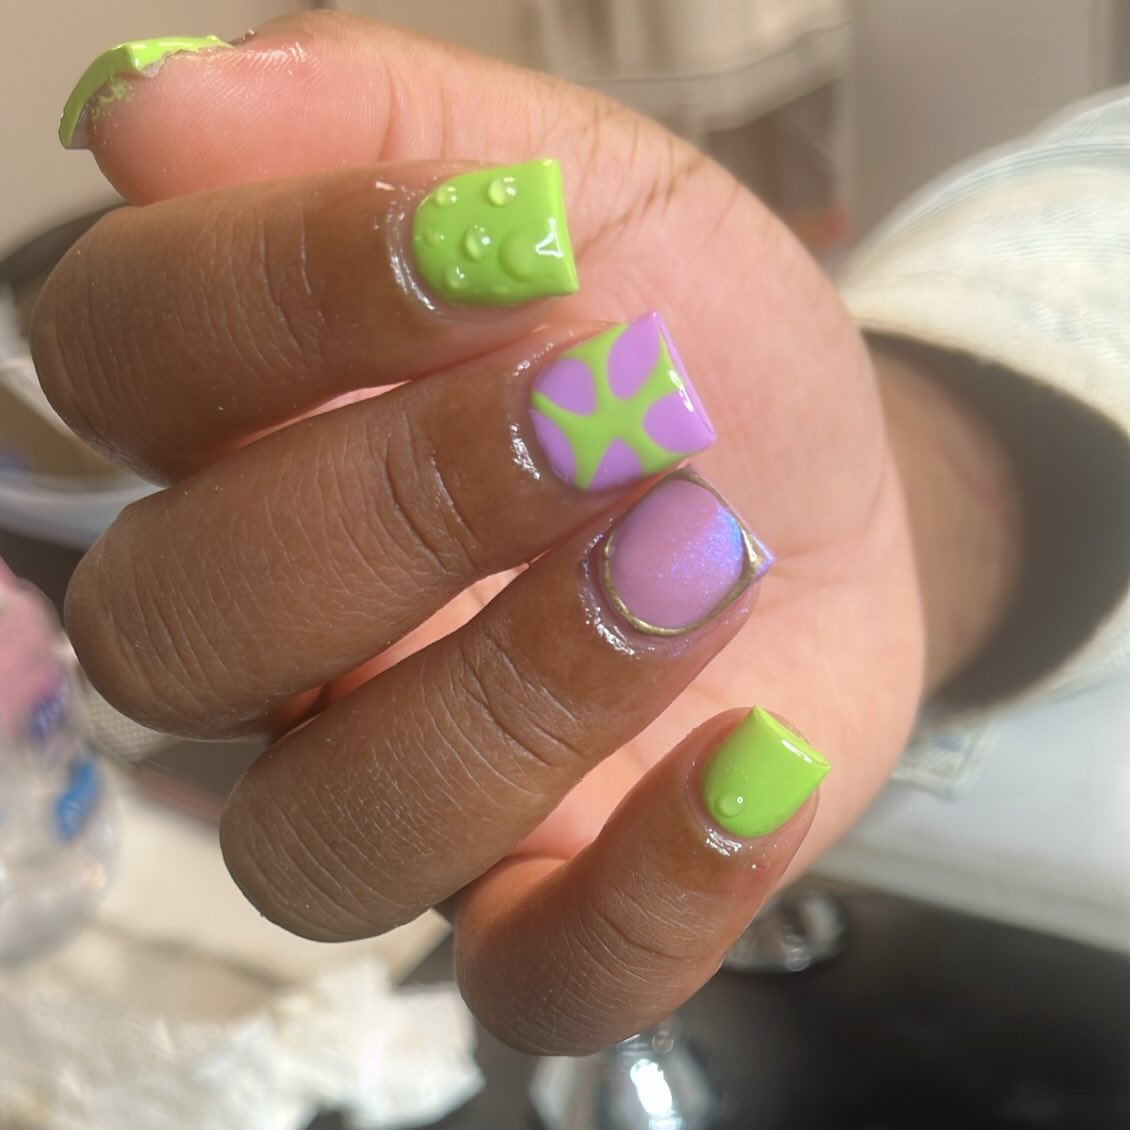
There is a lot going on in this set, but the repeated lime and lilac palette keeps all the details connected. Short square nails give the artwork a clean frame, while each finger gets a slightly different treatment.
Details worth noticing:
- Raised clear droplets give the bright green nail a playful textured finish.
- The lilac petal design uses green space between the shapes, creating a bold floral effect without tiny painted lines.
- A softly shimmering lilac nail brings in a smoother, glowing finish.
- The thin metallic border around that accent nail adds a small polished detail.
- Solid lime sections give the more decorative nails some breathing room.
This is a useful approach when you want every nail to feel different. Instead of repeating one pattern, choose a shared palette and let texture, shimmer, florals, and solid color take turns.
- ▸Texture: glossy raised droplets
- ▸Pattern: oversized lilac petal shapes
- ▸Glow: soft purple shimmer
- ▸Finishing detail: slim metallic edging
- For a stronger green focused manicure, browse 18 Acrylic Green Nails for creative designs that work beautifully with longer nail shapes and eye catching finishes.
10. Lavender Almond Nails With Lime Crescent Tips
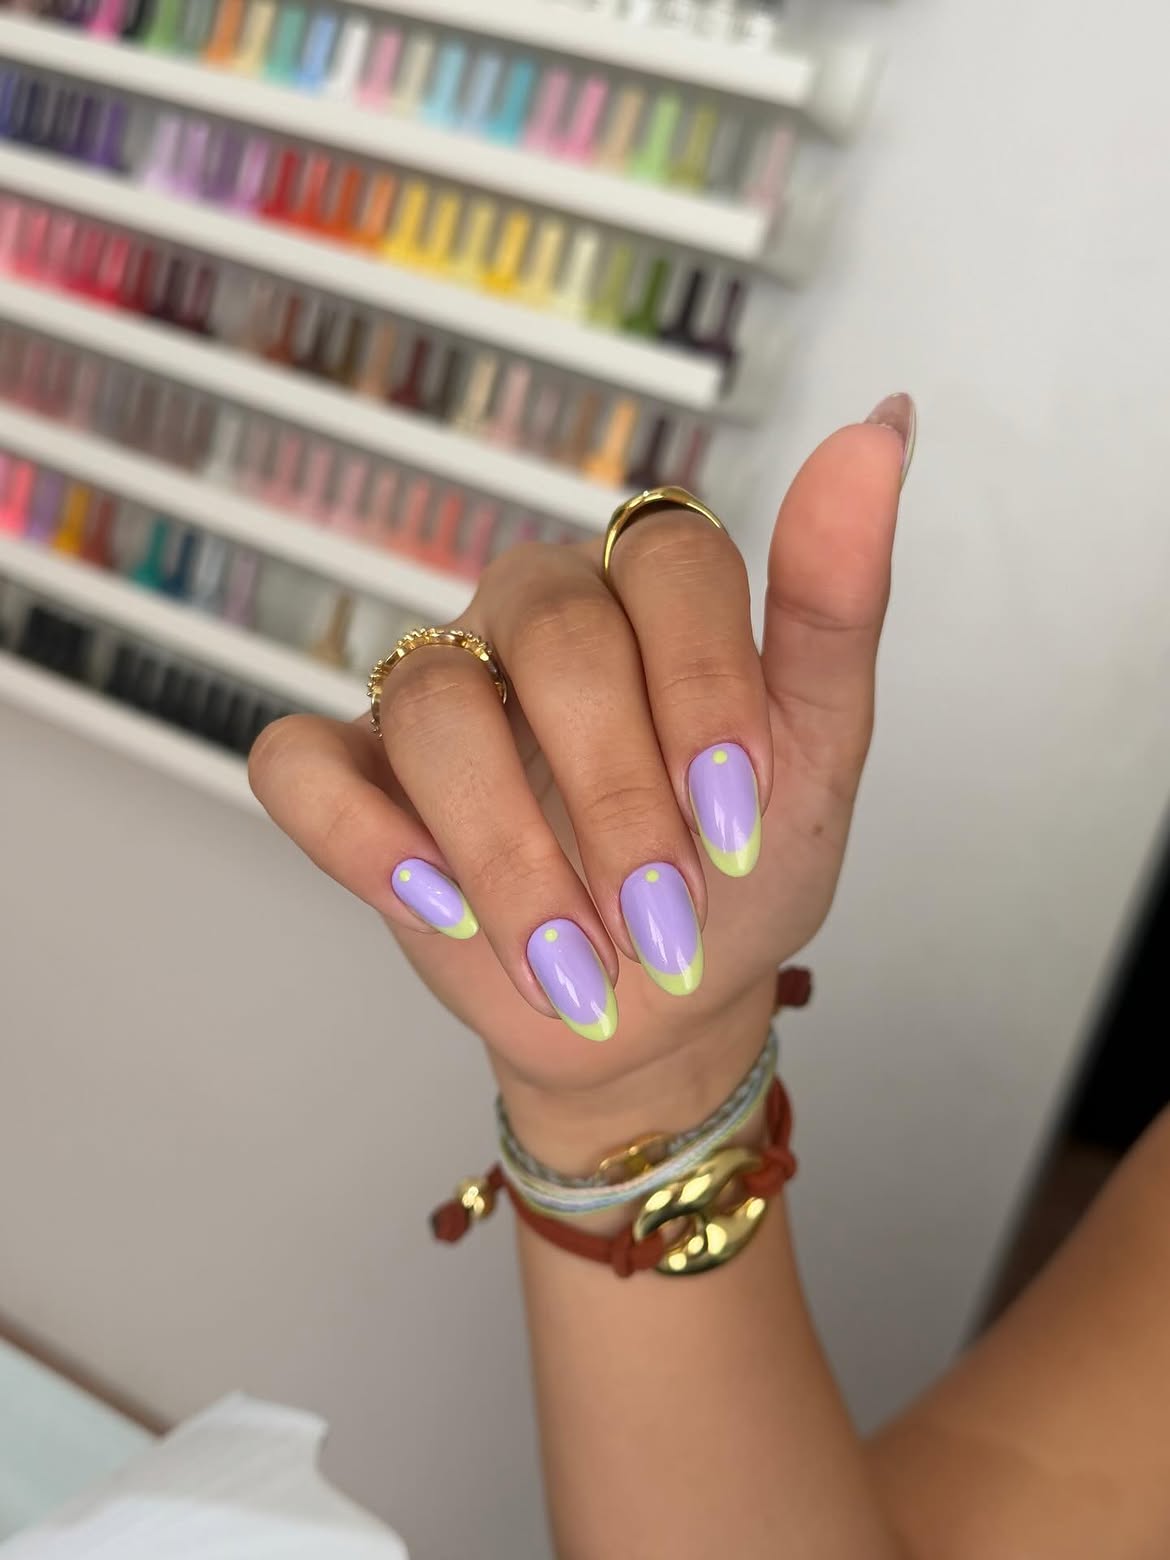
A soft lavender base gives this manicure a calm look, then the lime tips sharpen it up with a brighter finish. The curved green sections sit low along the edge instead of forming a thick French tip, which keeps the design light and clean.
The tiny lime dot near each cuticle is an especially smart detail. It repeats the tip color without adding another large pattern, so the whole nail feels connected from top to bottom.
What to borrow from this set:
- Keep the lavender as the main color across every nail.
- Paint slim lime curves at the tips rather than wide blocks.
- Add one small green dot near the cuticle for balance.
- Use a glossy finish so both pastel shades stay bright.
- An almond shape gives the curved tips a smooth, flowing outline.
This one shows how just two small details, a curved edge and a single dot, can make a simple color combination feel much more considered.
Start with one smooth lavender shade across the full nail.
Finish with a slim lime crescent at the tip and one tiny matching dot near the cuticle.
11. Botanical Color Swap With Floral Accents
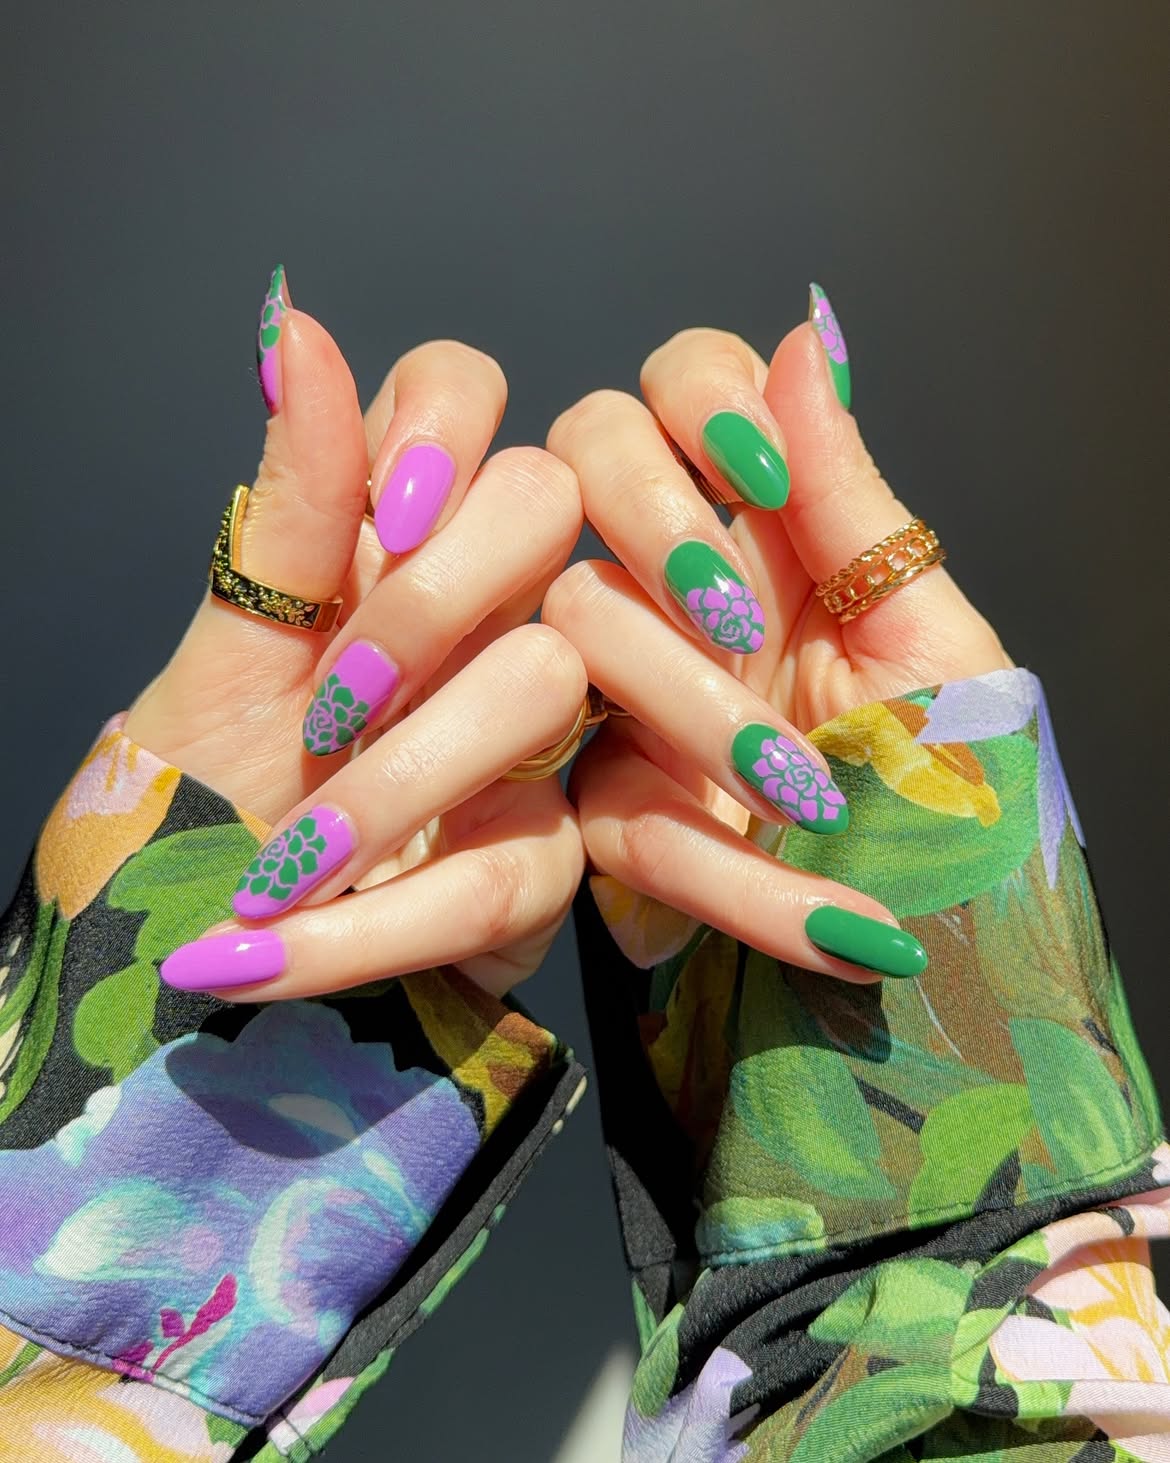
This set gets its charm from a simple color reversal. Some nails are coated in glossy orchid purple, while others use a rich leafy green. The floral accent nails then switch those colors, placing green flowers over purple and purple flowers over green.
That mirrored approach makes the manicure feel connected even though the artwork changes across both hands.
- Solid nails create breathing room between the floral designs.
- Rounded flower shapes keep the artwork soft rather than overly detailed.
- The medium almond shape gives the floral clusters enough space to stretch toward the tips.
- Using the opposite color for each flower keeps the palette tight and easy to follow.
- A glossy finish makes both shades look saturated and bright.
Rather than covering every nail with flowers, keeping several nails solid makes the botanical details much easier to notice.
12. Neon Corner Tips With Solid Accent Nails
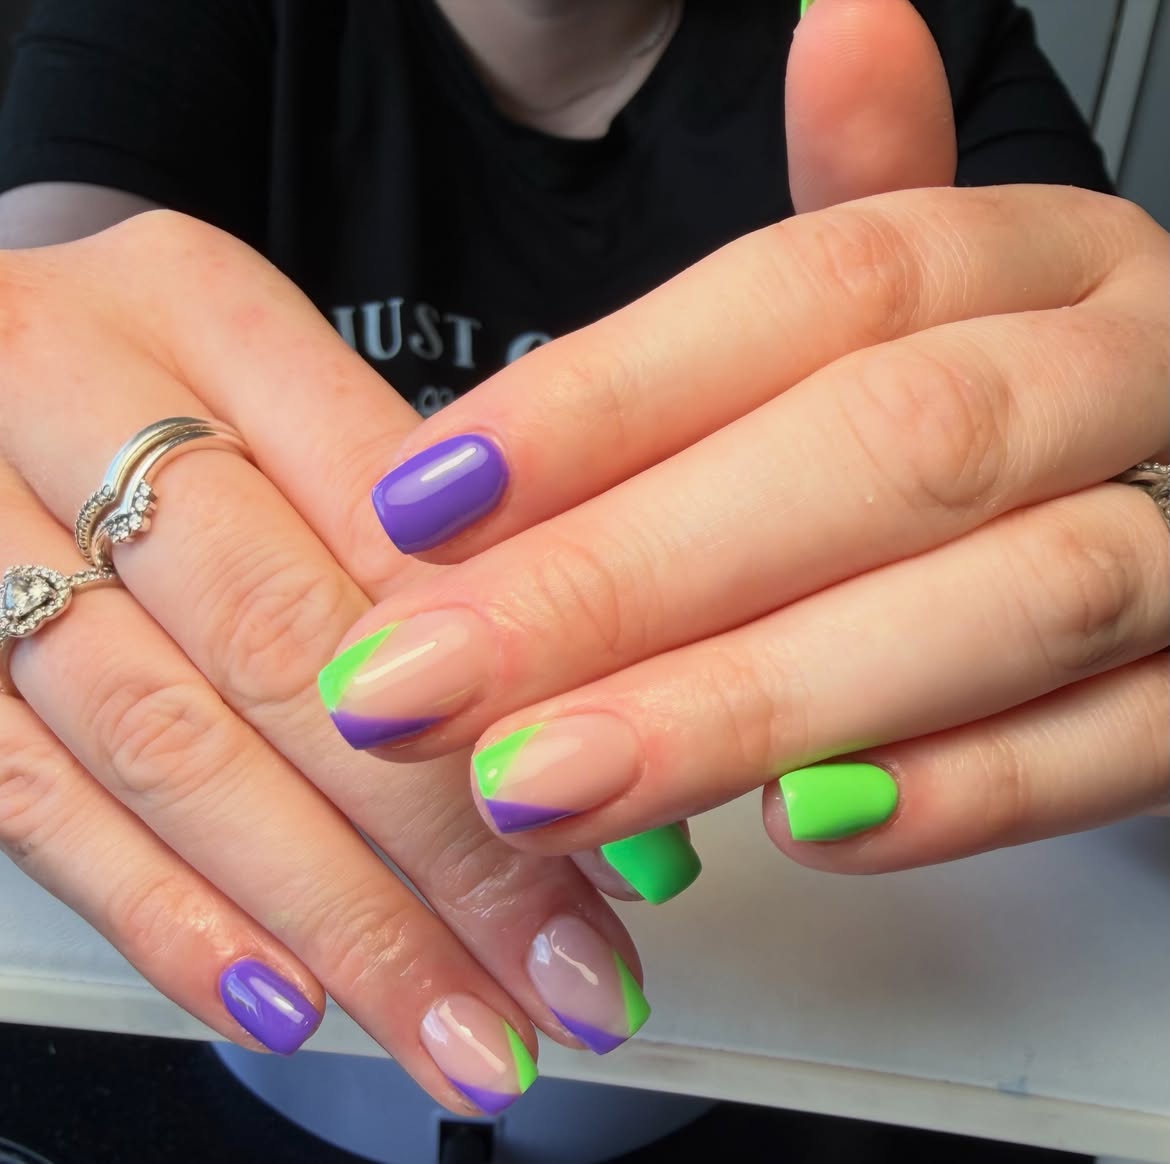
Bright color gets a cleaner treatment in this set. Instead of covering every nail with art, glossy violet and electric green are split between solid accent nails and angled corner tips over a sheer nude base.
The corner placement is what gives the manicure its sharp, modern feel.
- Keep a few nails completely violet or green for strong blocks of color.
- On the nude nails, place each shade on opposite corners of the tip.
- Let the natural looking base stay visible through the center.
- Repeat the angled shapes rather than making every corner exactly identical.
- A short square shape makes those diagonal sections look especially crisp.
This approach is useful when neon shades feel a little too intense on a full manicure. Leaving open space between the colors gives them plenty of impact without making the entire set feel crowded.
Build the mix
13. Grape and Mint Nails With Metallic Confetti Dots
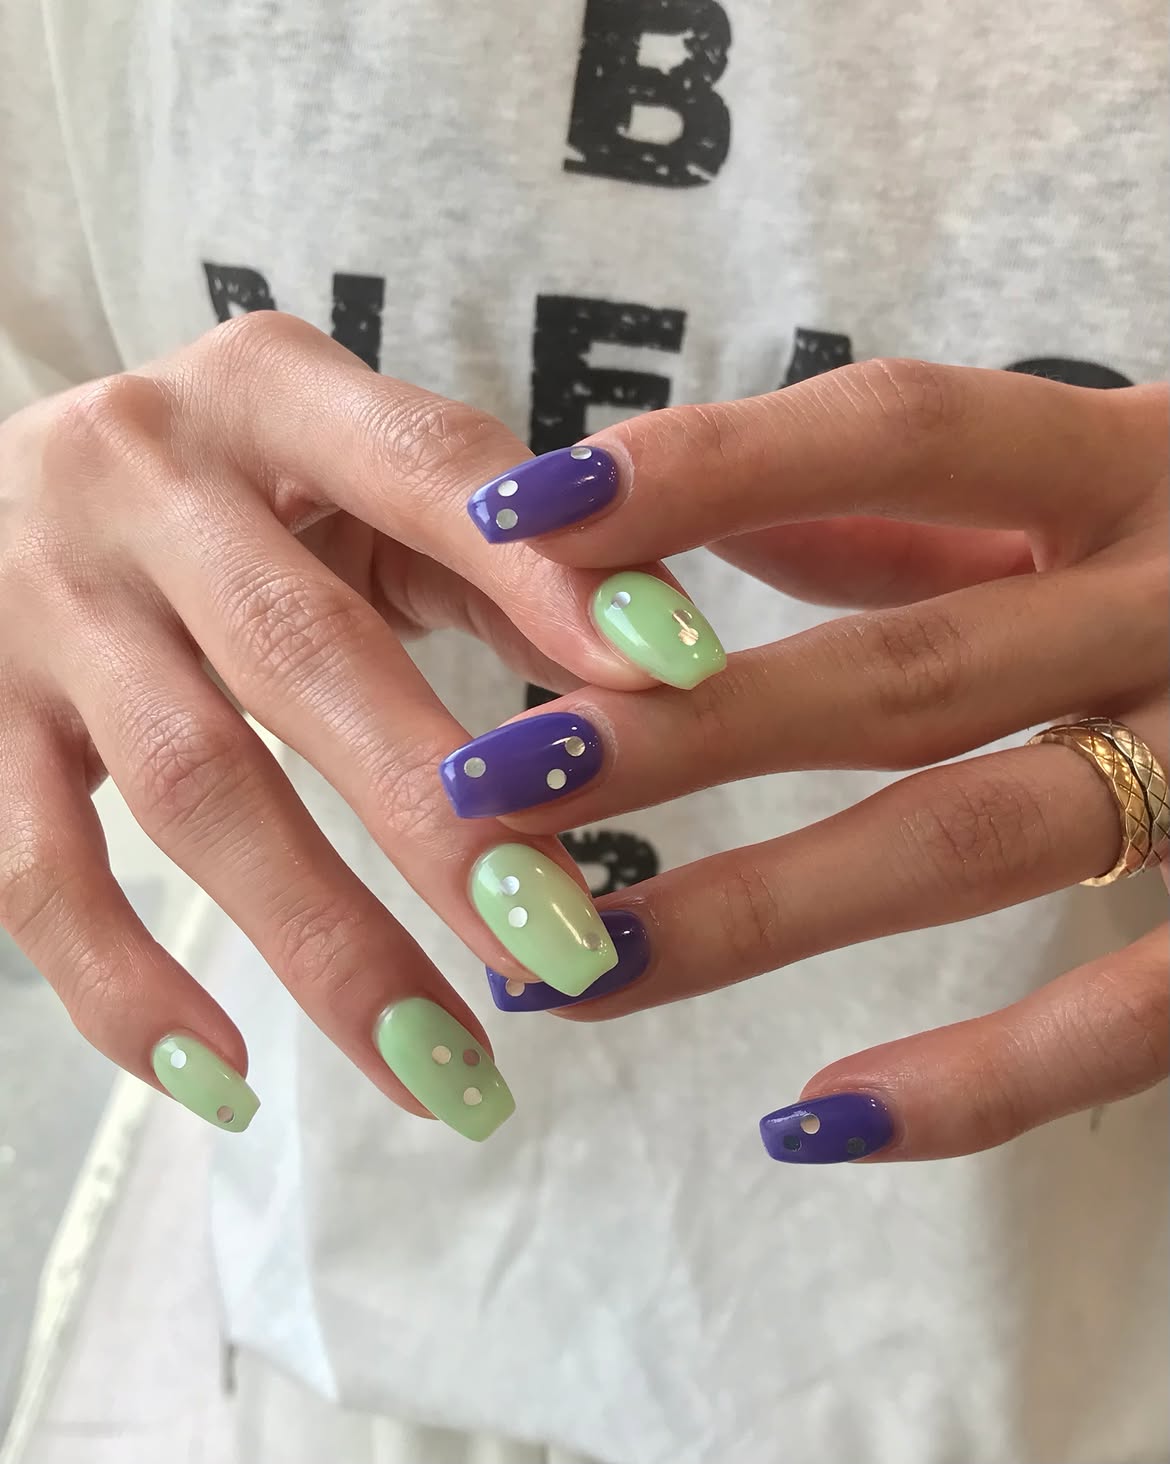
This manicure keeps the nail art simple and lets the color contrast do most of the work. Glossy grape purple alternates with a soft mint green across short square nails, creating an easy rhythm from finger to finger.
The small metallic dots are what make the set feel more playful. Instead of covering the nails with a full pattern, a few silver and champagne toned circles are scattered near the edges and corners.
What makes the design work:
- Solid purple and mint nails keep the color story clear.
- Metallic dots add shine without hiding the base shades.
- Uneven dot placement gives each nail a slightly different look.
- The short square shape keeps the manicure neat and graphic.
- High gloss across every nail ties the two colors together.
For an even cleaner version, keep the dots concentrated near one corner rather than spreading them across the whole nail.
Alternate glossy grape and mint bases, then scatter a few metallic dots near the edges for a simple graphic finish with a little shine.
14. Sage Green Nails With Shimmering Purple Florals
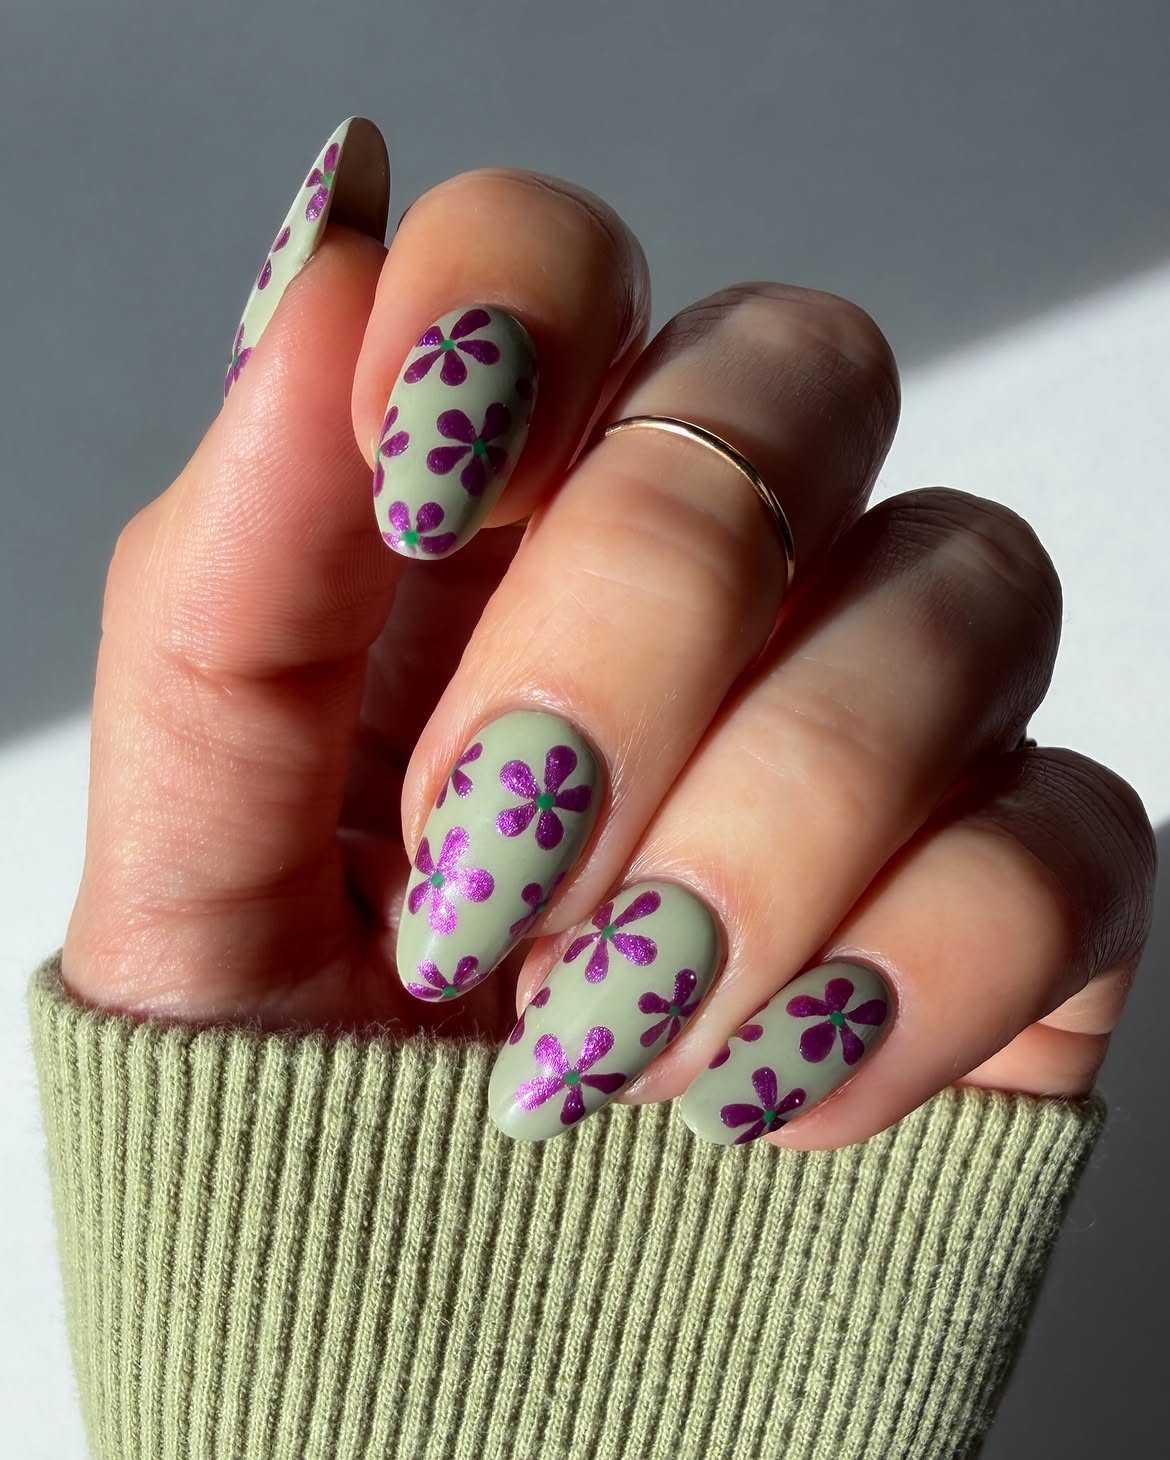
Tiny flowers give this manicure a softer, garden inspired direction. Every nail uses the same muted sage green base, while metallic purple petals are scattered across the surface in different sizes and placements.
The shimmer finish on the flowers is what keeps the design from looking flat. Light catches the purple petals while the green background stays calm and understated.
A few details make the set feel especially balanced:
- Flowers sit at different angles rather than forming strict rows.
- Some blooms extend beyond the nail edges, which makes the pattern feel more natural.
- Small green centers connect each purple flower back to the base color.
- The rounded almond shape suits the curved petals and keeps the artwork soft.
- Repeating the floral pattern across every nail creates unity without making each nail identical.
💡 Nail Art Tip
Scatter the flowers at different heights and let a few petals disappear beyond the nail edge. That small change makes a repeated floral pattern feel much less rigid.
15. Mauve Base With Electric Lime French Tips
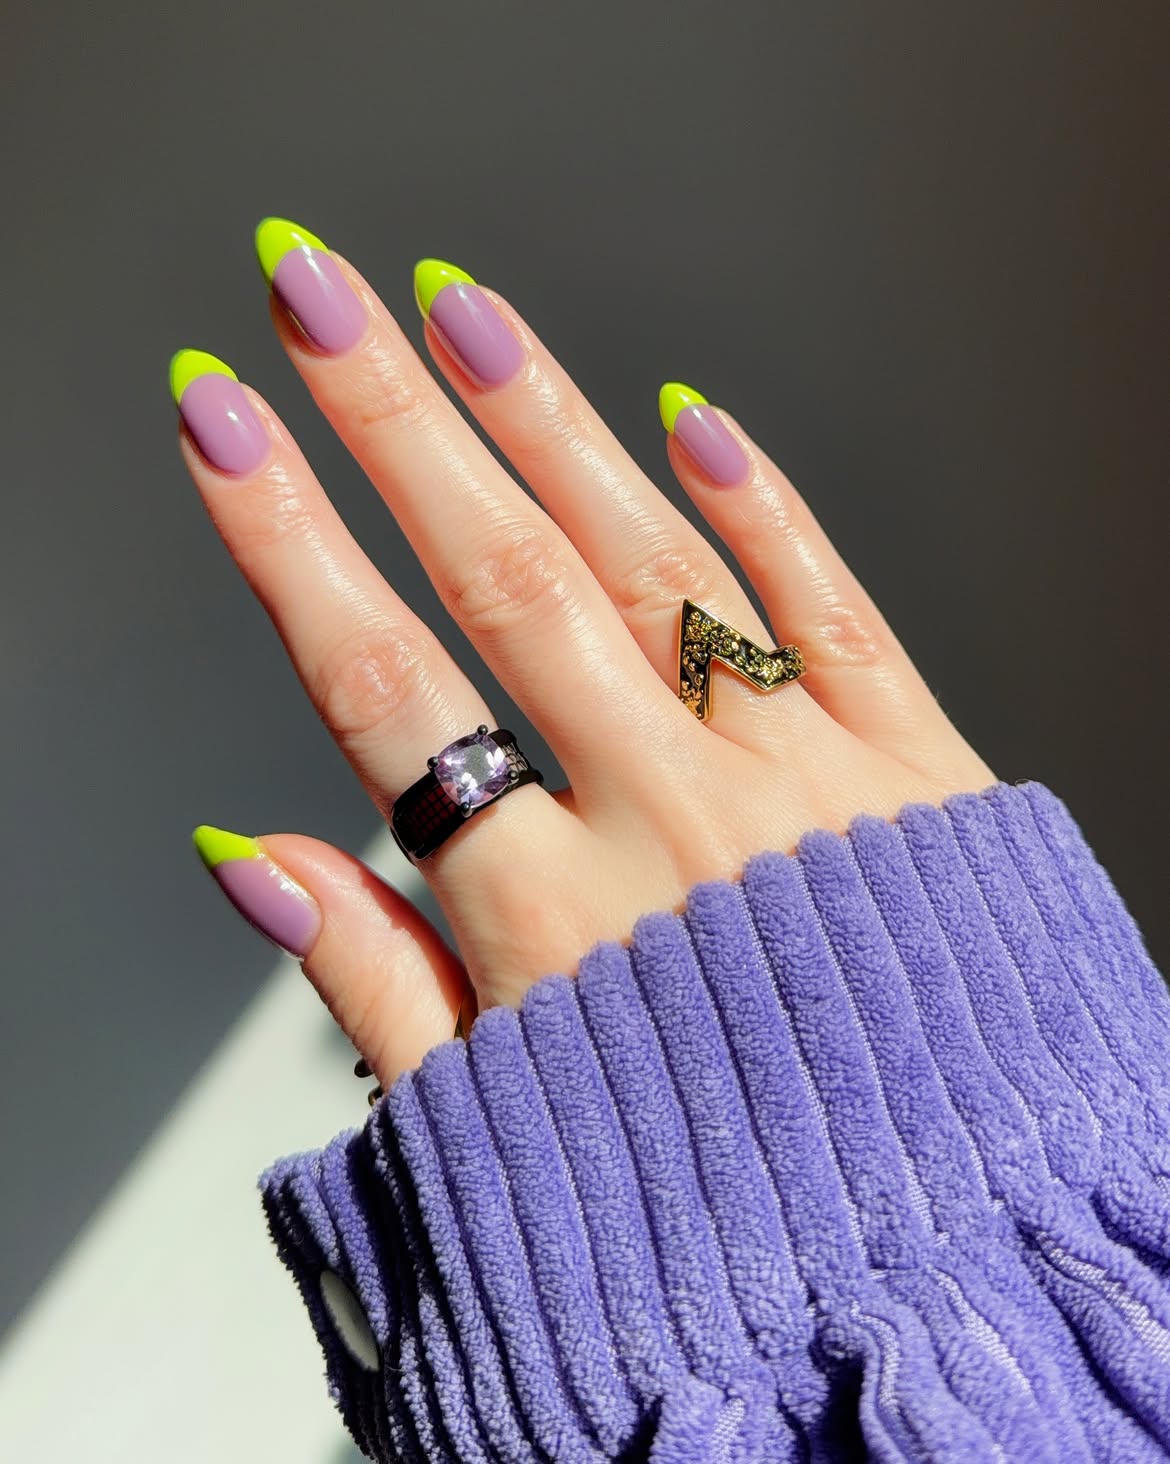
This set proves that a very simple layout can still feel bold. Each nail uses the same muted mauve base, then finishes with a bright chartreuse tip that follows the natural curve of the almond shape.
The contrast is what carries the whole look. The purple shade feels soft and slightly dusty, while the green is vivid enough to catch the eye right away. Since there are no flowers, dots, gems, or extra lines, both colors get plenty of room to stand out.
Why the combination feels balanced:
- The mauve base covers most of the nail and keeps the brighter shade under control.
- Lime appears only at the tips, so the neon color stays sharp rather than overwhelming.
- Matching placement across every finger creates a cleaner look than the mixed patterns seen in some of the earlier sets.
- The tapered almond shape makes the French edge look smooth and elongated.
This is one of the easier ideas in the roundup to adapt if you prefer strong color with very little nail art.
16. Neon Green and Violet Starburst Accents
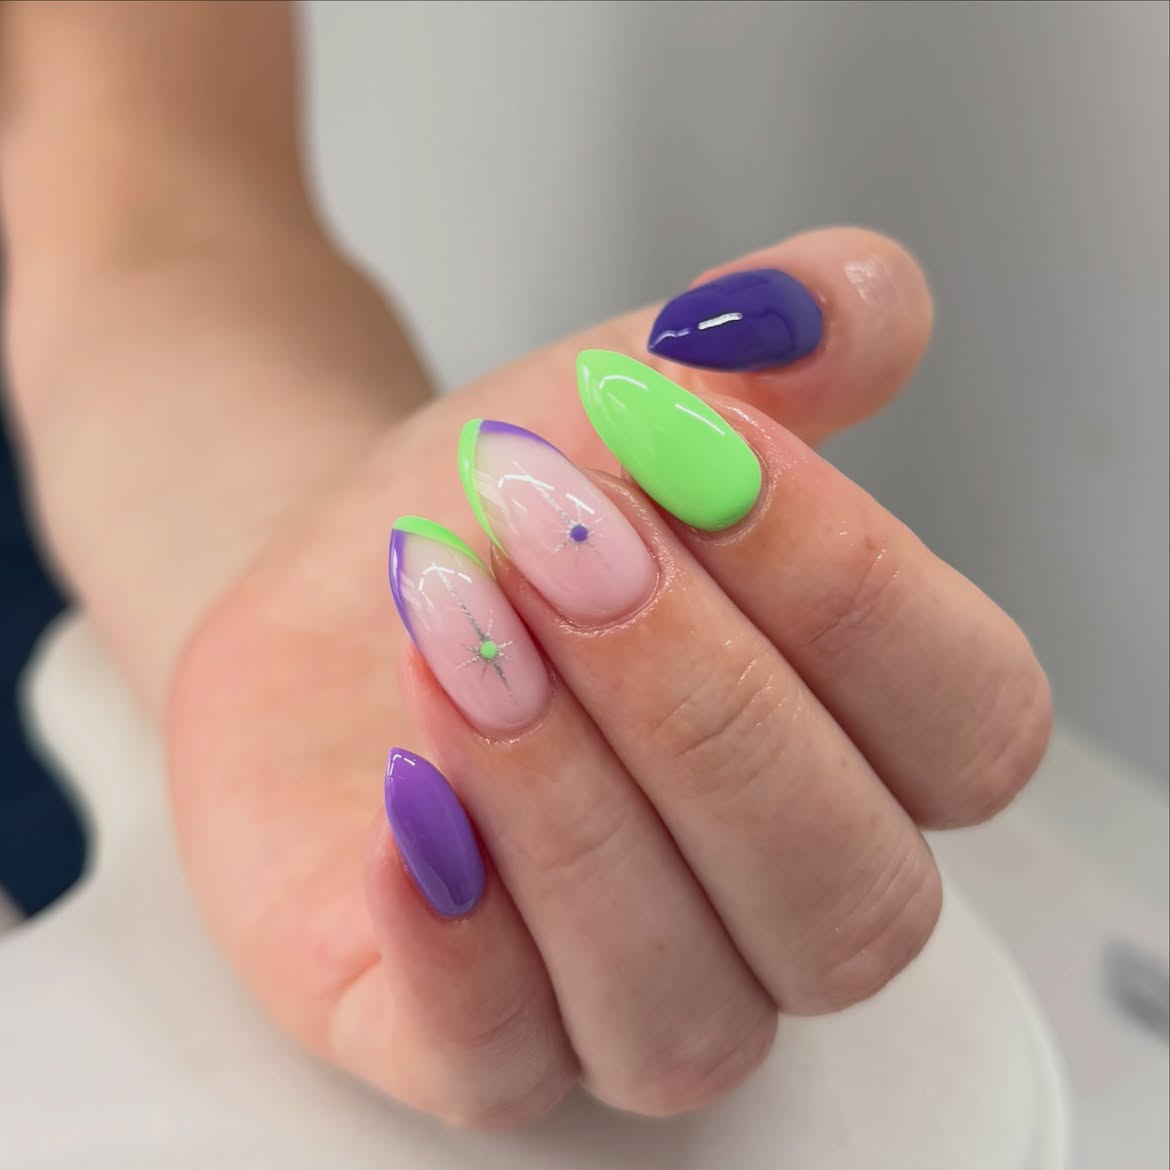
opposite edges, while fine silver starburst lines meet at a tiny colored center. The surrounding solid nails keep the manicure bold without making every finger compete for attention.
What works here
- Deep violet adds weight beside the much brighter green.
- Solid color nails frame the softer translucent accents.
- The curved edge detail feels more fluid than a standard French tip.
- Fine silver lines bring in a delicate sparkle without covering the base.
- The almond shape gives the color curves enough space to stretch naturally.
For a cleaner version, keep the starburst art on only one or two nails and let the remaining fingers stay fully coated in either purple or green.
Use solid violet and green nails to frame the detailed accents.
Leave plenty of the nude base visible around the starburst lines.
Avoid covering every nail with the same detailed pattern.
Keep the silver lines fine so they do not overpower the bright color pairing.
17. Wavy Lime and Violet Tips on a Bare Base
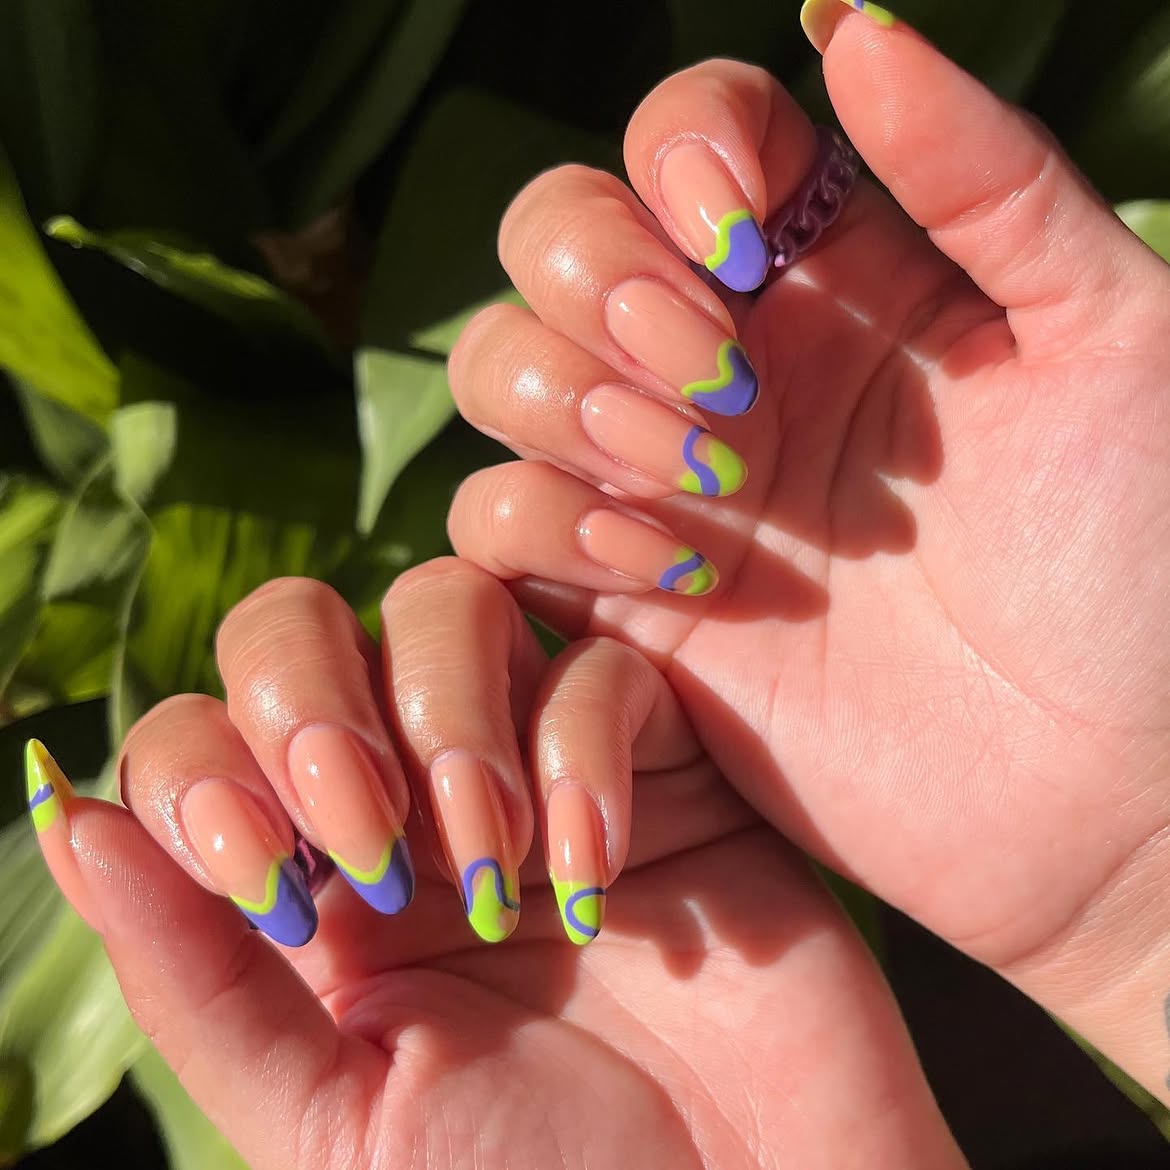
This set leaves most of the nail sheer, then concentrates the color right at the tips. Bright lime and violet curve into each other in loose, uneven waves, giving the manicure a playful painted look without covering the whole nail.
The clever part is that no two tips follow exactly the same path. Some have a broad violet section edged in green, while others use looping green shapes with slimmer purple curves. The clear nude base keeps all that movement from feeling crowded.
To get a similar effect, treat each nail like a small variation on the same idea rather than copying one pattern across every finger.
Keep the base sheer and glossy so the tip art has plenty of open space around it.
Paint loose violet curves across the tips, changing the placement slightly from nail to nail.
Add lime beside and around those curves so the two shades weave together rather than forming a standard French tip.
18. Electric Lime Leopard Print With Violet Accents
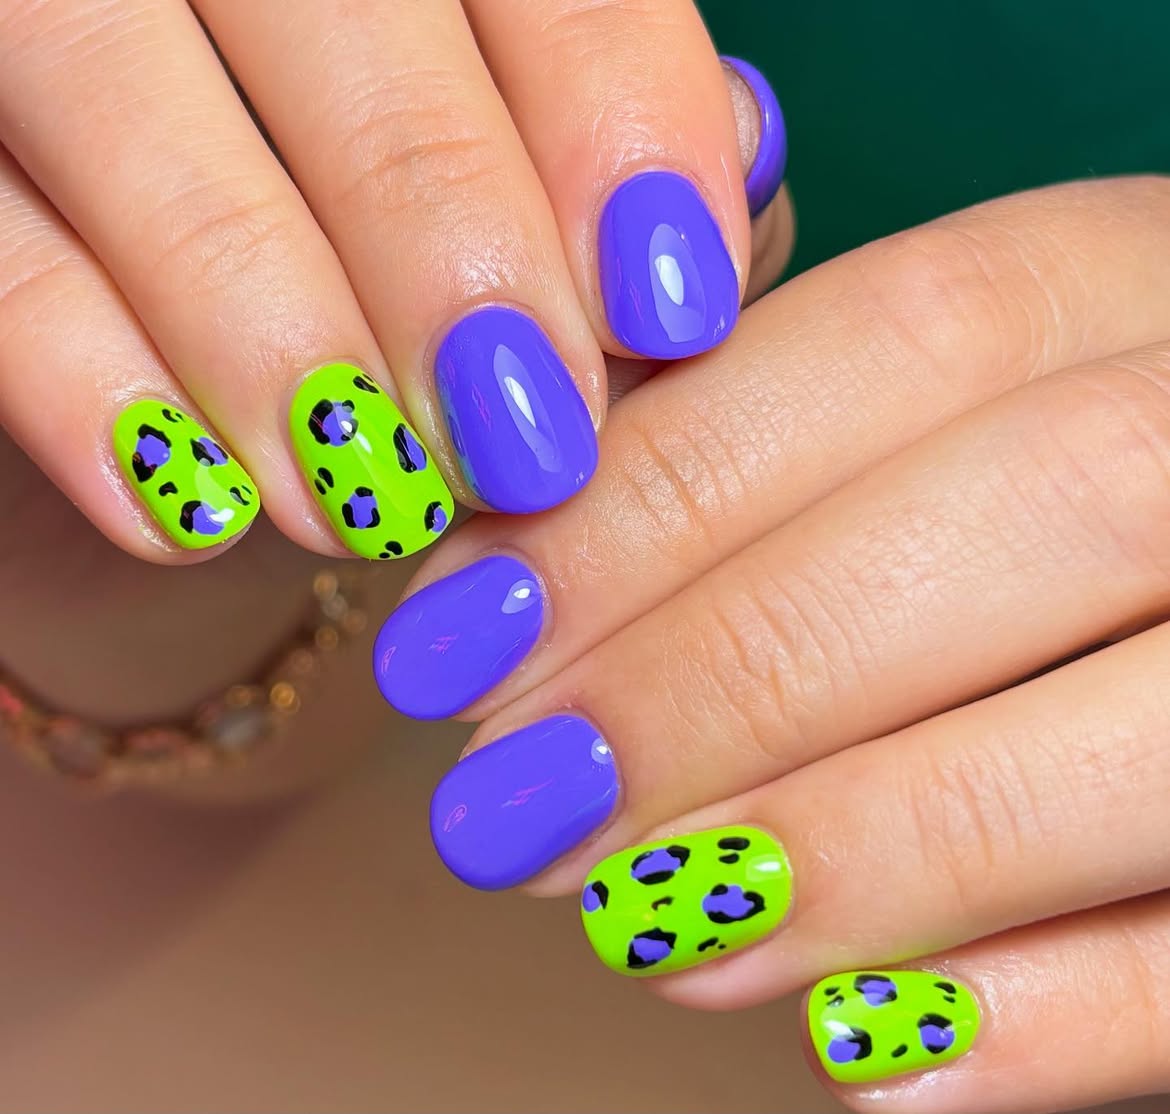
Animal print gives the final color pairing a completely different personality. Several nails are painted a vivid violet, while the accent nails use an electric lime base covered with irregular leopard spots.
The pattern stays readable because the spots are fairly open and scattered. Purple centers connect them back to the solid nails, while small black outlines and marks give the print definition.
Details worth borrowing:
- Use solid violet nails between the patterned ones so the leopard print has space to stand out.
- Paint uneven spots instead of neat circles for a more natural animal print effect.
- Repeat violet inside some of the spots to connect both parts of the manicure.
- Keep the nails short with softly rounded corners for a bold but practical shape.
- Finish everything with high shine gloss so the neon green looks especially bright.
💡 Pattern Tip
Leave small gaps between the leopard spots and vary their size. The open lime background keeps the pattern easy to see, while violet centers tie it back to the solid accent nails.