18 White and Green Nails Designs for a Fresh, Stylish Look

Green can feel crisp, playful, earthy, or polished, and pairing it with white gives every version room to stand out. These 18 White and Green Nails show how much variety can come from two main colors. Some designs keep things simple with sage stripes, mint French tips, solid emerald polish, or a soft ombre fade. Others bring in tiny flowers, gold outlines, silver stars, botanical branches, marble effects, and raised details.
The collection covers short square nails, rounded shapes, and longer almond styles, offering useful ideas for different moods and routines. You will also see how small changes in placement can shift the entire design. A single dot feels graphic, scattered daisies look cheerful, and flowing lines create a more artistic result. White sections help brighter greens feel clean, while blush and nude bases soften the contrast.
Use these real nail references to compare colors, finishes, and accent placement before choosing your next design. Save the ideas that match your style, then adjust the details to suit your preferred nail shape and length.
18 White and Green Nails Inspo 2026
1. Pair Soft Green Nails With Florals and a Tiny Star
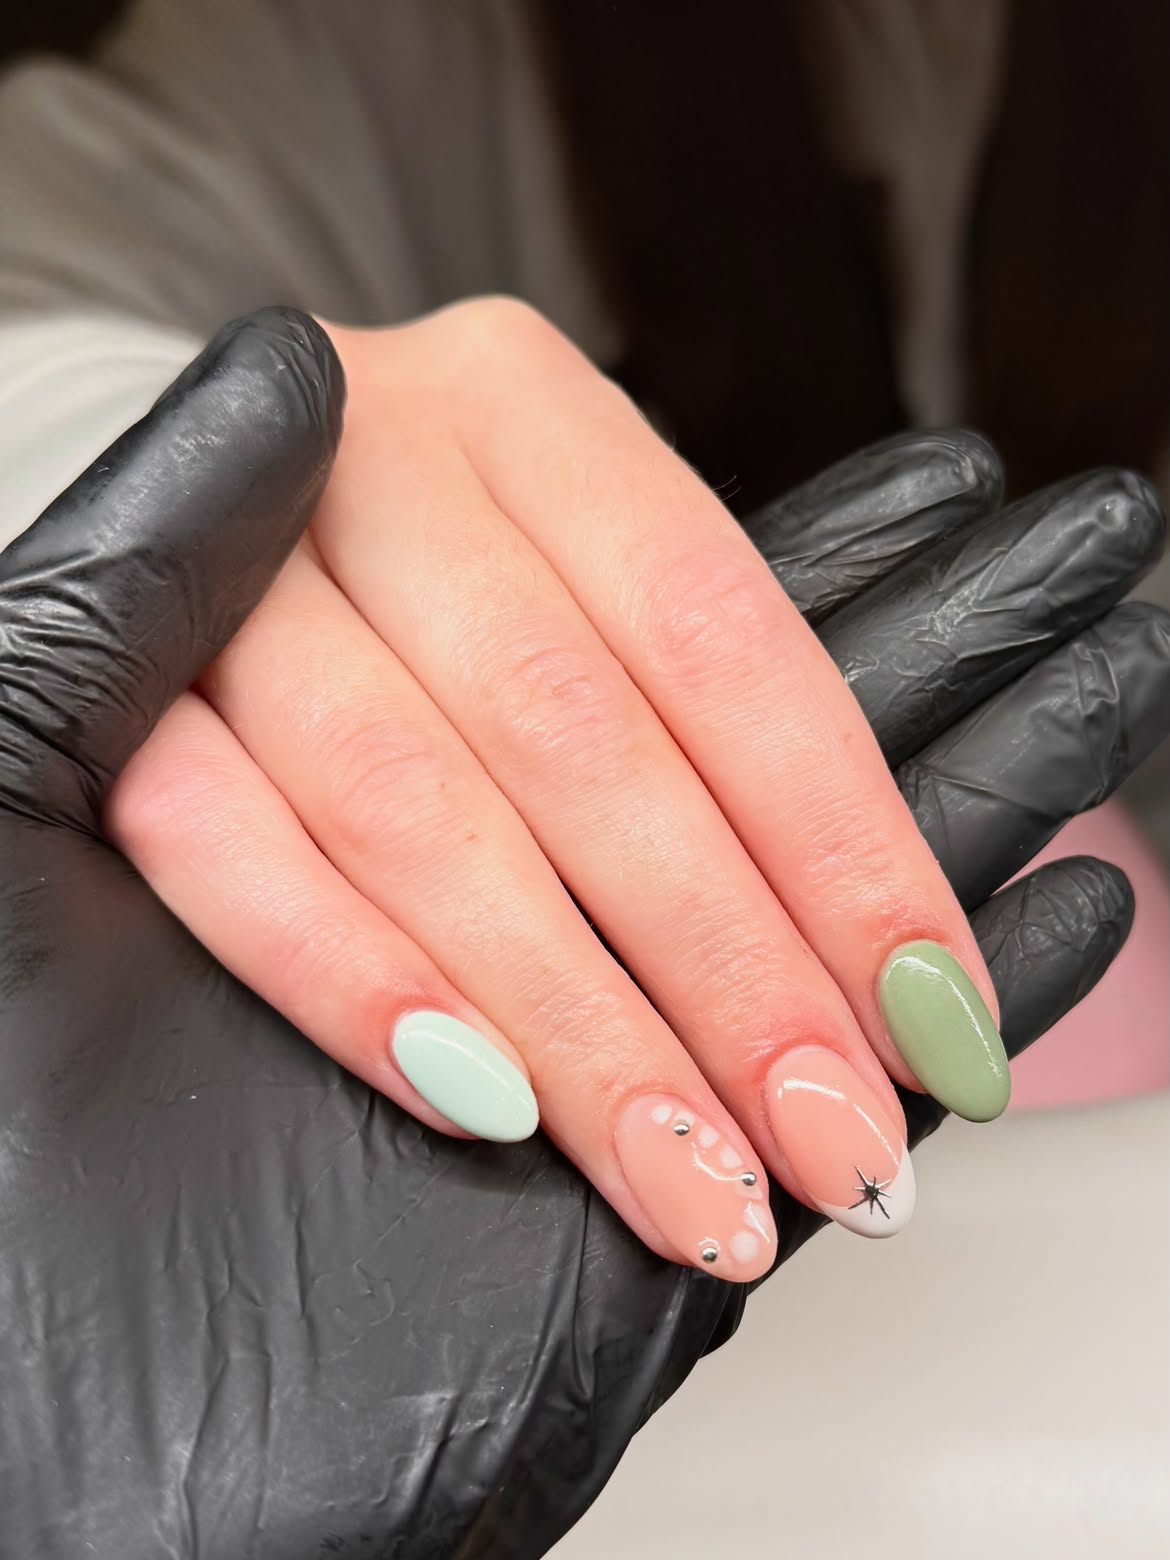
Soft mint and muted sage give this manicure a calm base, while two detailed accent nails keep it interesting. The medium almond shape and glossy finish make each small feature easy to notice.
What works here:
- A pale mint nail brightens the palette.
- A dusty sage nail adds gentle depth.
- One nude nail features white petals and tiny silver studs.
- Another nude nail has a soft white tip with a slim black star motif.
Keep the green shades slightly different. The contrast helps the solid nails frame the artwork instead of competing with it. For a simpler version, place the floral design on one nail and keep the star as the only dark accent. The finished look feels light, playful, and polished while staying true to the white and green nails theme.
2. Give Lime Swirls a Vintage Floral Cameo Accent
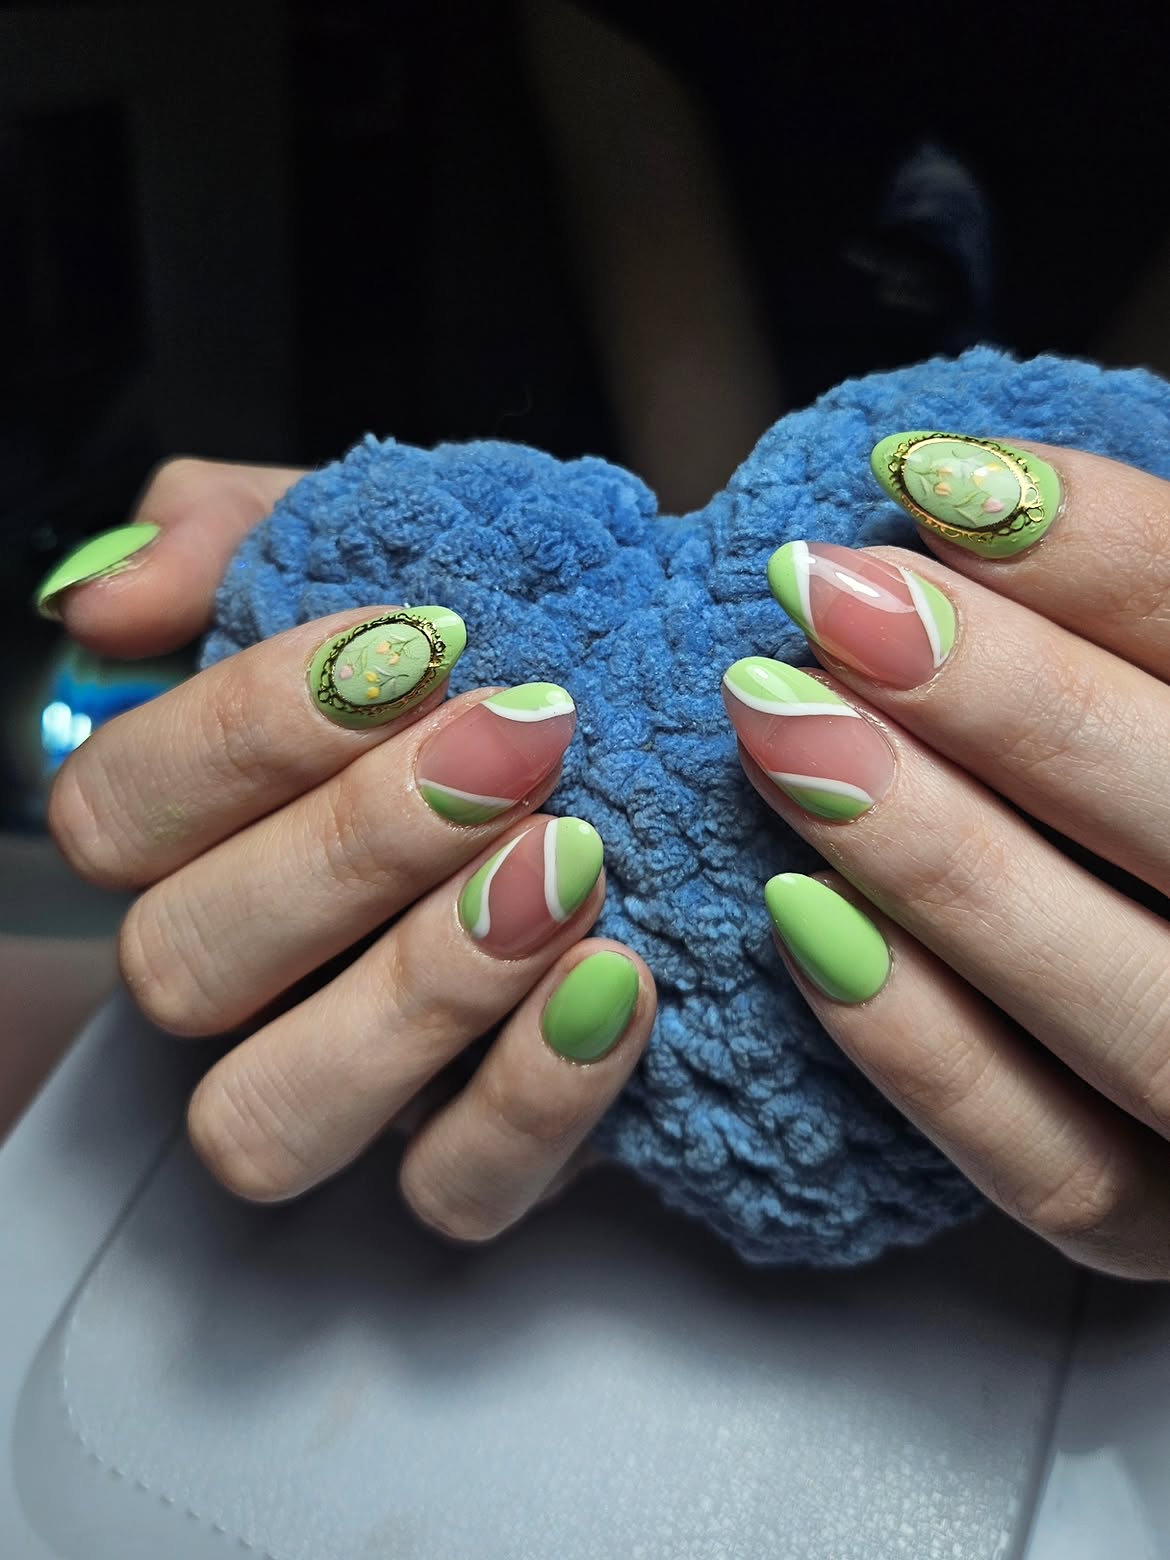
Bold lime polish makes this set cheerful, while nude negative space keeps the detailed nails from becoming crowded. Slim white outlines trace the curved green sections, creating crisp waves across the short oval nails. Two accent nails take a different direction with miniature floral artwork surrounded by ornate gold toned frames.
How to recreate the balance:
- Cover a few nails with solid lime green.
- Paint curved green sections over a sheer nude base, then outline them in white.
- Reserve two nails for the framed floral details.
Use the cameo style accents sparingly. Their ornate shape already attracts attention, so the remaining nails only need clean color blocks and flowing lines. That contrast gives these white and green nails an artistic character with a vintage influence.
Alternate solid green nails with open nude sections.
Keep the white outlines slim and consistent.
Avoid placing ornate framed details on every nail.
Do not mix in extra colors that compete with the green.
3. Trace Milky White Square Nails With Lime Green
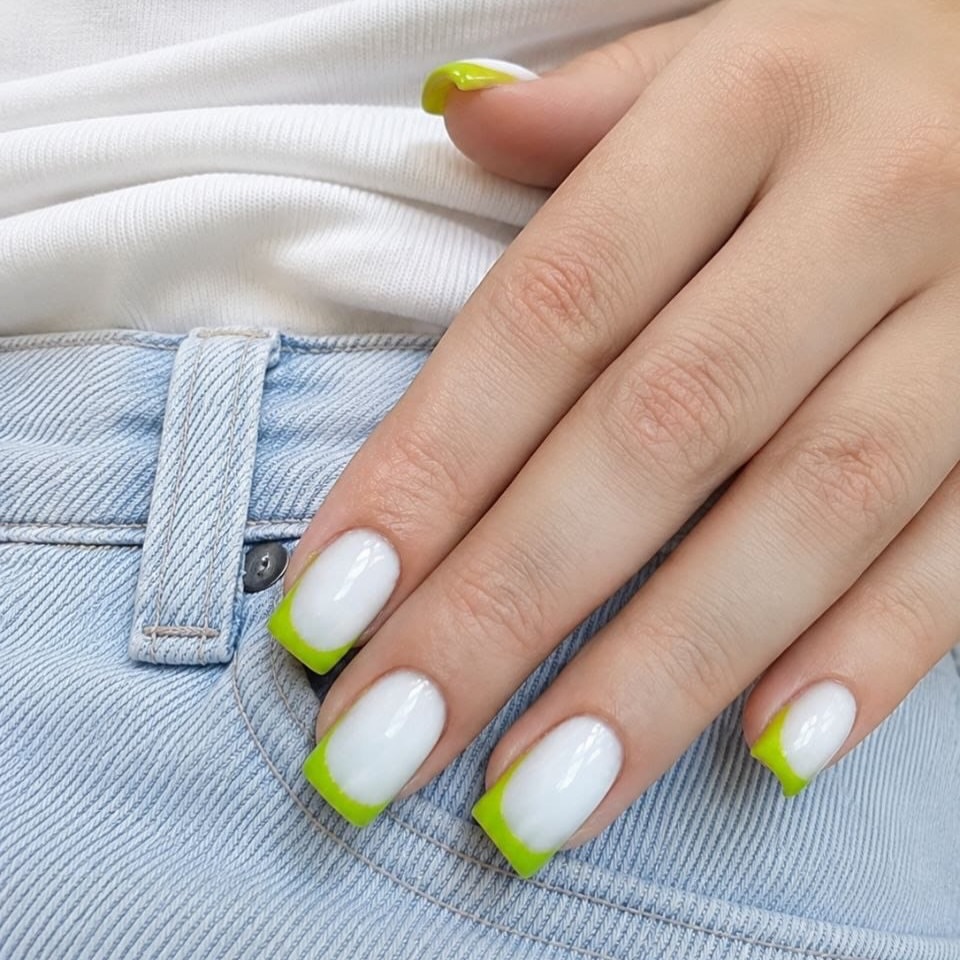
Lime green appears only around the outer edges, allowing the milky white centers to remain the main feature. On these medium square nails, the bright color follows the sides and flat tips like a loose frame. The placement feels graphic and fresh without needing patterns, gems, or detailed artwork.
Begin with an opaque white base, then add the green border after the center color is even. Keep most of the lime near the tips and lower sides so the white sections still look spacious. The slightly irregular outline gives these white and green nails a relaxed finish instead of making them feel overly strict.
💡 Keep the border balanced
Paint the white center first. Add lime along the sides and flat tip with a slim brush, leaving enough white visible to preserve the bold contrast.
If you want even more fresh seasonal color ideas, these 17 Spring Green Nails are full of soft shades, floral details, and cheerful manicure inspiration.
4. Layer Sage and White Waves Over a Sheer Nude Base
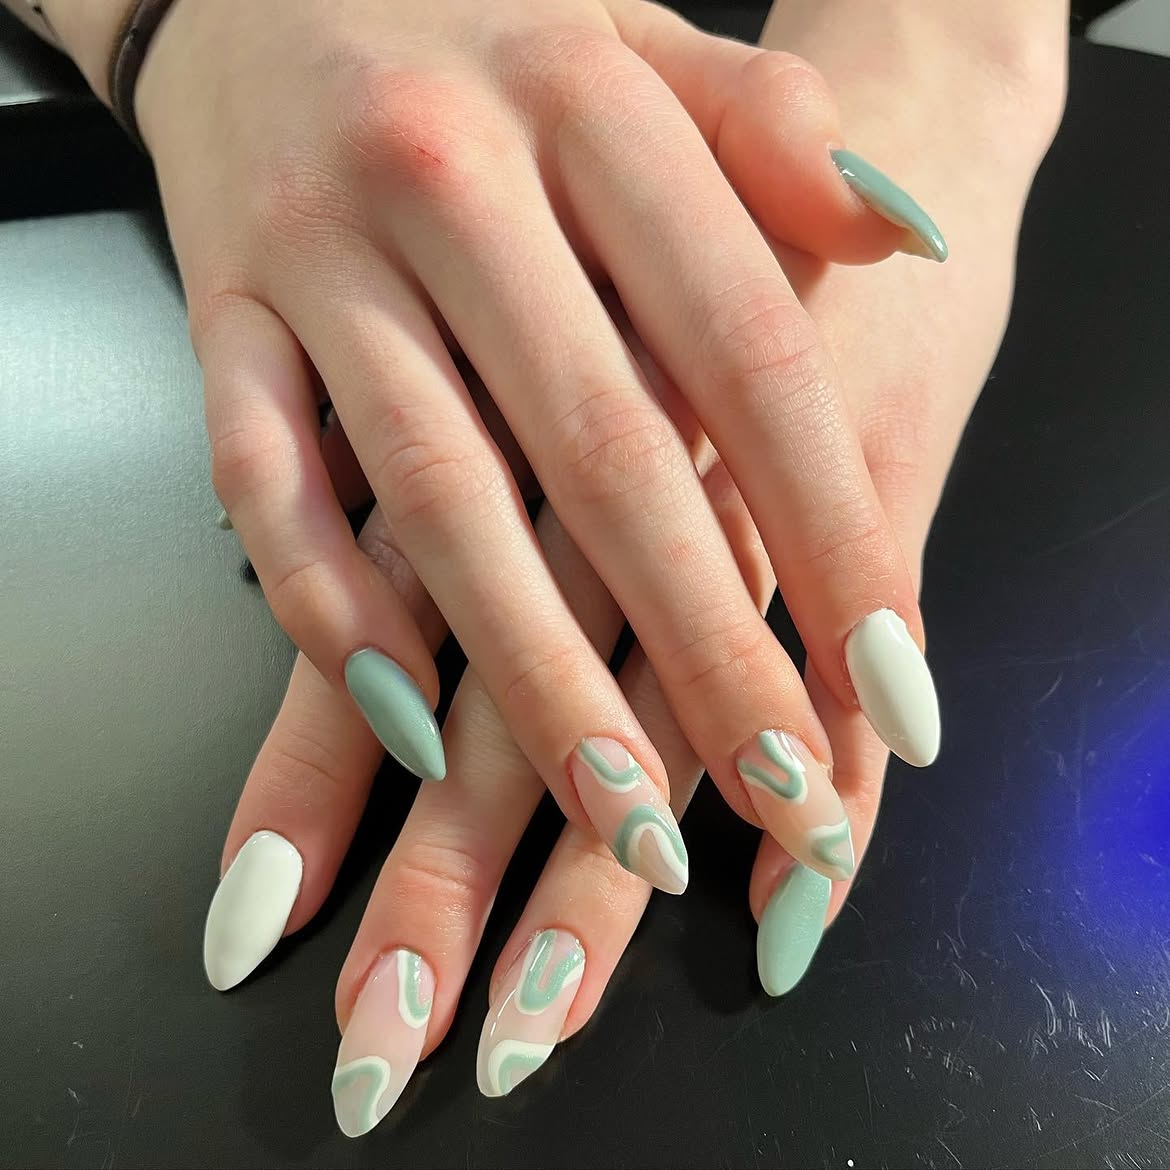
Rather than repeating one motif across every finger, this manicure gives each color a separate role.
Solid sage: Soft green nails ground the palette and bring calm color to the set.
Cream white: Plain white nails create breathing room between the patterned sections.
Sheer accents: Curved sage and white lines move across the nude base in loose, irregular shapes.
The long almond form gives the waves enough space to bend without looking crowded. Let the lines change direction from nail to nail, but keep their thickness fairly consistent. That small rule makes the abstract artwork feel connected. The mix of solid color and open space gives these white and green nails a smooth, modern rhythm.
| Solid nails | Wave accents |
|---|---|
| Add calm blocks of sage or cream white. | Bring movement to the sheer nude base. |
| Keep the finish smooth and glossy. | Vary the curves while keeping similar line widths. |
5. Pair Shimmering Sage With White Petals and Silver Stars
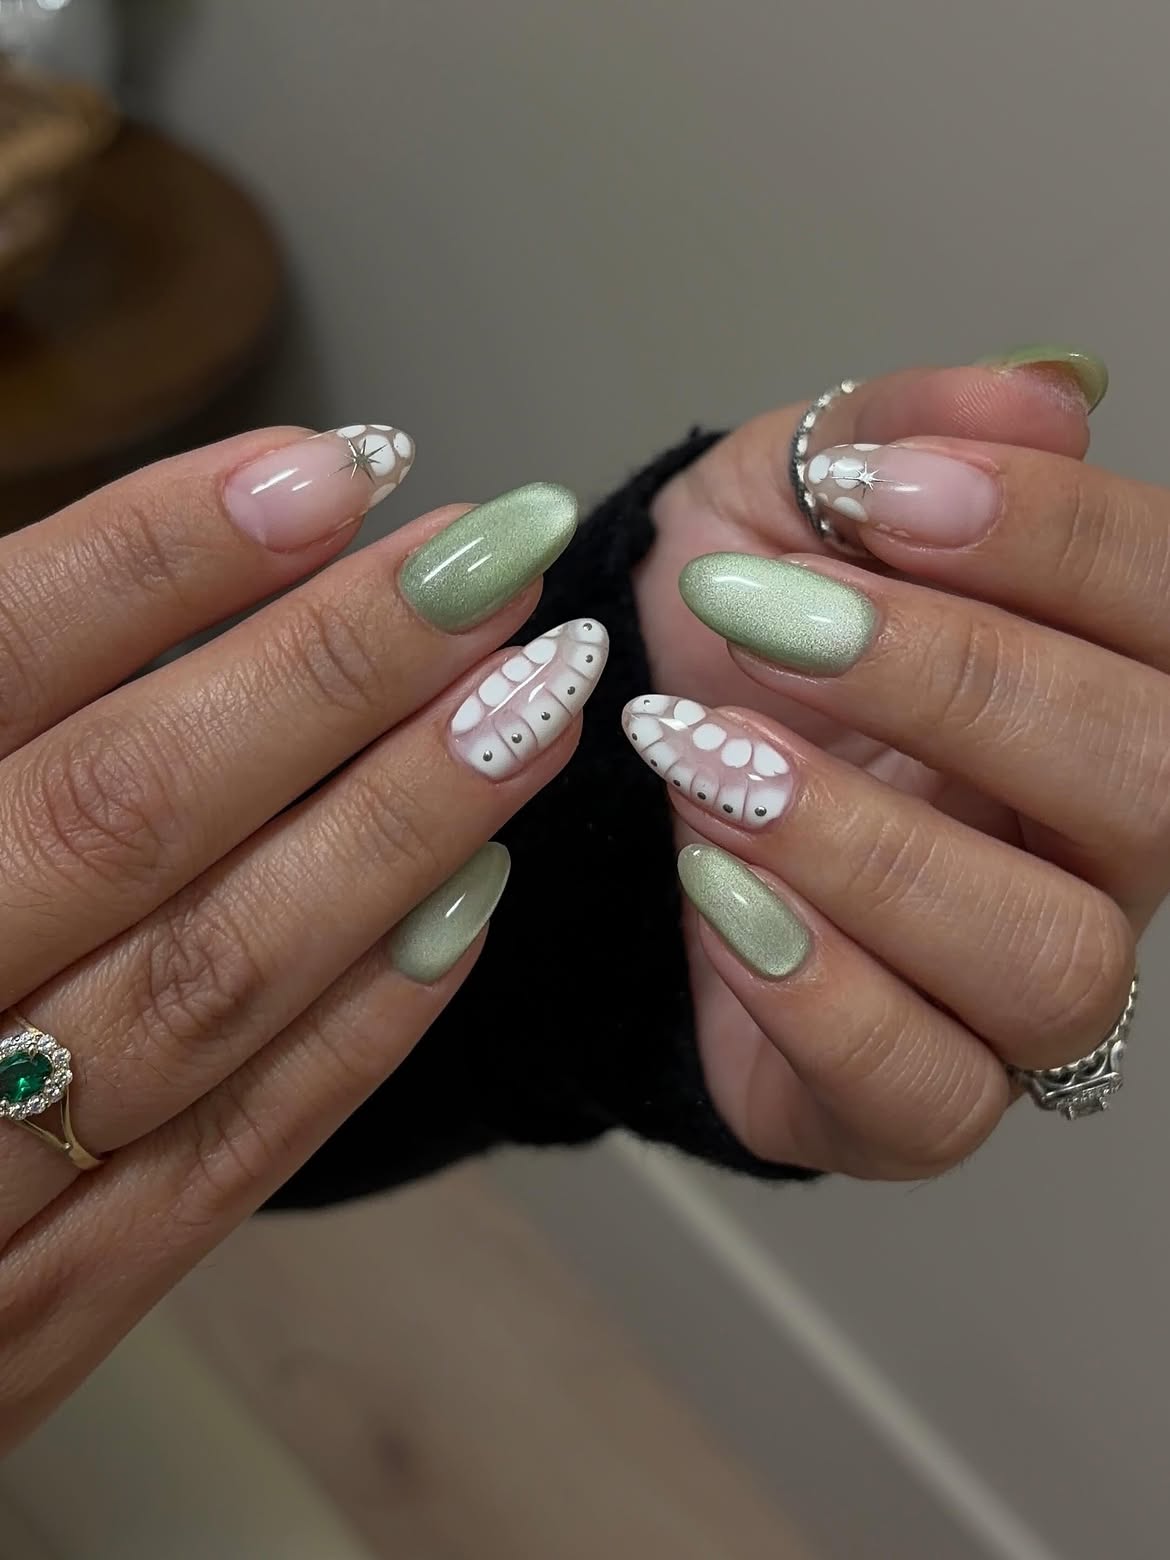
Soft shimmer gives the sage green polish a glowing finish that changes gently under the light. Instead of covering every nail with color, the manicure alternates these solid green sections with sheer nude accents. White petal shapes curve around the tips and edges, while tiny silver toned dots and starbursts add crisp points of shine.
Leave most of the nude base uncovered so the white artwork stays light and detailed. The petal rows can follow the natural curve of the nail rather than forming a straight French tip. Use the metallic pieces in small amounts, placing them near selected petals. This keeps the white and green nails delicate while allowing the shimmer and celestial details to remain visible.
Shimmering sage provides the glow, while open nude areas keep the white petals, silver dots, and tiny stars easy to see.
6. Reverse Deep Green and Cream With Single Dot Accents
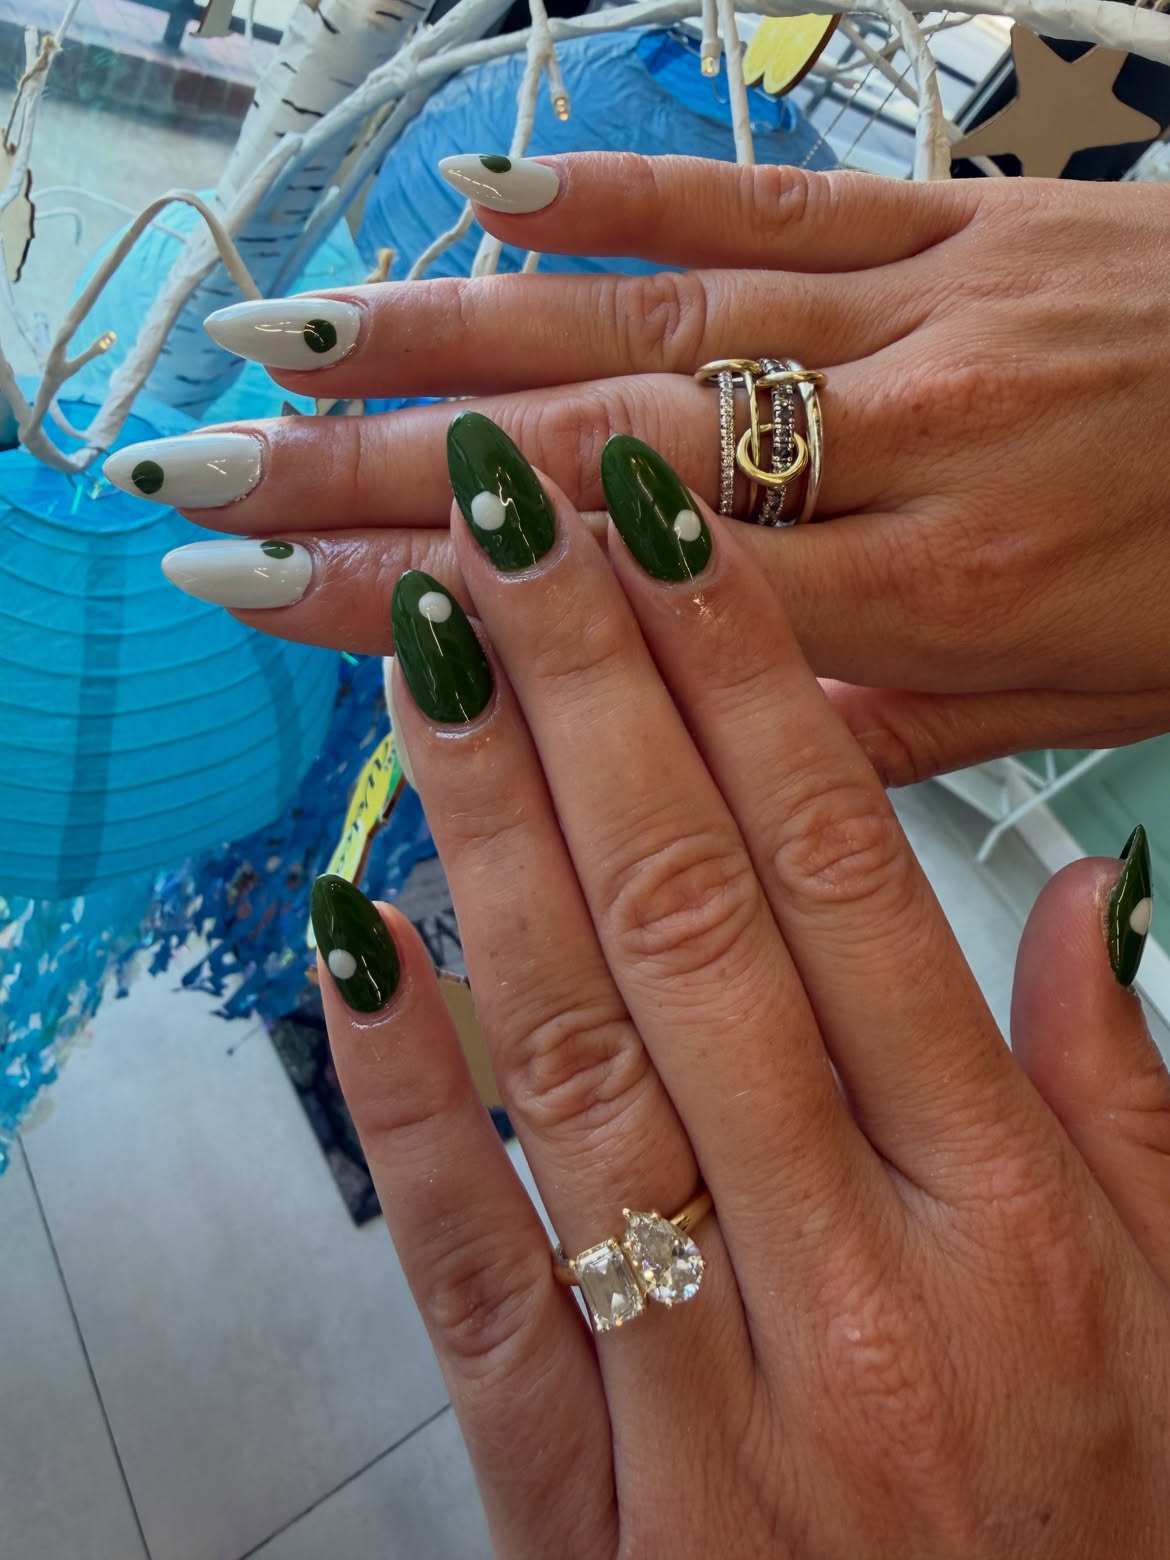
One round dot gives this two color manicure its entire direction. The long almond nails alternate between deep forest green and creamy white, then repeat the opposite shade as a simple circular accent.
On the green nails: A white dot creates a bright focal point against the dark glossy base.
On the white nails: A green dot repeats the same idea with the colors reversed.
Keep the dots close in size and place them in a similar area on each nail. That repetition connects both hands even though their base colors are different. The clean shapes make these white and green nails bold, graphic, and easy to recognize without detailed artwork.
Use creamy white polish with one deep green dot.
Reverse the pairing with deep green polish and one white dot.
7. Use Vertical Sage Stripes on Short White Nails
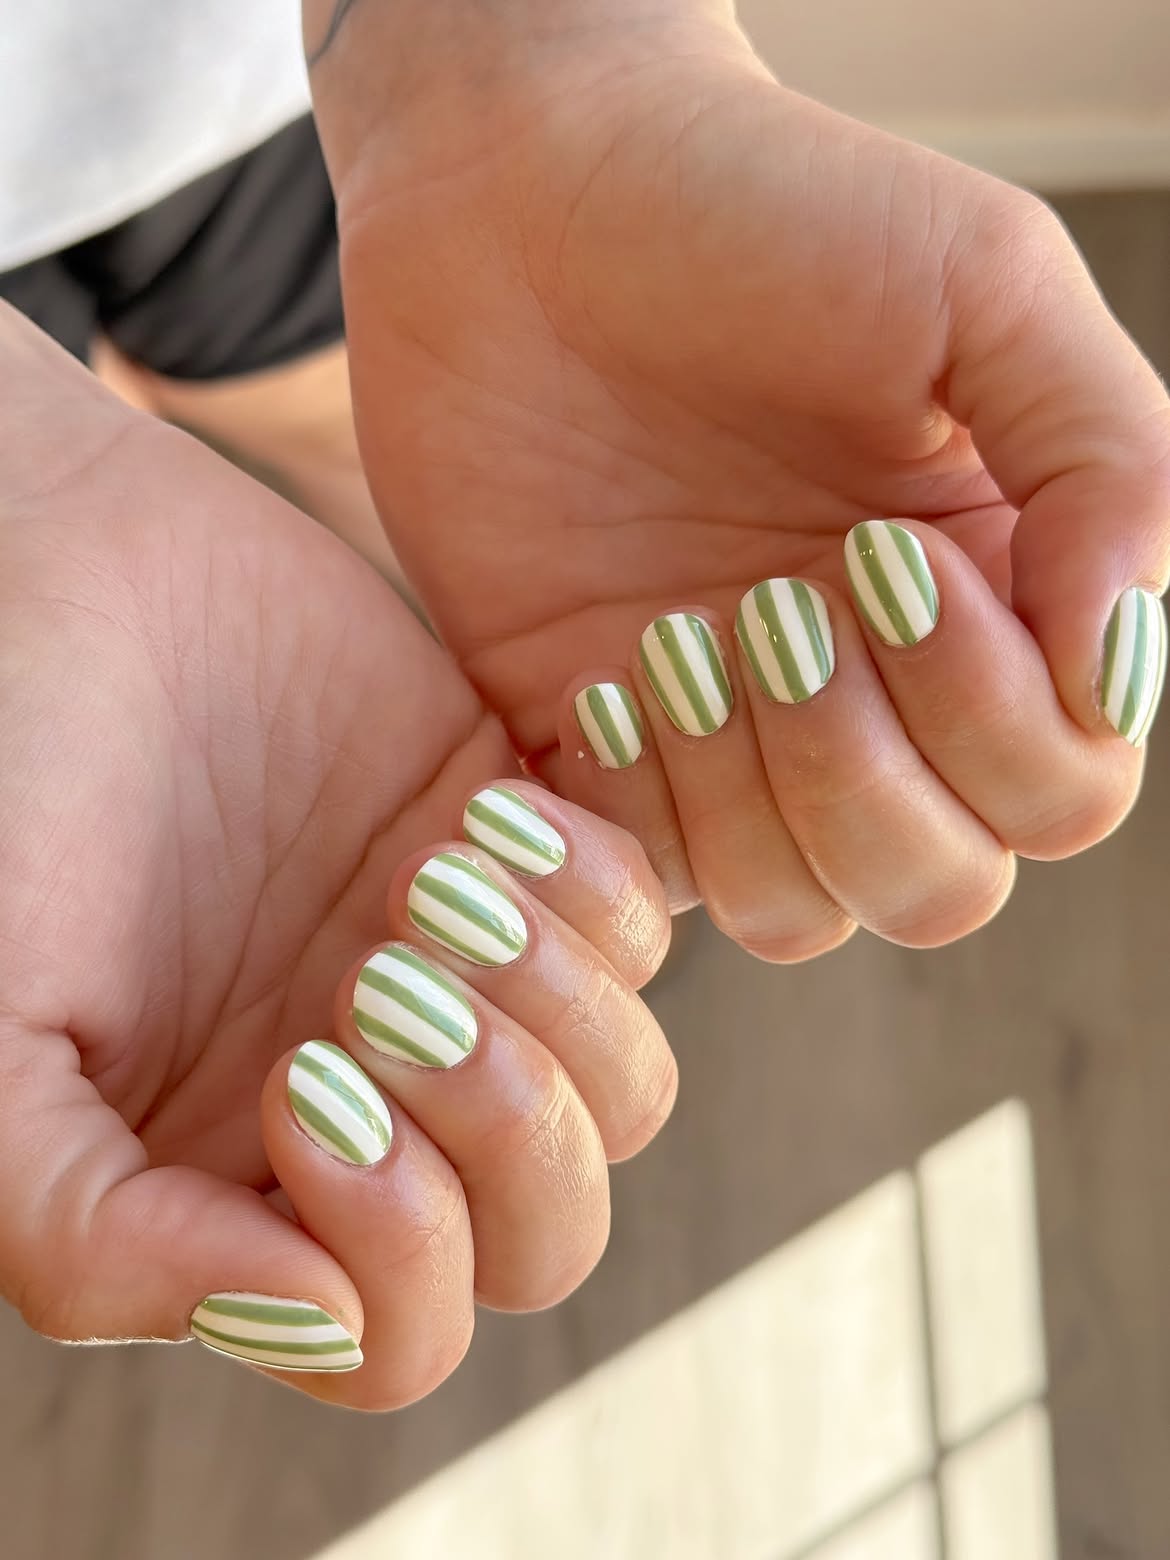
Crisp sage stripes give these short white nails a clean pattern without covering the bright base. Each green line follows the length of the nail, creating a steady rhythm across both hands. The rounded square shape keeps the design neat and practical.
Begin with a smooth white base, then paint slim green lines from the cuticle area toward the tip. Leave visible white space between every stripe so the two colors stay balanced. The lines do not need to match with mechanical precision. Slight changes in width give the manicure the relaxed, hand painted character visible in the reference. A glossy top layer brings the simple pattern together.
Apply an even white base across every nail.
Draw sage lines along the length of each nail.
Seal the stripes with a clear glossy finish.
8. Add Gold Leaf and Marble Details to Forest Green Nails
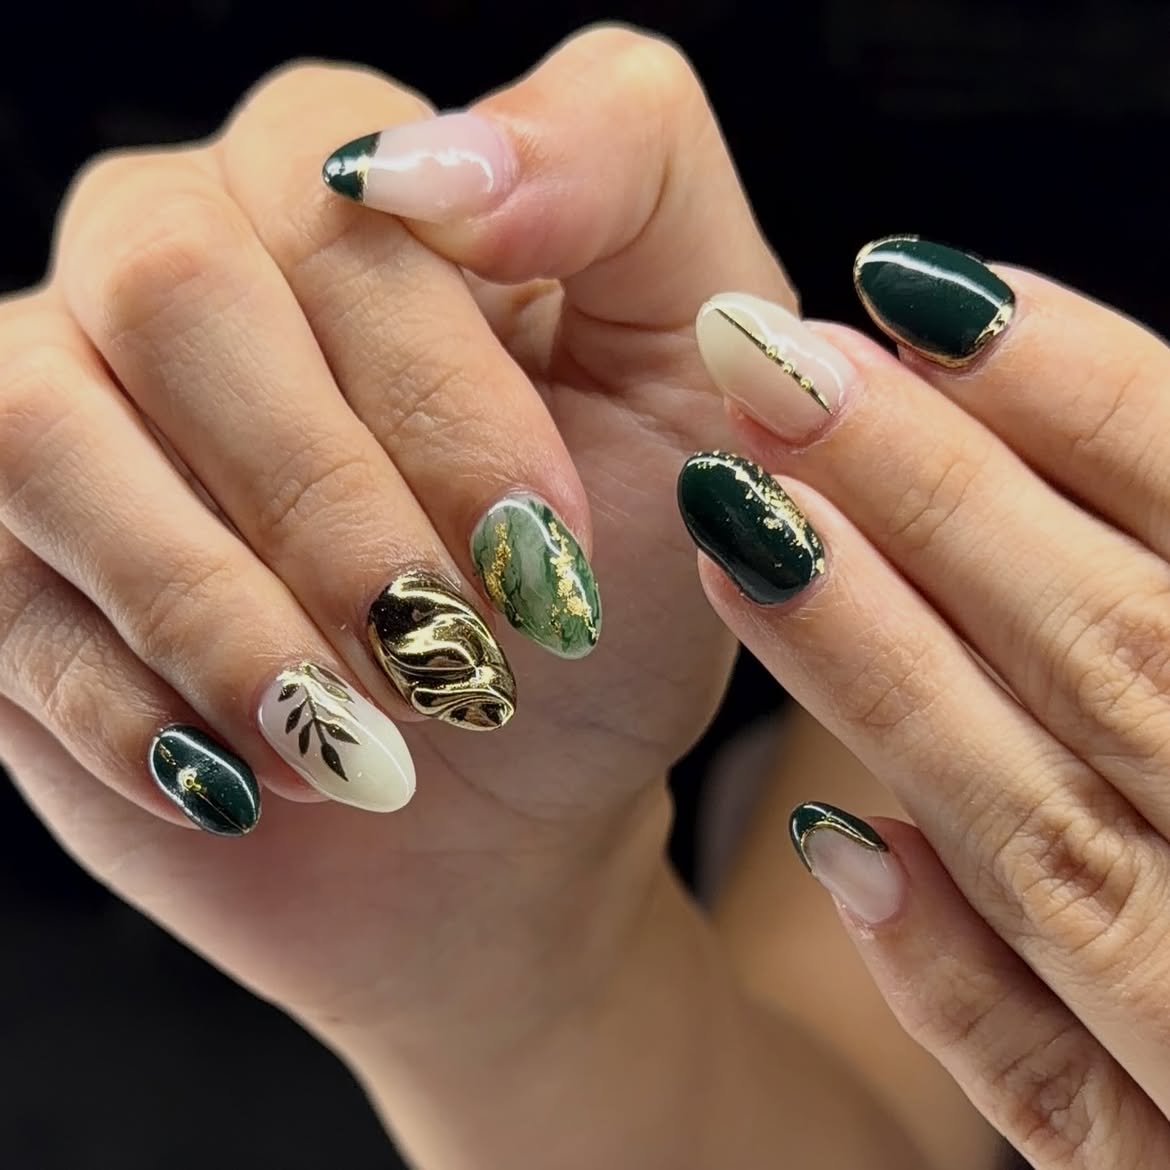
Gold acts as the connecting thread across this detailed manicure. The nails do not repeat one pattern, but the shared colors make every accent feel related.
- Deep forest green creates the dark, glossy foundation.
- Creamy white supports a delicate botanical branch.
- Cloudy sage green carries a marbled effect with scattered gold details.
- A dark accent nail uses flowing metallic lines for stronger contrast.
Since every decorated nail has its own character, repeat the solid green shade across the set to prevent the design from feeling crowded. Keep the gold mainly along borders, veins, and selected curves. These controlled metallic details connect the cream and green sections while preserving the layered look of the original manicure.
Build the layered finish
9. Build a Pistachio Botanical Set With White Leaves and Gold Edges
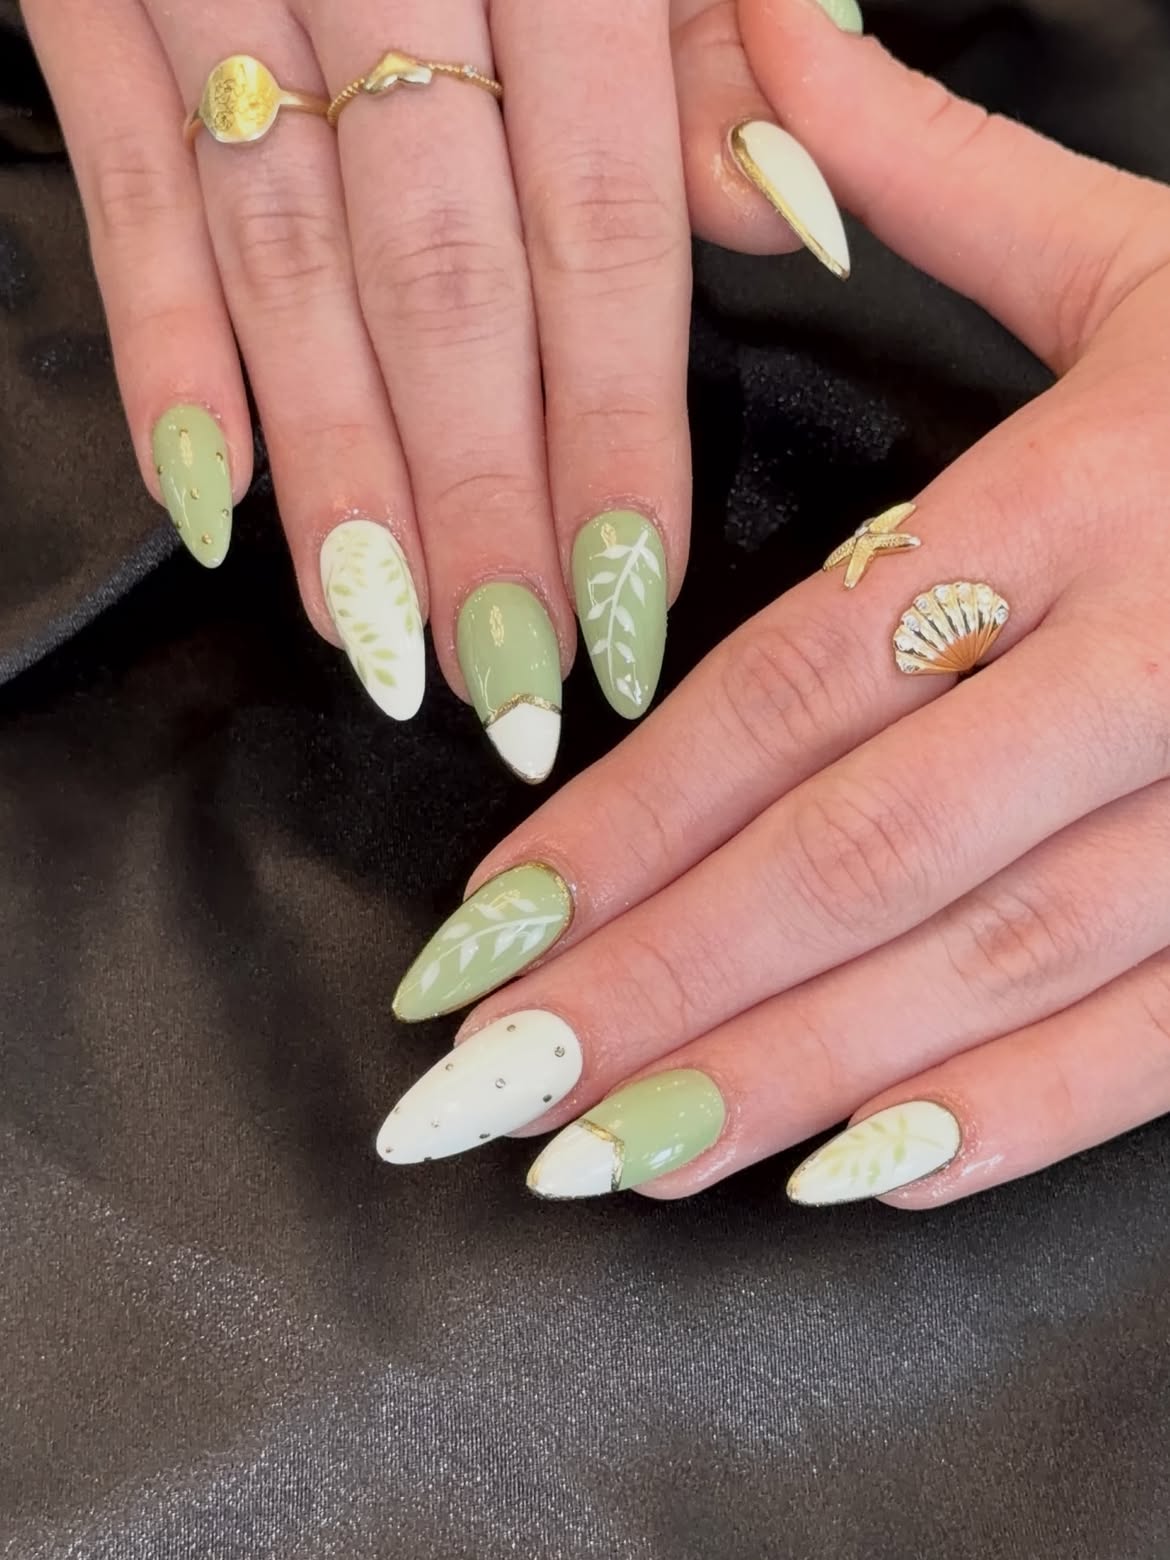
Pale pistachio green gives this manicure a softer botanical direction. White leafy branches stretch across several green nails, while other accents reverse the palette with faint green sprigs over creamy white. A few nails divide the two colors into curved tip sections joined by fine gold outlines.
- Vary the placement of the branches instead of introducing unrelated patterns.
- Some can rise from the cuticle area, while others can follow the side or tip.
- Repeating the same narrow leaves keeps the full set connected.
Small gold flecks and slim metallic borders bring the green and white sections together without hiding the painted foliage. The long almond shape gives each branch enough room to remain clear.
For more muted green inspiration, 16 Matcha Green Nails brings together cozy shades, clean details, and stylish looks for your next manicure.
10. Outline Pale Green French Tips With Flowing Gold
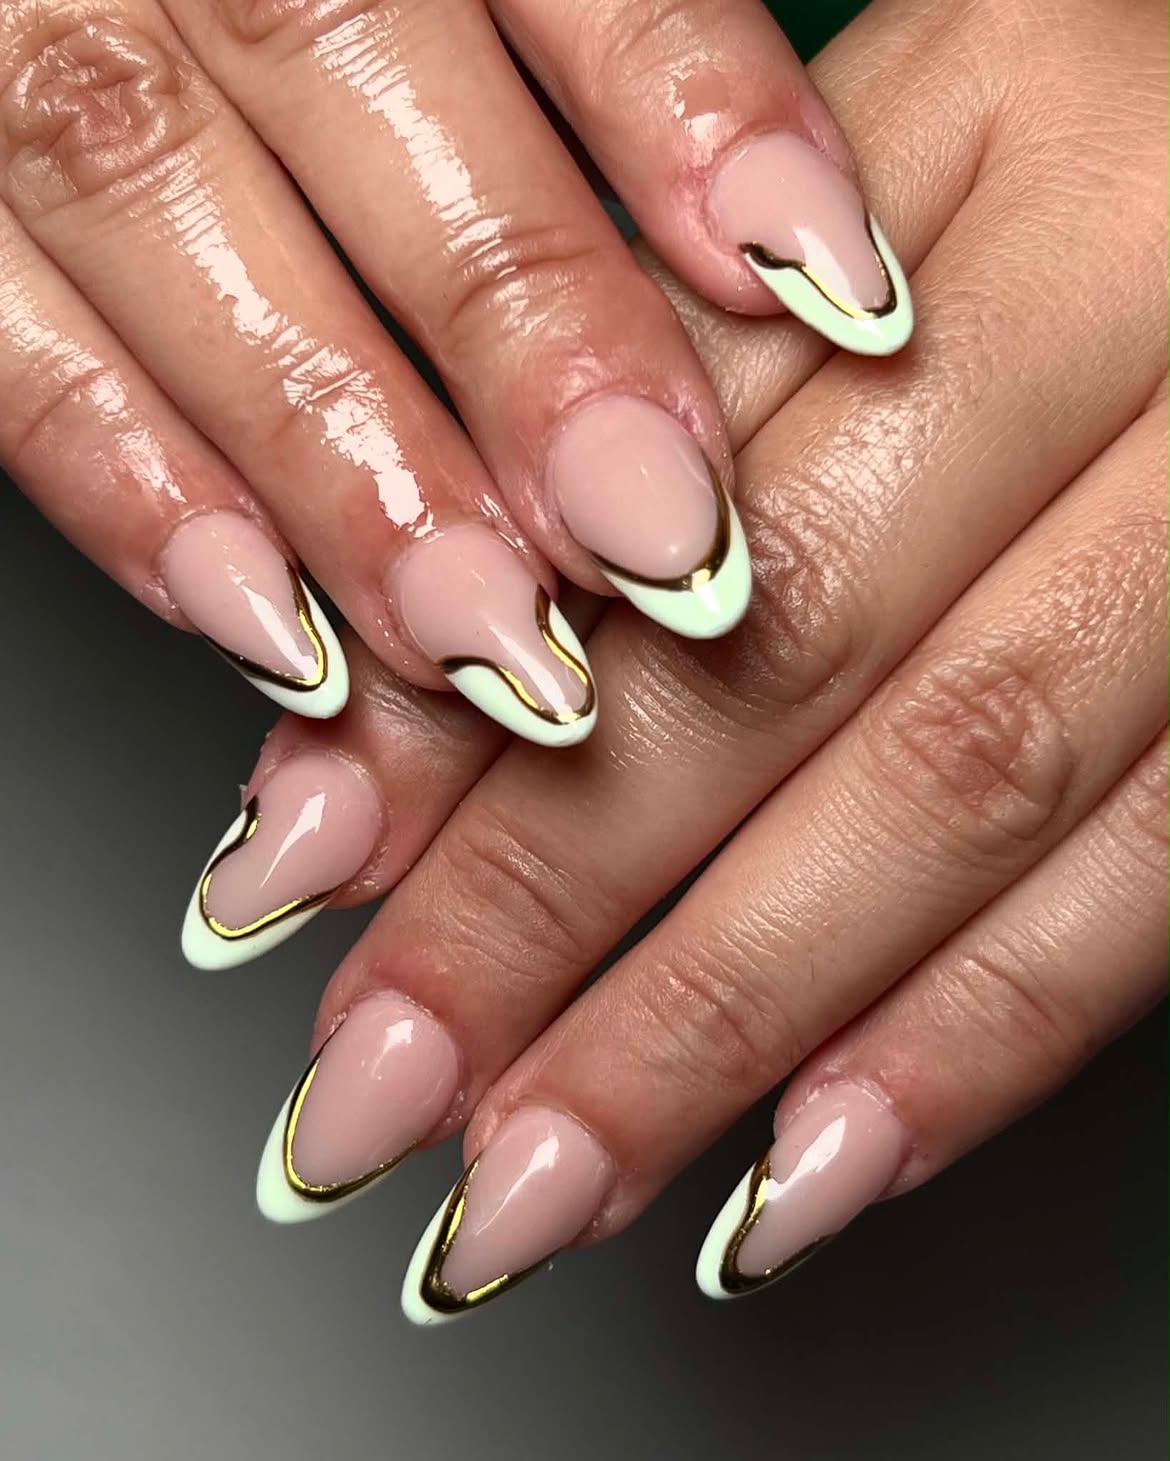
A thin gold border gives this pale green French manicure a more sculptural finish. The glossy blush base remains visible across most of each almond nail, while creamy mint color gathers around the tips. Instead of using one identical smile line, the metallic outline rises and dips in a different place on every finger.
Paint the green tips first, then trace their inner edges with gold. Allow a few curves to lean toward one side so the pattern feels fluid. Keep the gold narrow where it meets the nude base and slightly fuller around selected corners. Repeating the same three colors makes the changing shapes feel deliberate and connected.
- ▸ Begin with a glossy blush base that remains visible.
- ▸ Shape the pale green tips with softly changing curves.
- ▸ Trace the inner edge with a fine gold line for definition.
11. Draw Emerald Crosses and Waves Over a White Base
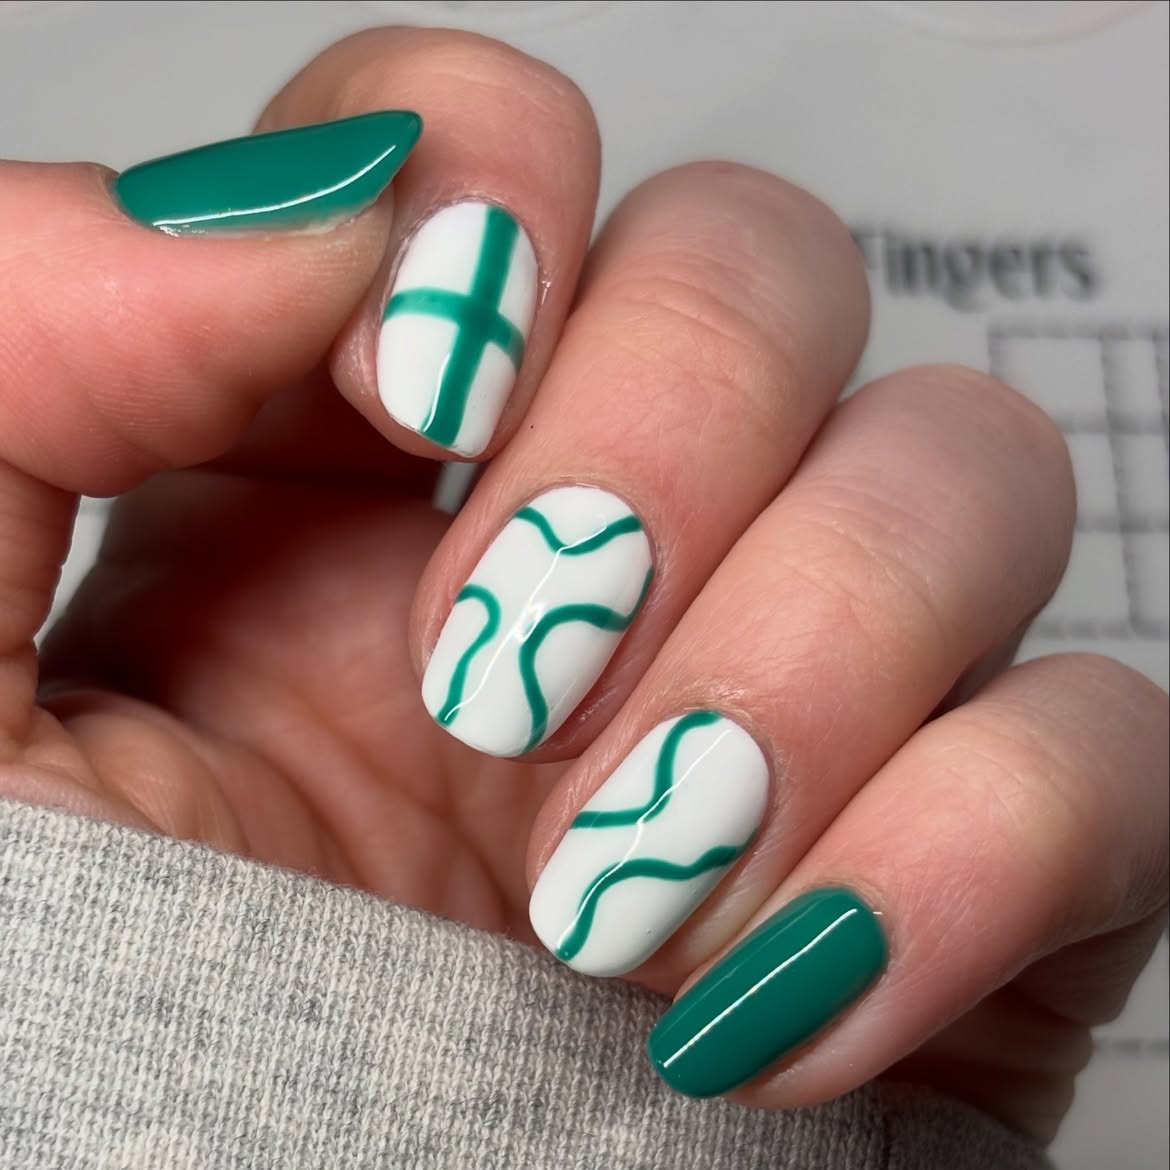
Saturated emerald polish gives this manicure a strong frame, while the white accent nails carry loose green linework. One nail uses a wide cross shape, and the others feature broad curves that bend in different directions. The glossy finish keeps both the solid and patterned sections equally crisp.
Use the same emerald shade for every solid nail and painted line. Change the layout instead of changing the color. Keeping the line thickness fairly close helps the cross and waves feel like parts of one collection. Place the solid green nails around the patterned center to prevent the white and green design from becoming too busy.
12. Mix Glossy Sage With Blush Accents and Gold Speckles
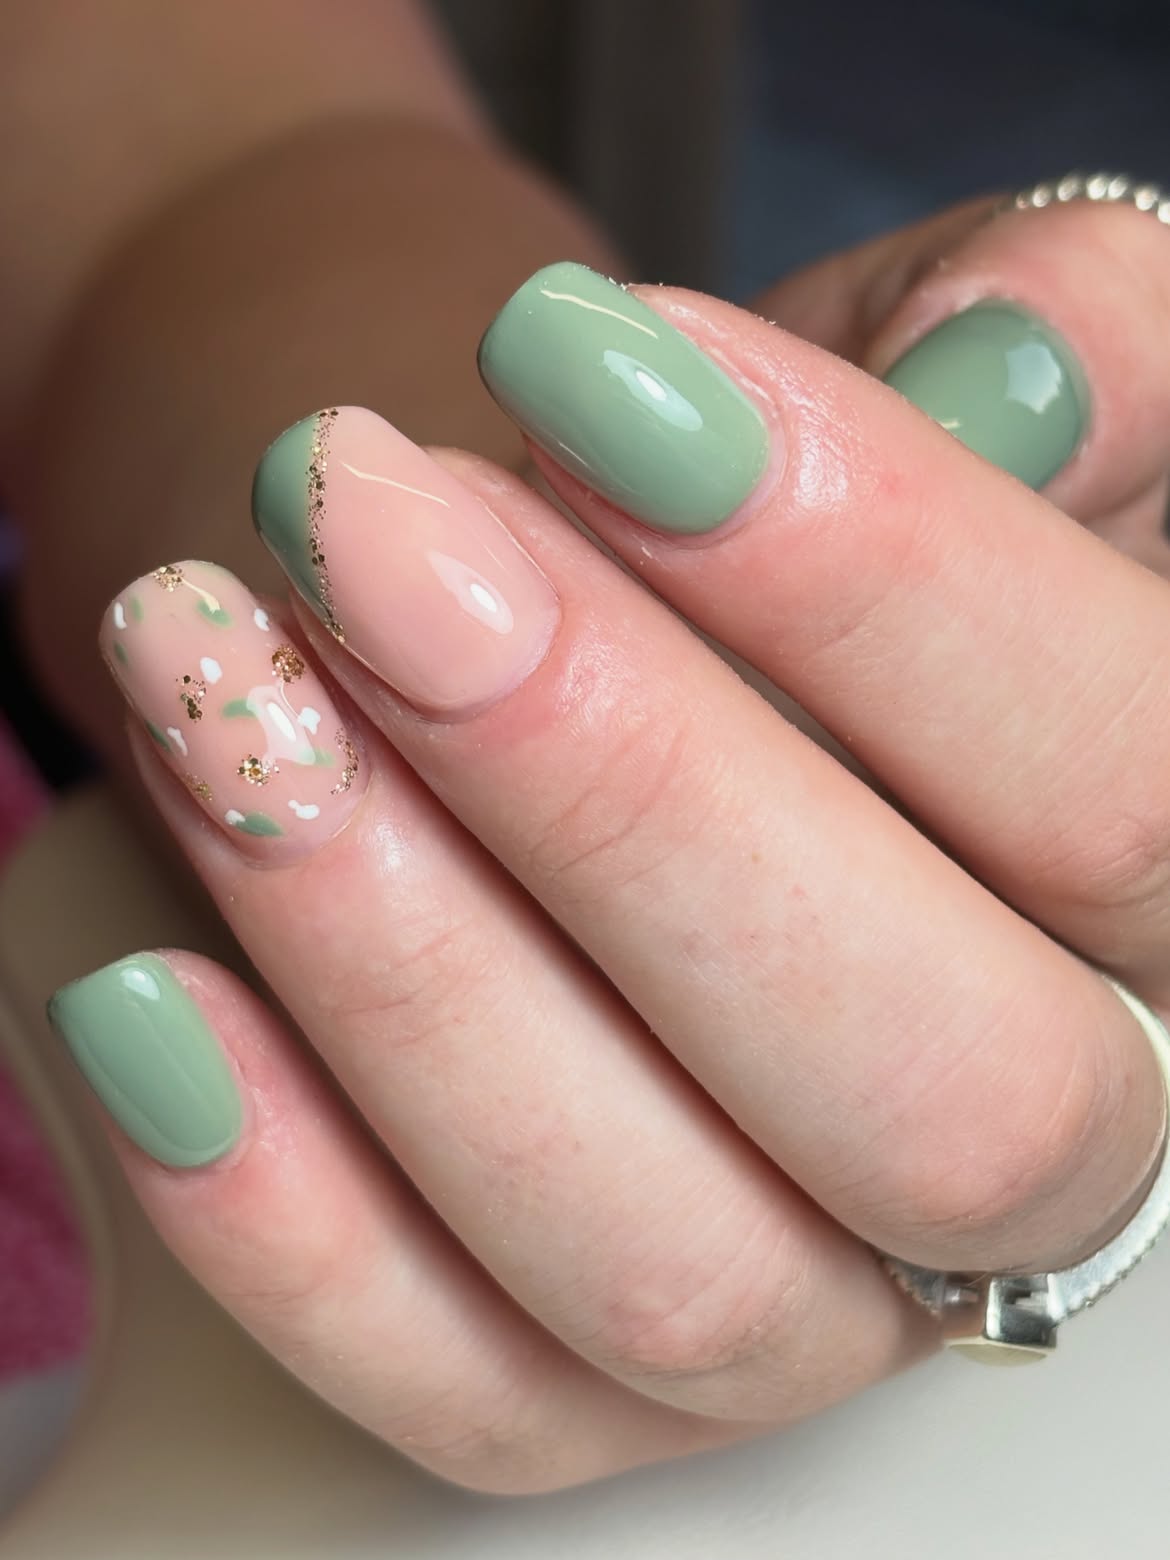
Soft sage green covers most of this short manicure, creating a smooth base for two delicate blush accent nails. The decoration stays small, allowing the glossy color and rounded square shape to remain easy to see.
- Solid sage nails anchor the full set.
- One blush nail has a curved green side section edged with fine gold speckles.
- Another blush nail carries scattered white and green marks with small gold details.
- Repeating the same sage shade keeps the mixed accents connected.
Limit the detailed artwork to one or two neighboring nails. This placement creates a clear focal area while the solid nails provide enough calm space around it.
Use solid sage on most nails.
Place the gold in narrow lines and small clusters.
Do not decorate every nail with scattered shapes.
Skip extra colors that compete with sage and blush.
13. Scatter White Daisies Across Glossy Green Square Nails
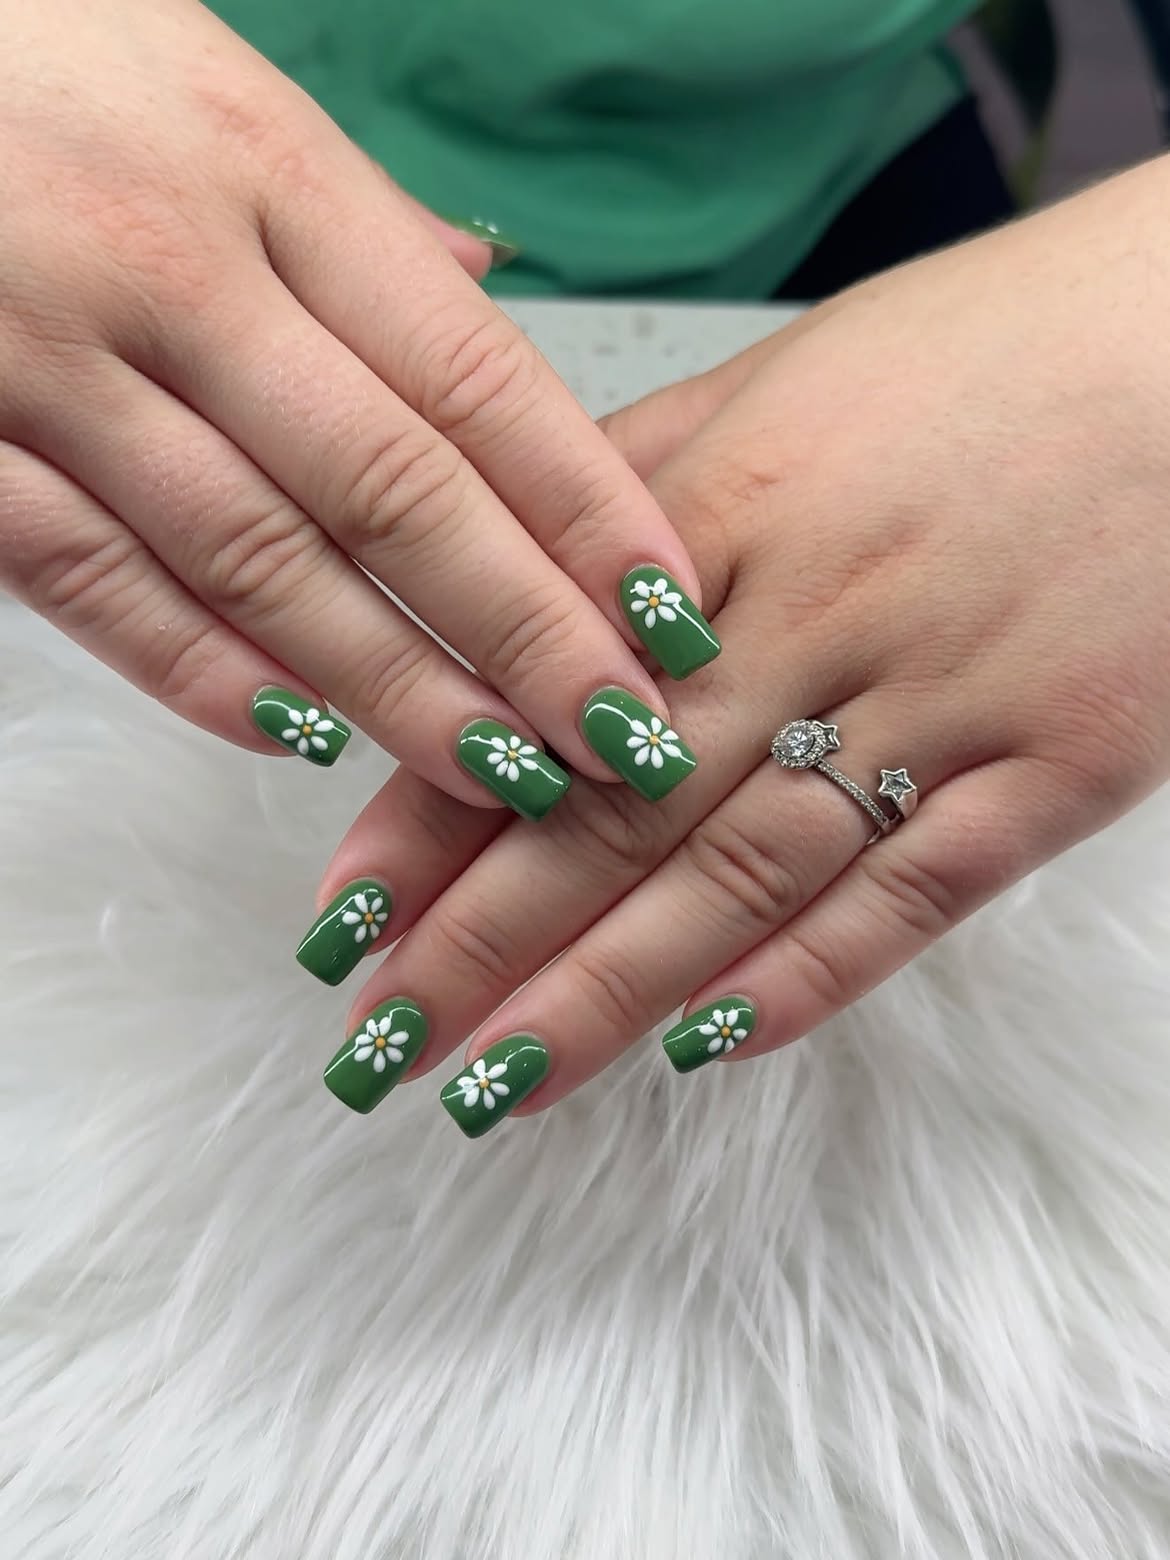
White daisies stand out clearly against the smooth medium green base. Each short square nail carries a simple flower with white petals and a warm yellow center, but the placement changes from finger to finger. Some blooms sit near a side, while others appear closer to the tip or center.
Paint the full green base first, then build each flower around one small yellow dot. Keep the petal shape similar across the set while shifting the position of every bloom. This change prevents the repeated motif from looking rigid. A glossy finish strengthens the contrast and keeps the white details clear against the green polish.
Repeating the same white flower creates unity, while changing its position keeps every green nail visually distinct.
14. Alternate Mint Studded Tips With Black and White Zebra Stripes
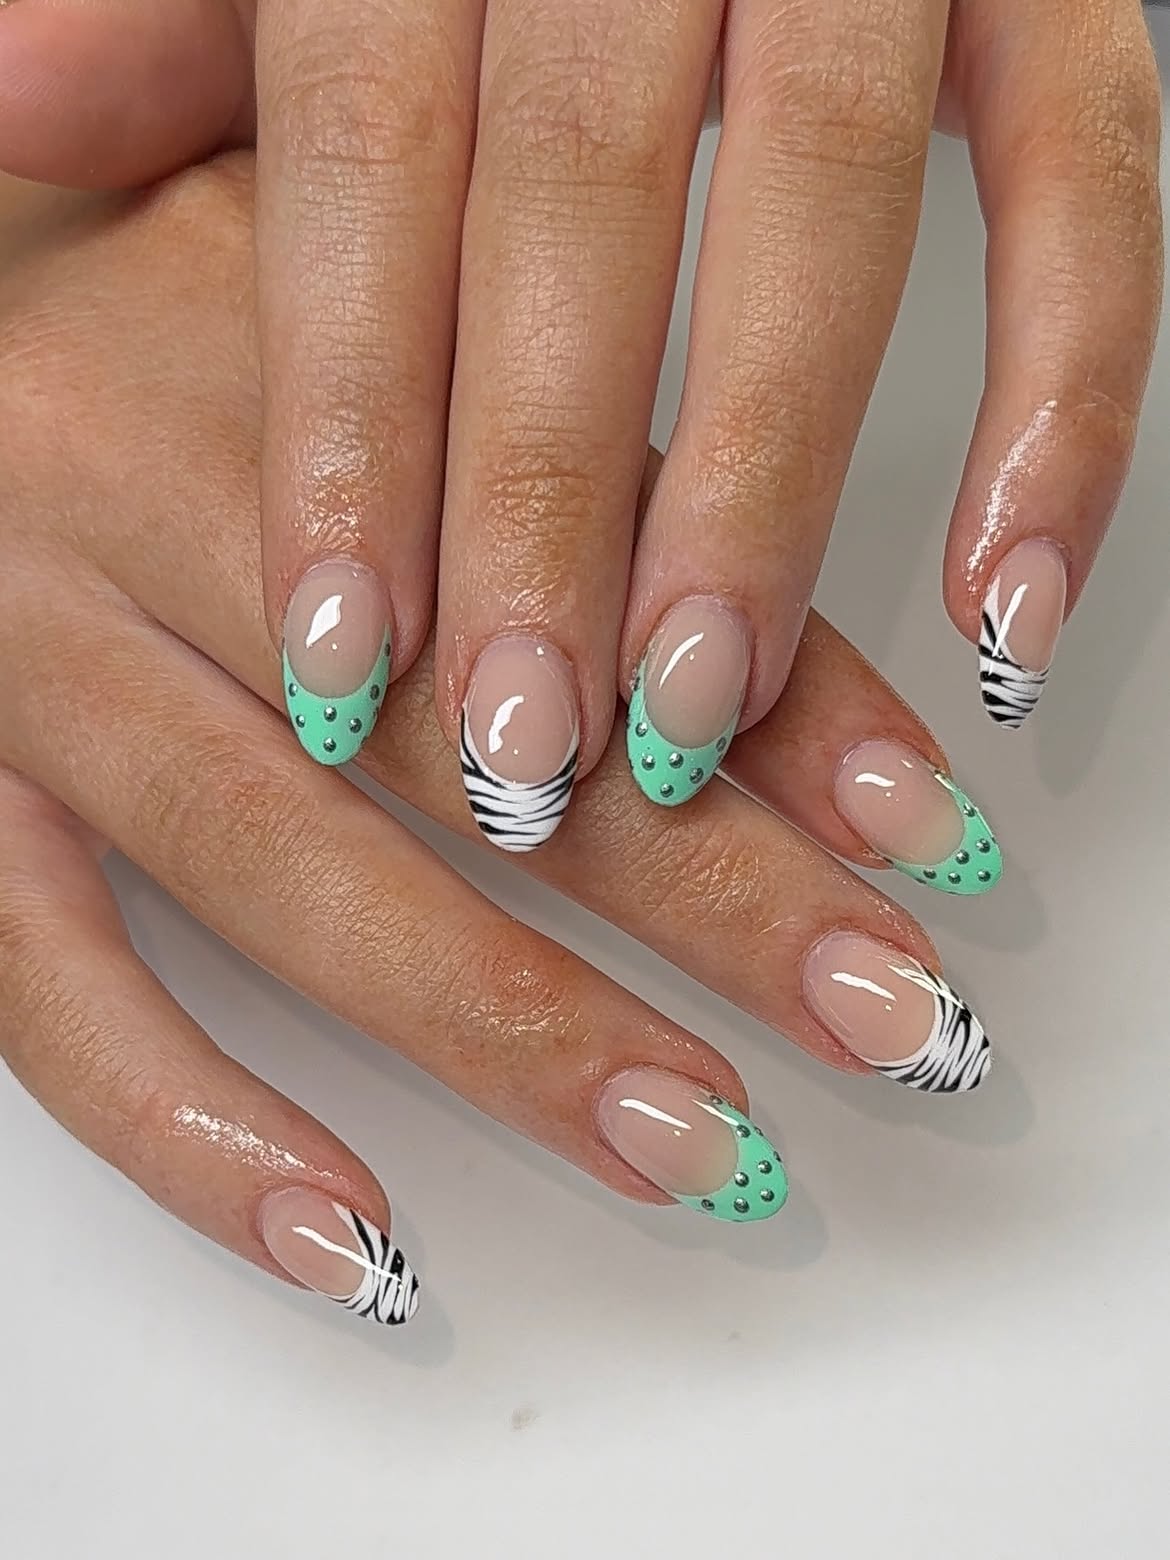
This manicure divides its French tips into two contrasting styles while keeping the glossy nude base consistent.
- Bright mint tips carry small silver toned studs.
- White tips feature narrow black zebra stripes.
- The green and patterned tips alternate across both hands.
- A similar tip depth helps the mixed designs feel connected.
- The almond shape gives the striped lines and stud placement enough room to remain visible.
Keep the mint sections smooth so they balance the busier animal pattern. On the zebra nails, vary the direction of the black lines rather than spacing them evenly. The contrast between polished green tips and graphic white accents gives the full set a playful but organized finish.
| Mint studded tips | Zebra stripe tips |
|---|---|
| Smooth green color creates a clean block. | Black lines bring movement to the white base. |
| Small metallic studs add controlled shine. | Changing stripe directions keep the pattern lively. |
| Best used on alternating nails. | Balanced by a plain glossy nude base. |
15. Pair Chartreuse Green With Raised White Flowers and Gold Beads
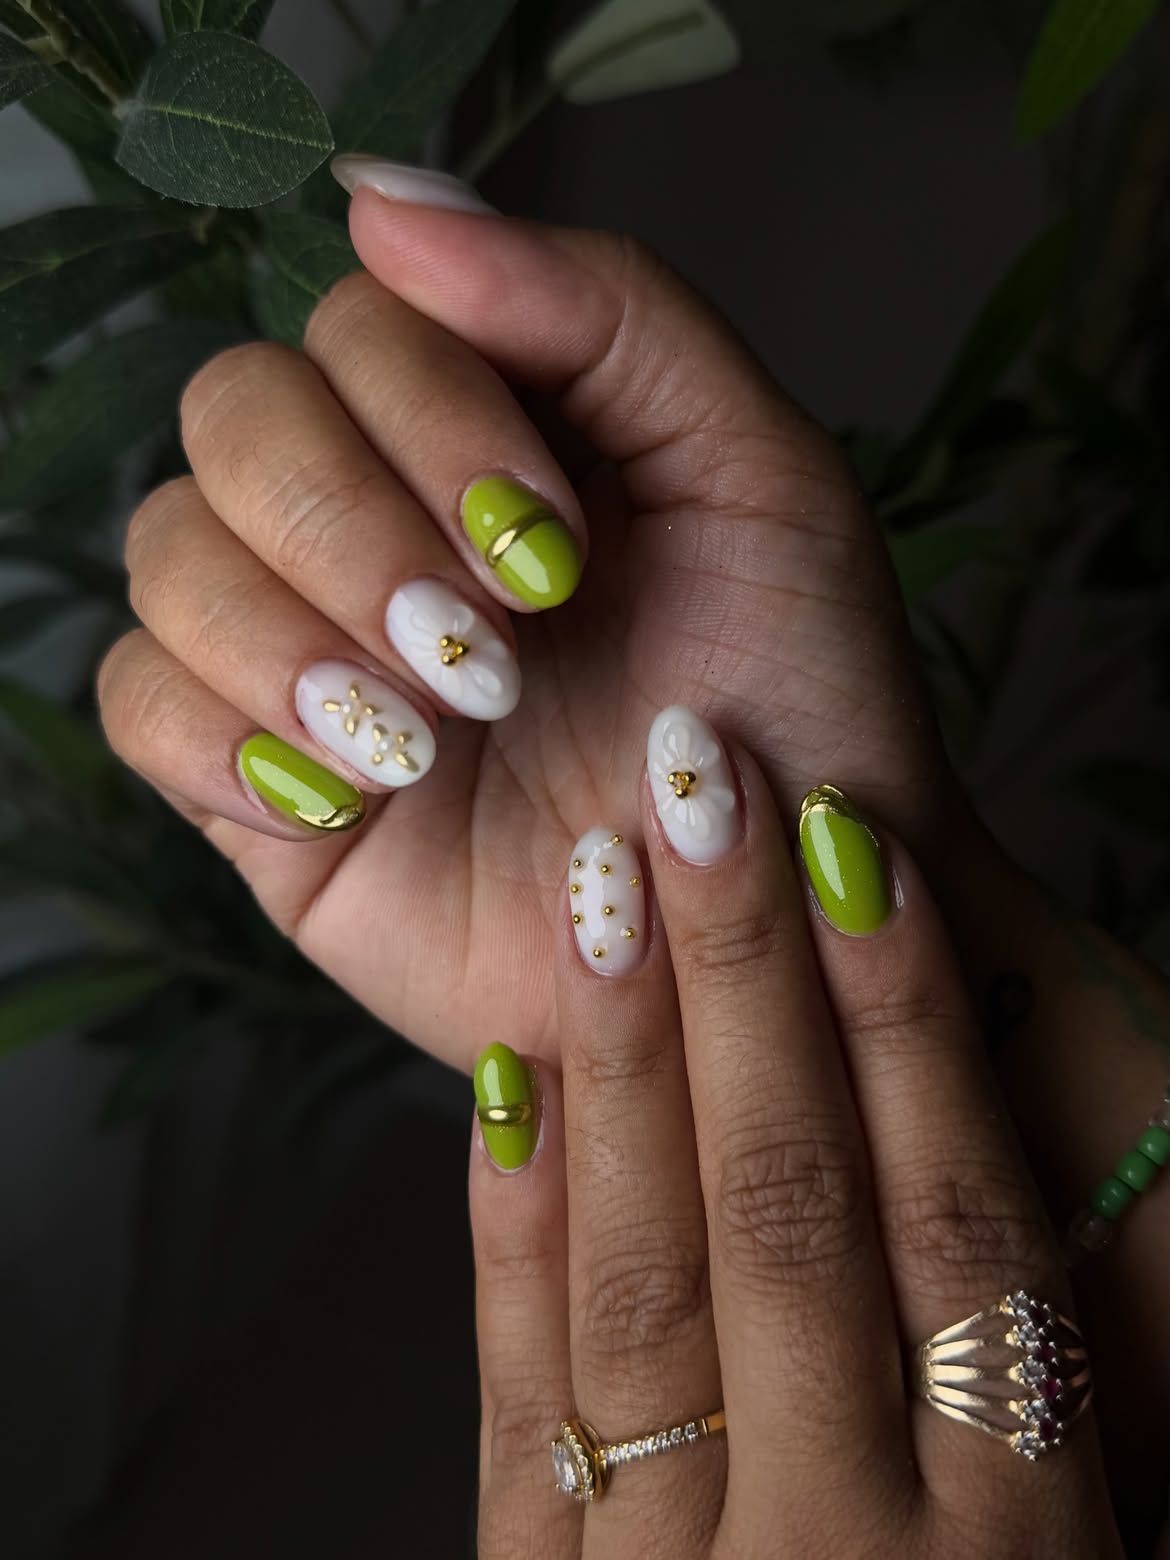
Vivid chartreuse polish gives this manicure a bright, glossy foundation. Curved gold bands cross selected green nails, creating smooth metallic breaks in the solid color. The white accent nails introduce texture through raised flower petals, small gold centers, and scattered bead details.
Gold appears in several forms, but each use stays compact.
- The curved bands define the green sections, the flower centers sharpen the white petals, and the small studs fill open areas without covering the base.
- Alternate the chartreuse and white nails so the raised artwork has space around it.
- This balance keeps the color energetic while allowing the floral texture and metallic accents to remain clear.
📌 Keep each accent focused
Use one curved gold band on the green nails, then reserve the raised petals and bead clusters for the white accents. Separating these details prevents the textured design from becoming crowded.
16. Pair Bright Mint With Silver Dots and a Star French Tip
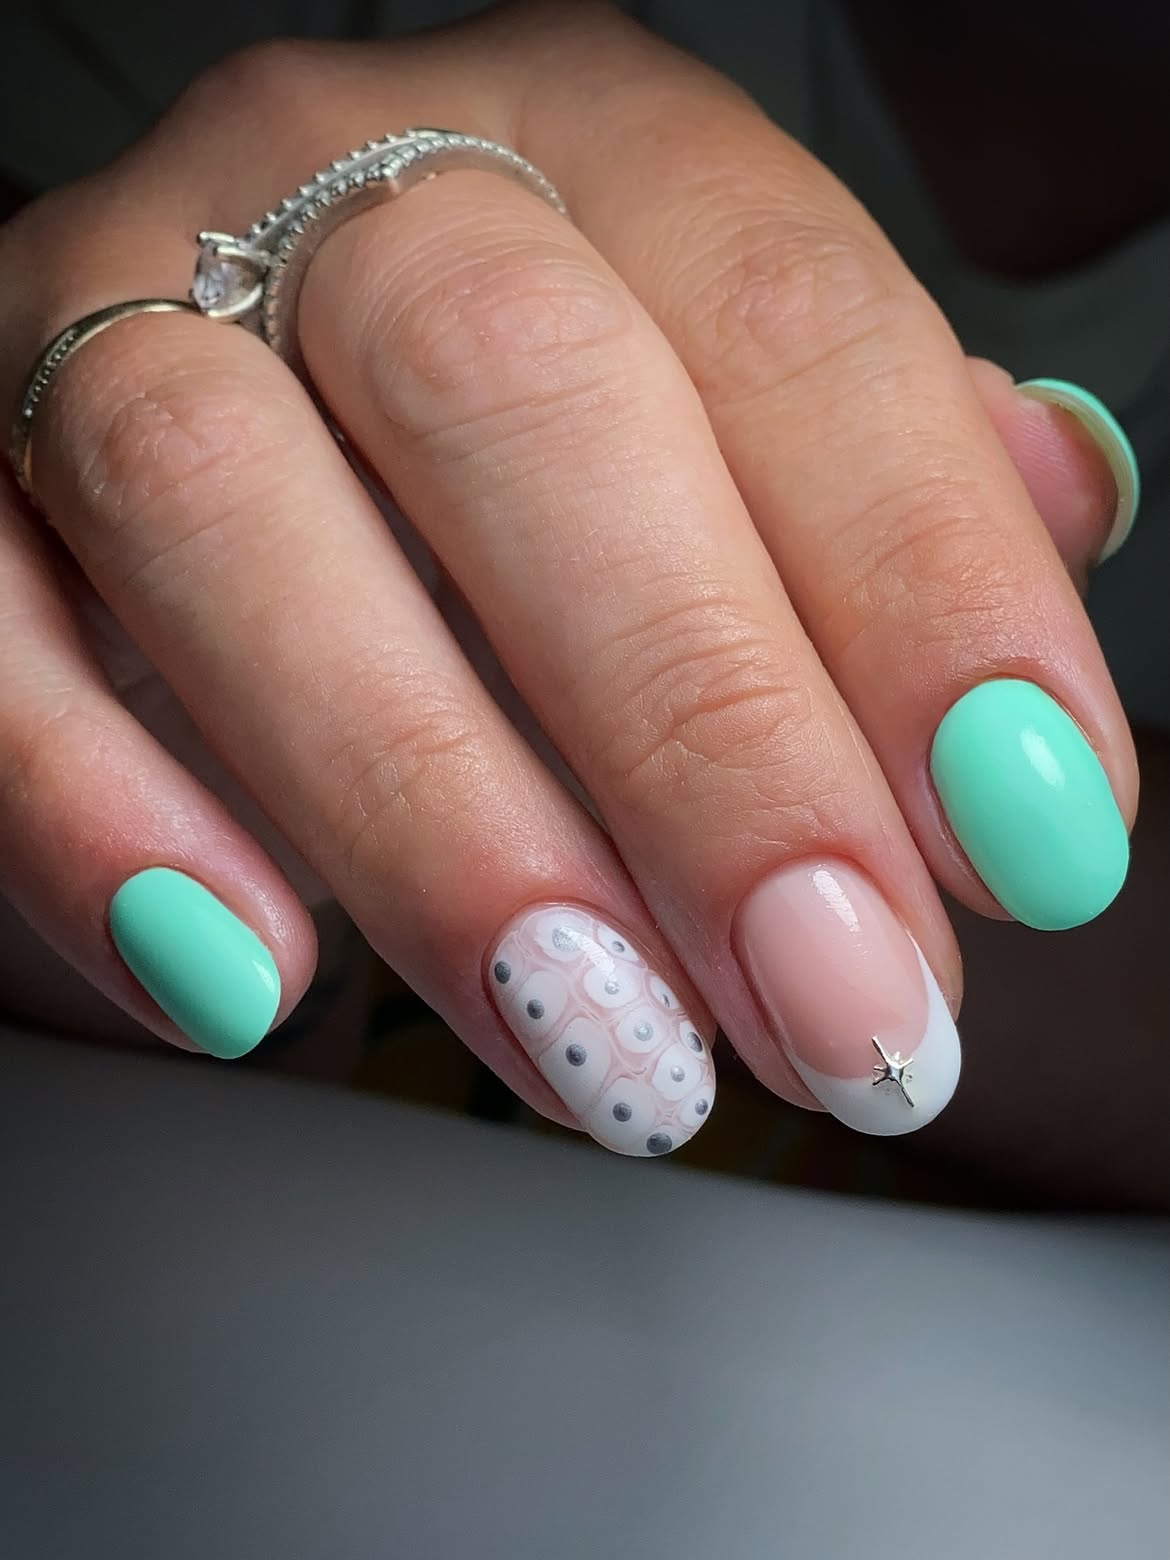
Glossy mint polish covers the outer nails, creating a vivid frame for two softer white accents. One accent nail uses overlapping pale shapes across a white base, with small silver dots placed inside the pattern. The other keeps a sheer blush center, adds a curved white French tip, and finishes with a small silver star.
Both accents use silver, but they handle it differently. The patterned nail spreads small points of shine across the surface, while the star creates one clear focal detail. Keep the surrounding mint nails plain and glossy so the decorative center remains easy to read on the short oval shape.
Overlapping pale shapes and small silver dots distribute detail across the white nail.
A clean white tip and one silver star create a simpler focal point beside the patterned nail.
17. Add Pistachio Dots and Tiny Florals to Blush Nails
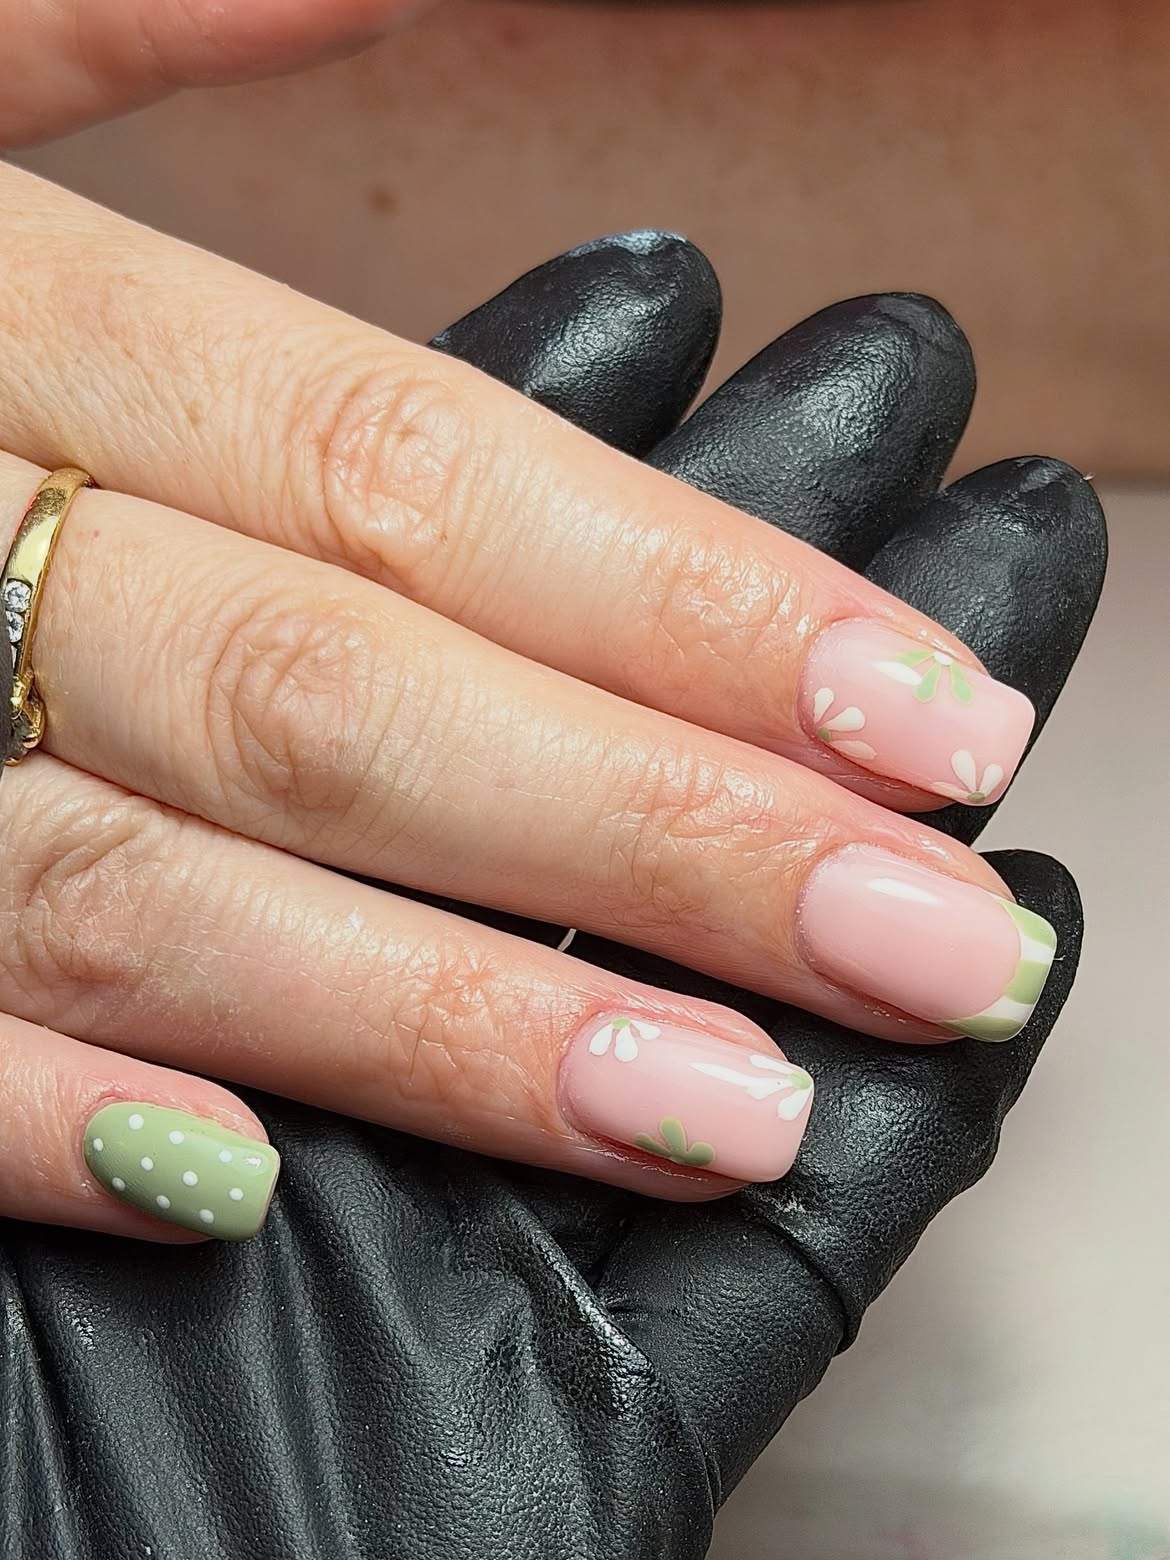
A milky blush base keeps this manicure soft, while pale pistachio details bring gentle contrast. Tiny white and green petal shapes sit near the corners and edges of several nails, leaving plenty of the pink base uncovered. One nail uses a curved green French tip, and another becomes a full pistachio accent covered with neat white dots.
Repeat the green shade in small ways across the manicure. Use it for the French section, selected petals, and the solid dotted nail. Keep the flowers close to the edges rather than filling the center. This open placement gives the short rounded nails a light garden inspired finish.
Apply a glossy milky blush base to most nails.
Add pistachio tips, petals, and one solid accent nail.
Finish with small white dots and edge placed flowers.
18. Fade Milky White Into Mint With a Soft Ombre Finish
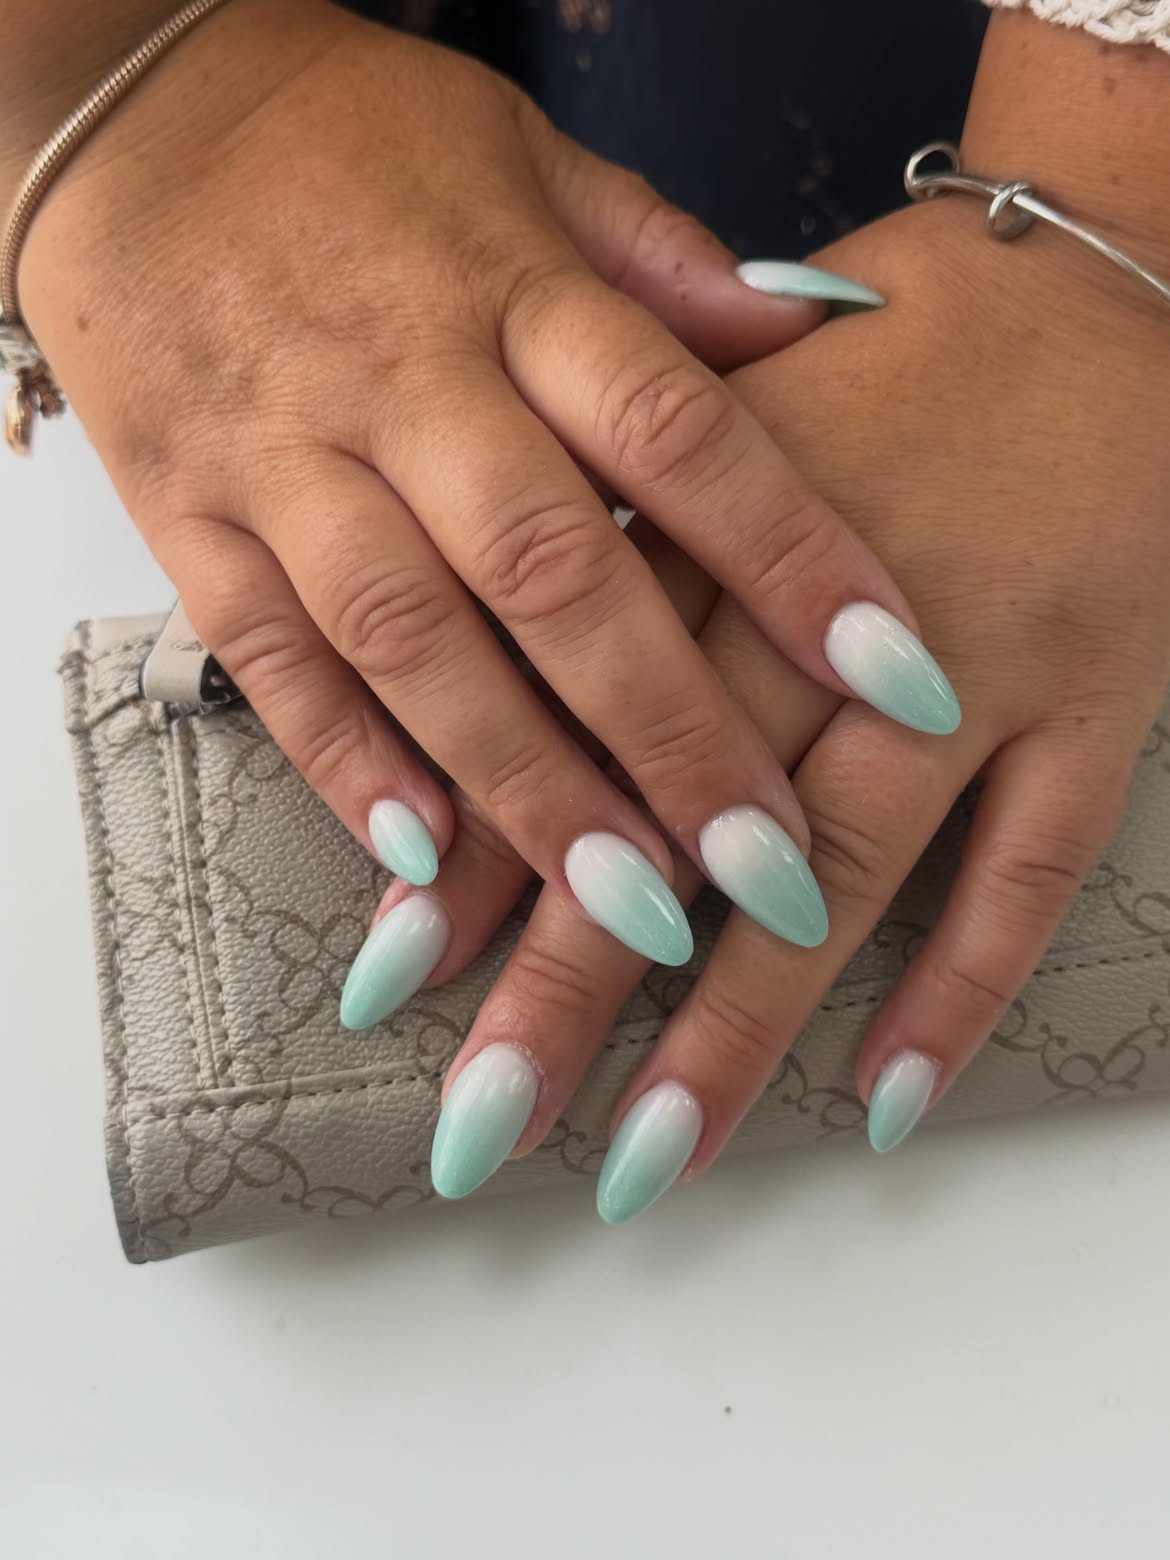
A smooth transition from milky white near the cuticles to pale mint at the tips gives this manicure a calm, airy appearance. Every almond nail repeats the same color flow, so the set relies on blending rather than patterns, metallic accents, or raised decoration. A gentle sheen keeps the finish from looking flat.
Begin with a light white base, then concentrate the mint color around the pointed ends. Blend it upward while the edges are still soft, stopping before the green reaches the cuticle area. Avoid a visible line between the two shades. The gradual fade is what gives these white and green nails their clean, balanced character.