20 Winter Nails You Can Do at Home for a Fresh Seasonal Look
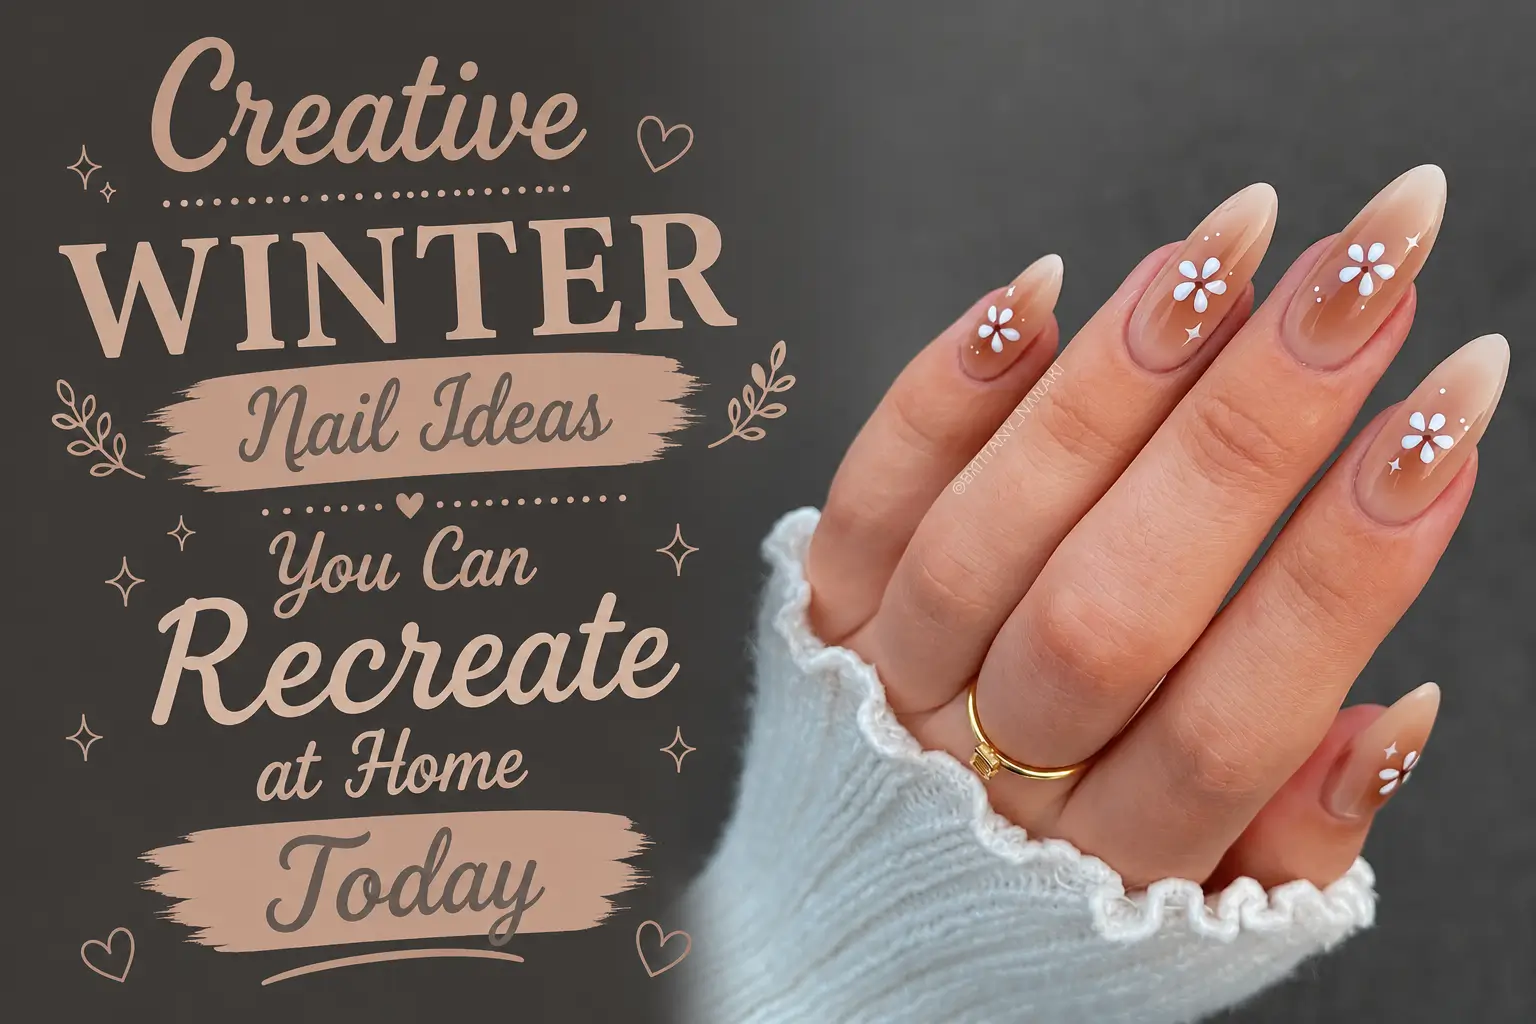
Cold weather is a good excuse to bring deeper color, icy shimmer, and a little extra sparkle to your nails. These Winter Nails You Can Do at Home include rich burgundy, snowy blue, soft pearl, bright coral, cozy plaid, and gold tipped looks. Some need only one bottle of polish and a glossy top coat. Others give you room to practice dots, fine lines, French tips, simple flowers, or small gem accents.
You do not need a crowded nail kit to try these ideas. A fine brush, a dotting tool, and a few well chosen colors can handle much of the detail. Stickers and flat decorations can also stand in for painted stars, snowflakes, and raised flowers when you want an easier route.
The designs work across short natural nails and longer almond or square shapes. Pick one that fits your time, use the design as a guide, and adjust the colors or accents to match what you already own. The goal is a winter manicure that feels polished, personal, and realistic to finish at home.
20 Winter Nails You Can Do at Home
1. Burgundy Ribbon Winter Nails You Can Do at Home
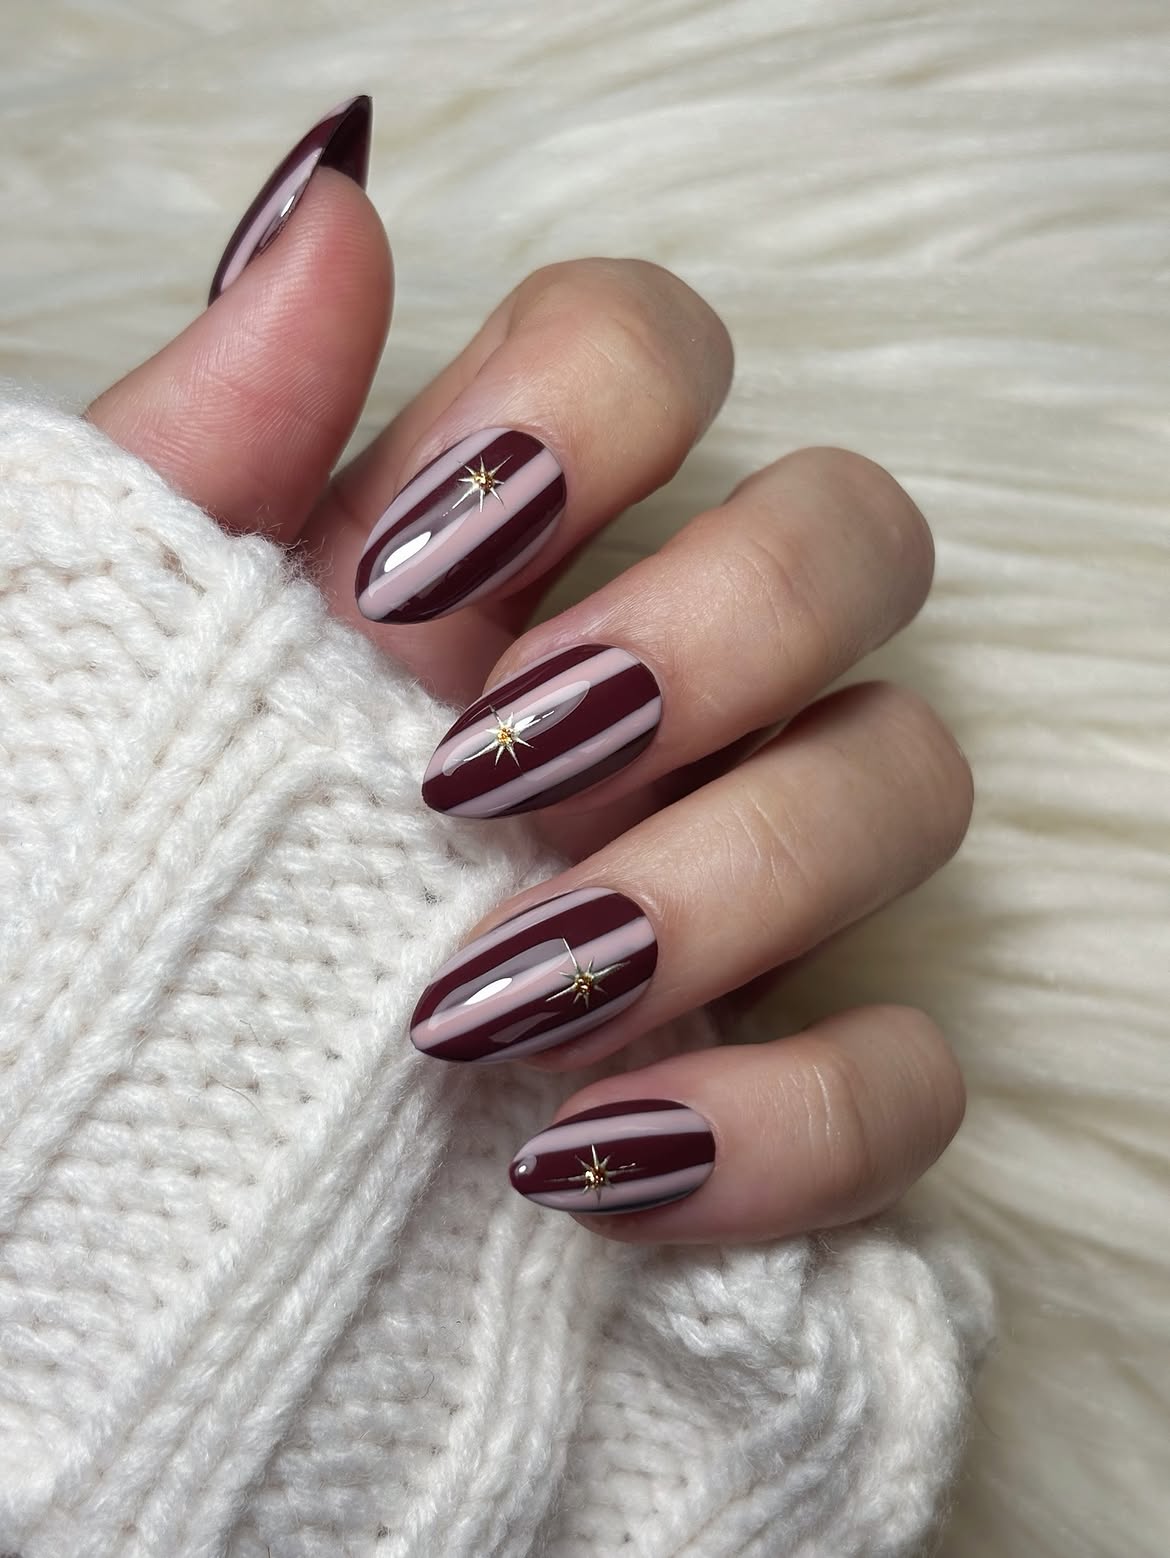
Deep wine polish gives this manicure its rich winter mood, while the pale blush ribbons keep the dark color from feeling heavy. Tiny gold starbursts add a festive detail without covering the clean striped design.
To recreate it, paint two slim blush lines along each nail with a fine liner brush. Let the lines follow a gentle curve instead of trying to make them completely straight. Keep plenty of wine color visible between the ribbons.
Place a small gold starburst near the center of each nail, then finish with a glossy top coat. Gold nail stickers can create a similar result if painted stars feel too difficult. The almond shape helps the ribbons look longer, though the same design can work on shorter rounded nails.
2. Glossy Burgundy Winter Nails with a Long Square Shape
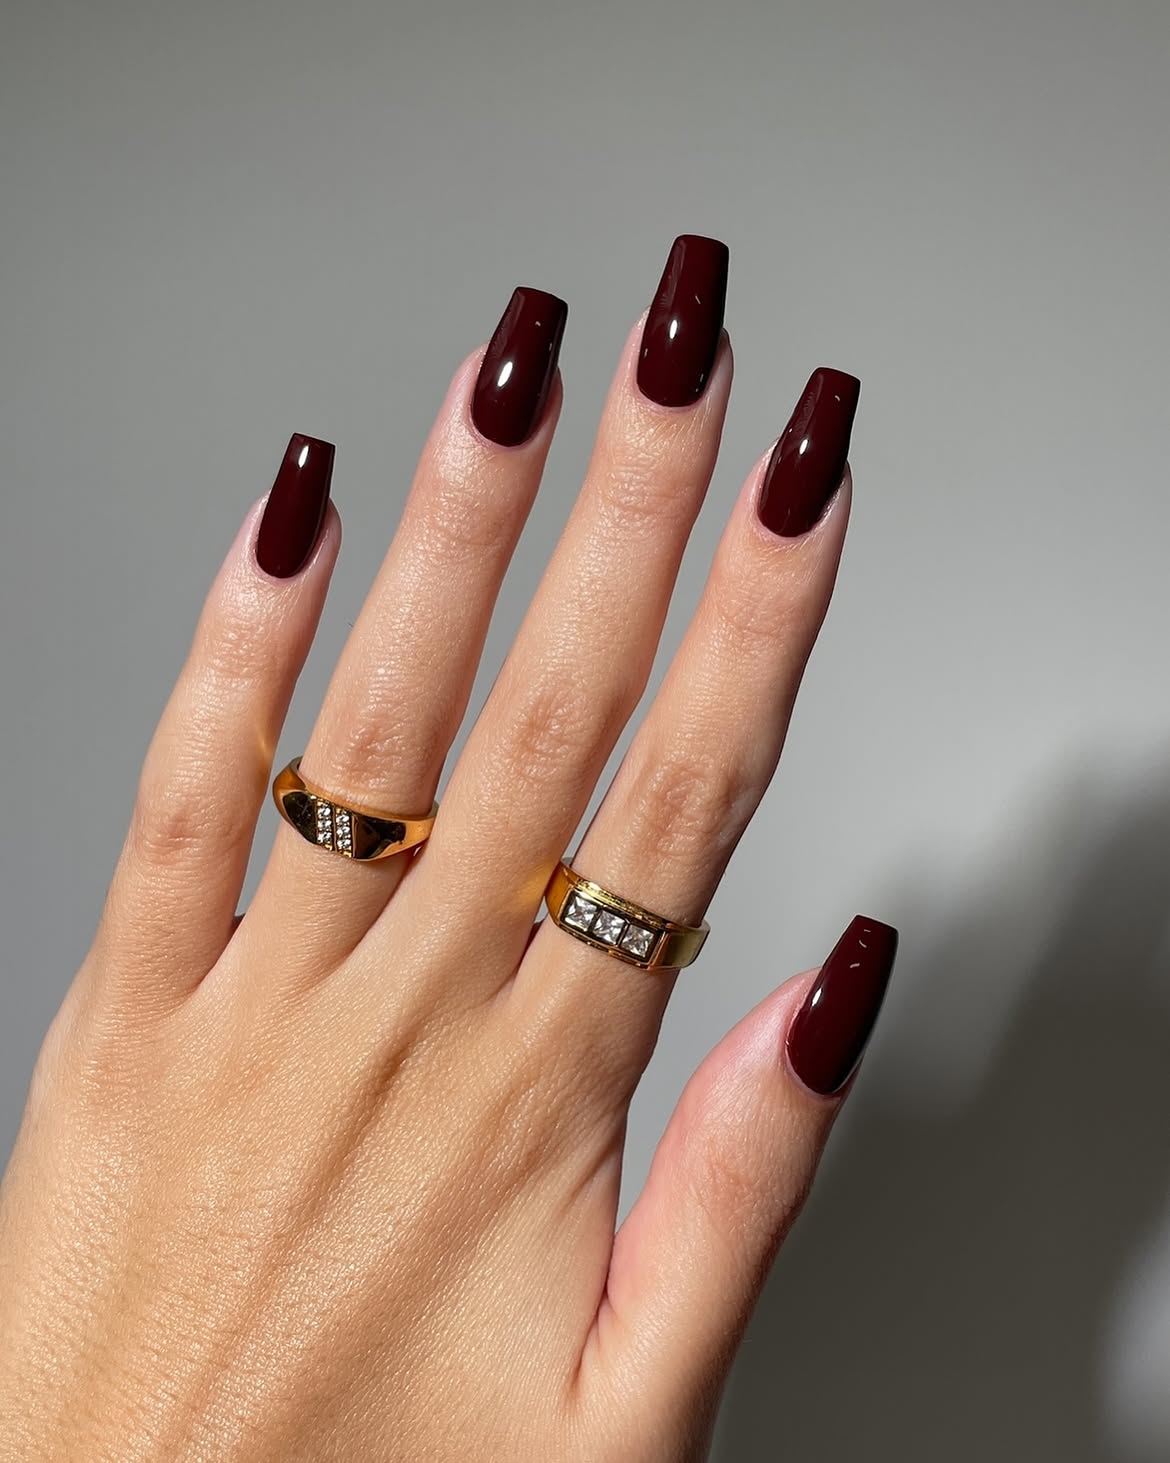
A single dark shade can carry an entire winter manicure when the outline is this clean. The nails feature a deep burgundy color, a long tapered square shape, and a glassy finish that catches the light.
What makes the look work
- The color is even from the cuticle to the tip.
- The side edges stay straight before narrowing slightly.
- The glossy surface gives the simple shade extra depth.
At home, file the shape before applying color. Leave a slim gap around the cuticle, then build coverage with two thin coats. Clean any polish from the skin before adding a shiny top coat. Short nails can use the same color with a soft square tip.
Apply thin layers for smooth, even color.
Cap the tips with top coat to protect the finish.
Do not load the brush with one thick layer.
Do not add top coat until the color has settled.
3. Playful Mismatched Patterns for Colorful Winter Nails
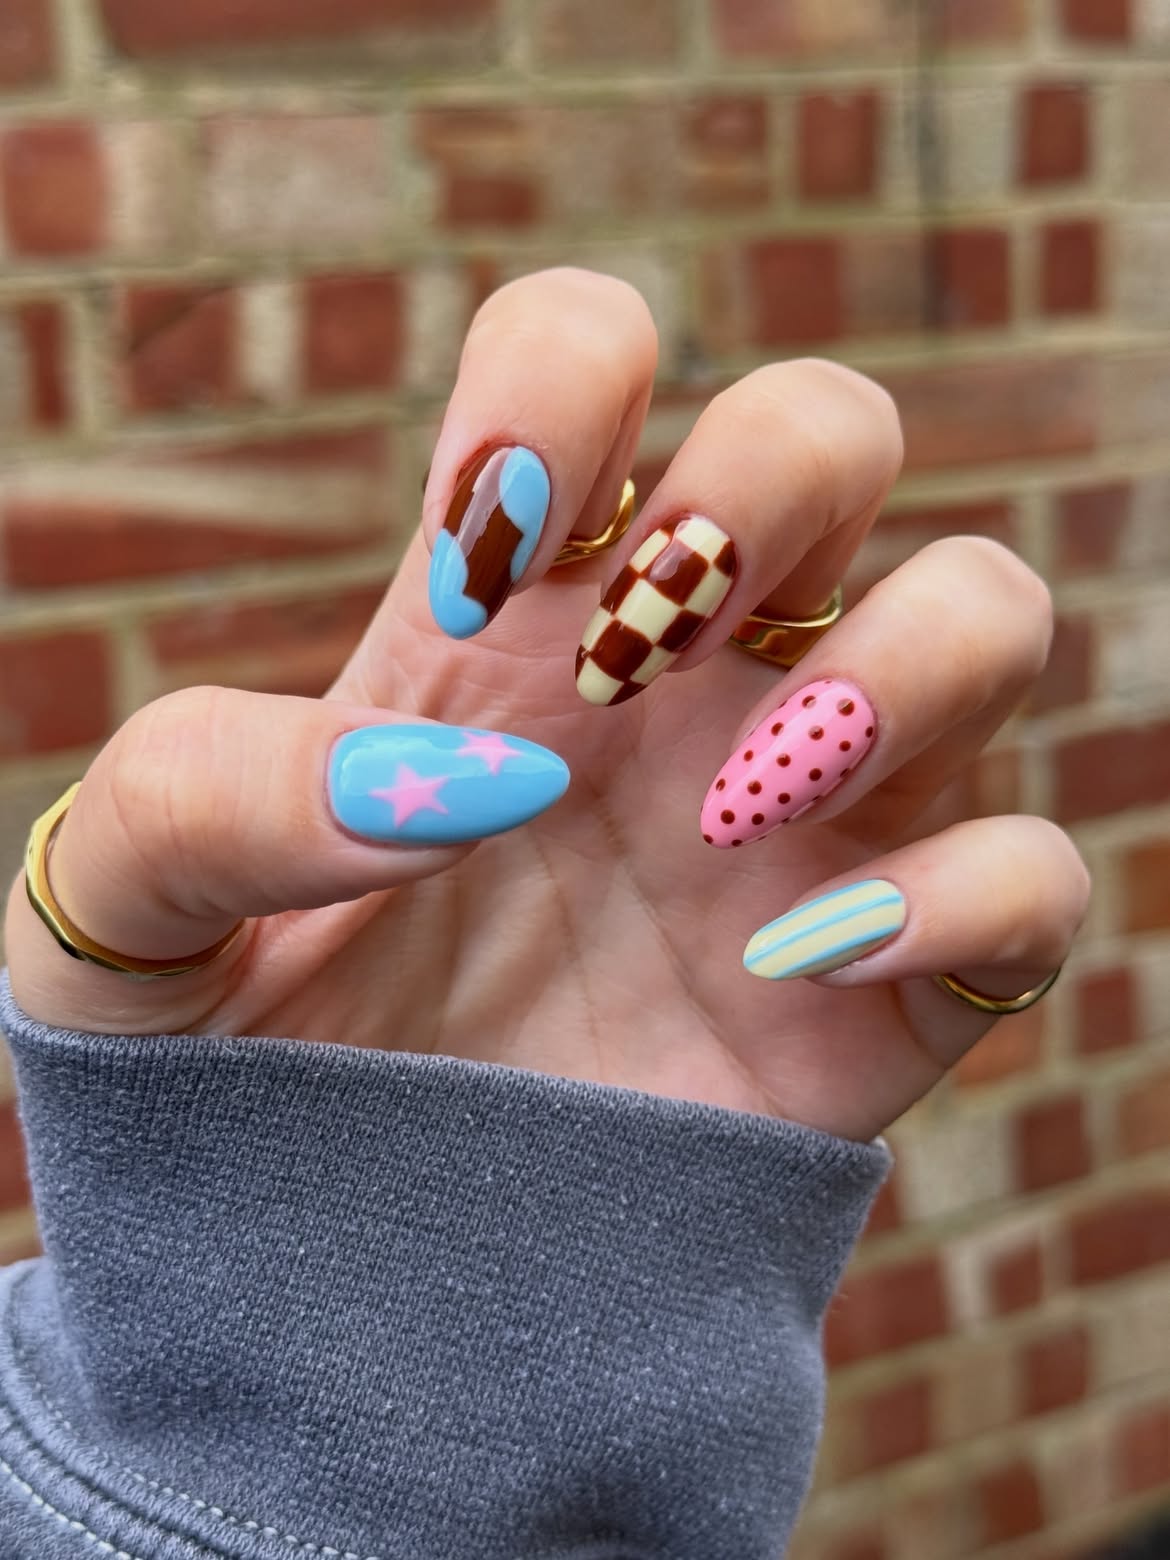
Winter color does not have to stay dark and muted. This lively set mixes sky blue, pink, cream, brown, and pale yellow across five different patterns, while the repeated colors help everything feel connected.
Thumb: Pink stars brighten a smooth blue base.
Center nails: Flowing color blocks sit beside a bold checkerboard and neat rows of dots.
Little finger: Slim blue lines give the pale yellow base a calmer finish.
Plan every nail on paper before opening the polish. A dotting tool or toothpick can create the small circles, while a slim brush works well for stars, curves, checks, and stripes. Complete one pattern at a time and let each color settle before painting the next detail.
For softer cold-weather styles, explore these [simple winter nail ideas for beginners] that look polished without needing advanced nail art skills.
4. Moody Teal and Tortoiseshell Mix for Short Winter Nails
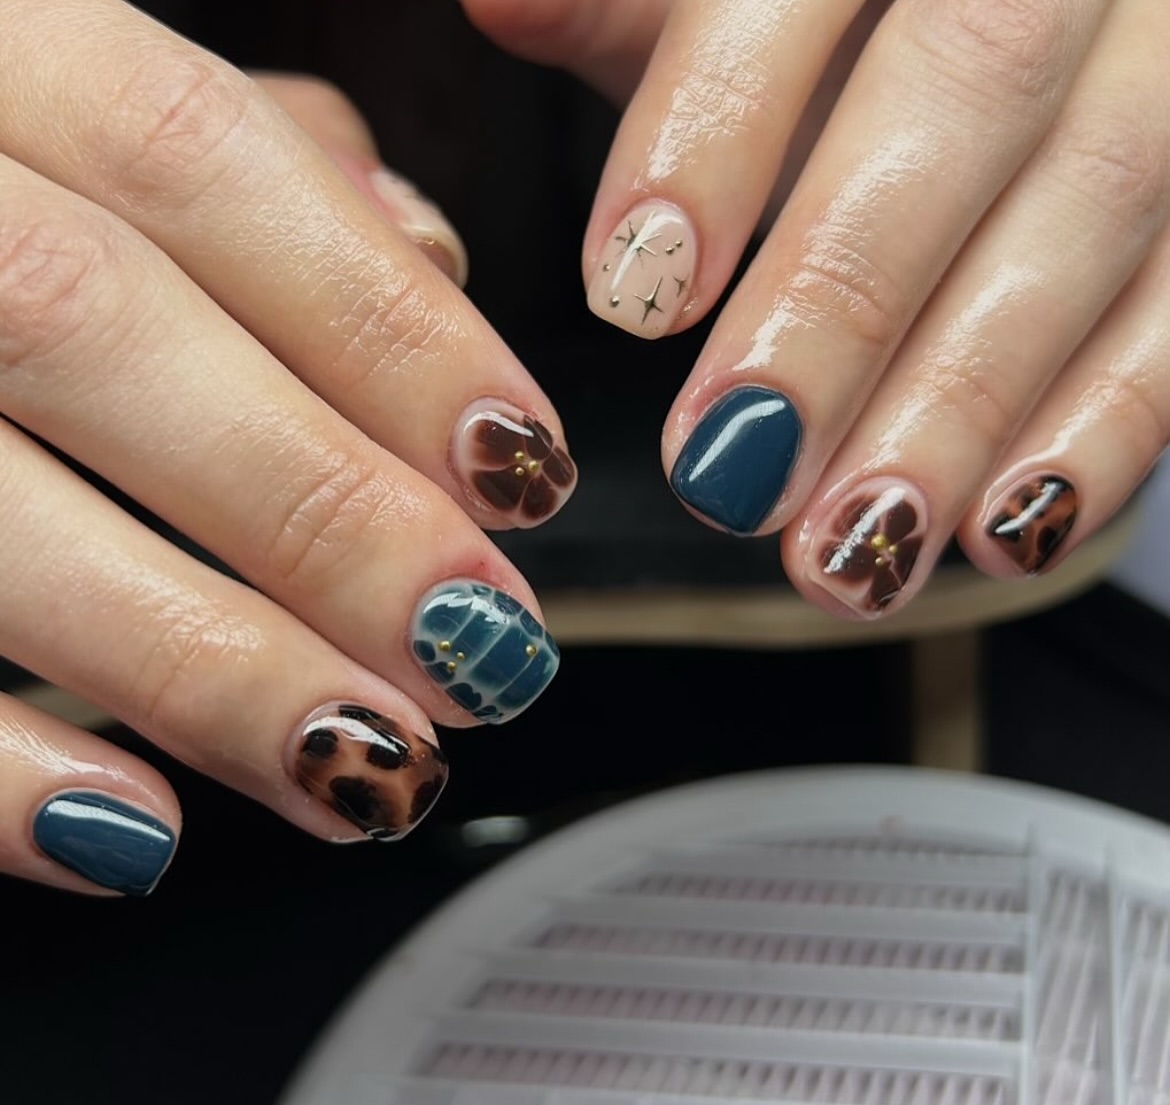
Moody teal gives this short manicure a cozy base, while brown tortoiseshell spots, fine crossing lines, and tiny gold details make every nail feel distinct. Clear and nude spaces keep the darker shades from becoming too heavy.
Choose one anchor: Use solid teal on a few nails to calm the busier patterns.
Add two prints: Paint loose brown and black spots on one nail, then use a slim brush to create crossing teal lines on another.
Finish with shine: Place small gold dots or starburst stickers over the simpler nails.
Keep the edges soft and slightly uneven when painting the tortoiseshell pattern. The natural variation is what gives it depth. A glossy top coat ties the prints, solid color, and gold details together.
Gather these pieces
5. Frosted Nude Nails with White Winter Flowers
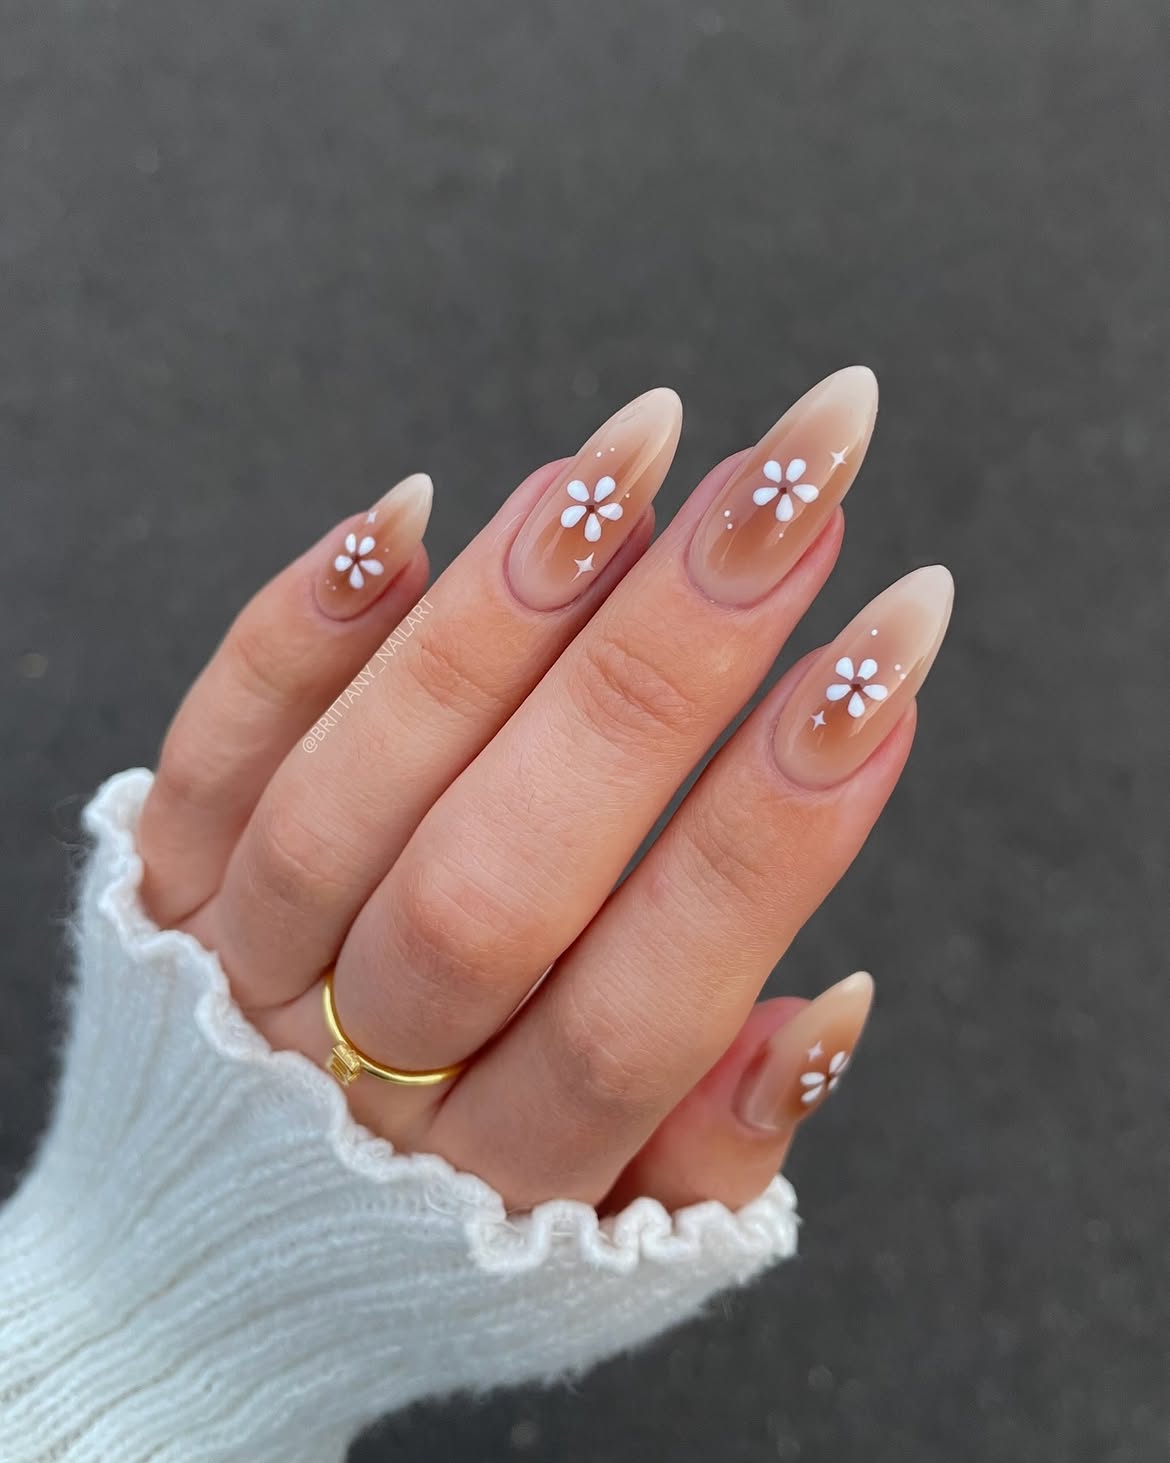
Barely there color makes the white flowers and tiny sparkles stand out without hiding the natural look of the nails. A sheer nude base fades into soft milky tips, creating a frosted effect that suits the colder season.
Each flower uses five rounded petals with a small open center. Fine white dots and star shapes fill the empty areas while keeping the design light.
Recreate the faded tips by tapping a little milky white polish onto the ends with a small sponge. Use a dotting tool for the petals, then shape them gently with a fine brush. Add only a few sparkles around each flower so the nude background still has room to show.
Apply a sheer nude base and let it settle.
Tap milky white polish onto the tips for a soft fade.
Paint white petals, dots, and small stars before sealing with gloss.
6. Burgundy Heart Nails with Silver Glitter Accents
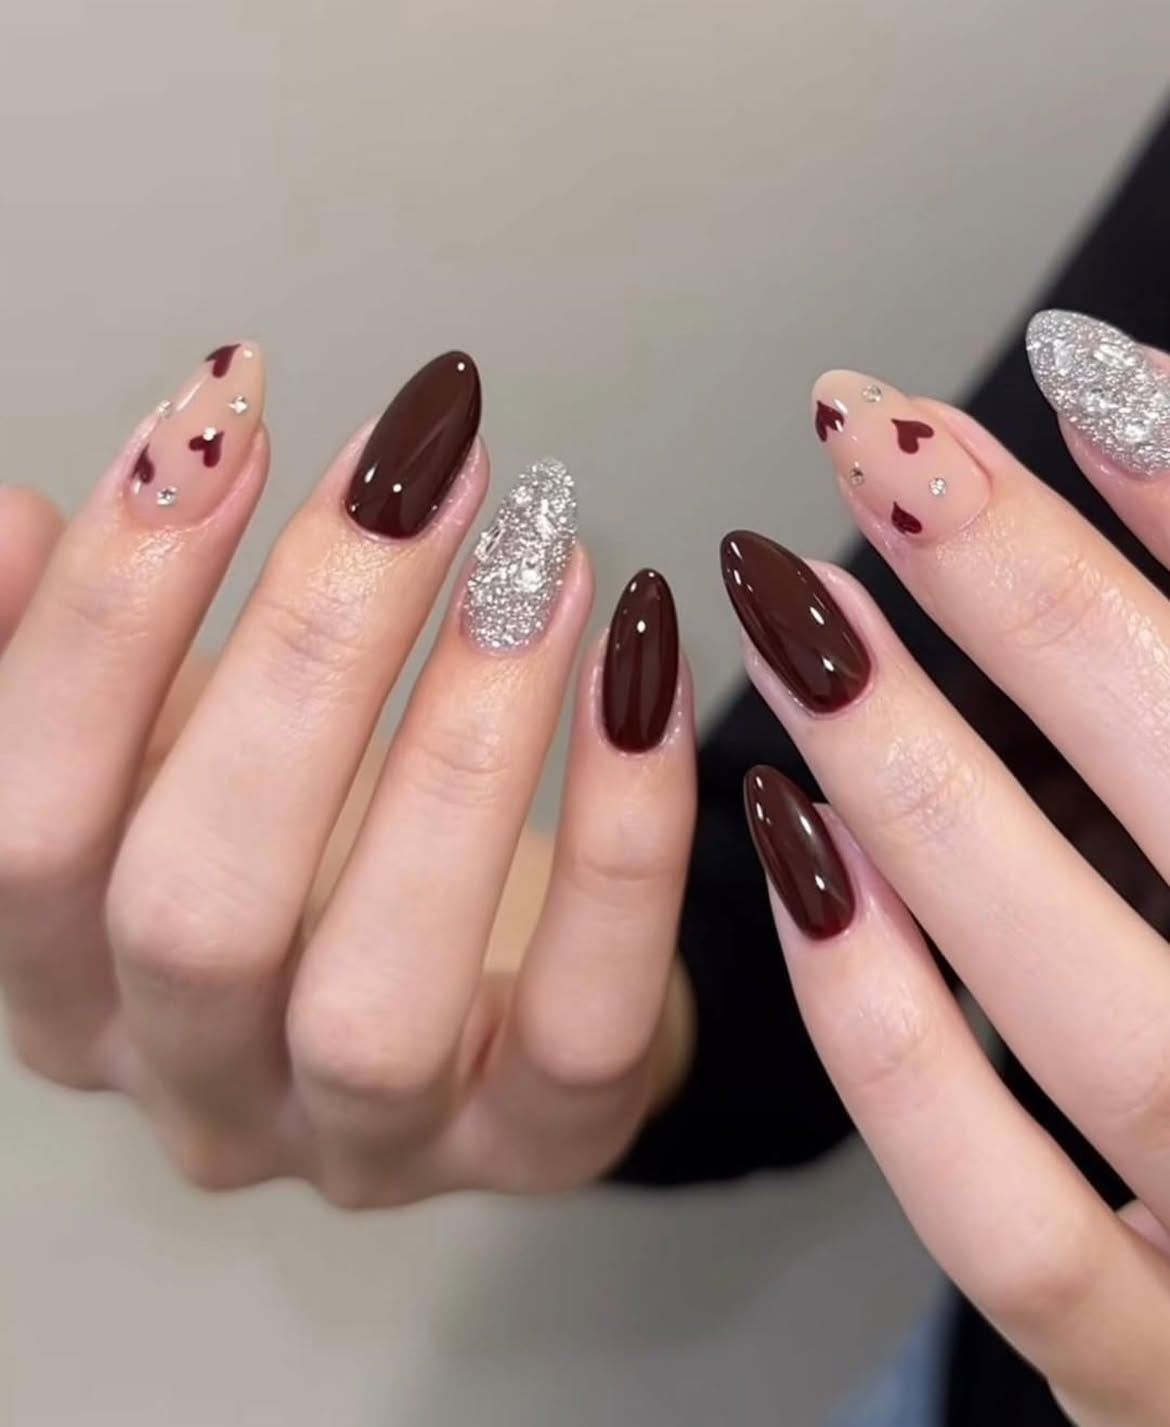
Rich burgundy polish, bright silver glitter, and tiny hearts create a winter manicure with plenty of contrast. The solid nails ground the design, while the blush accent nails give the darker color room to stand out.
Treat each finish as a separate part of the set. Use burgundy on most nails, silver glitter on one accent nail, and a sheer blush shade wherever you want the hearts. Small clear gems placed between the hearts echo the sparkle without making every nail glittery.
Create each heart with two small burgundy dots. Pull both dots downward with a fine brush until they meet at a point. Add the gems with nail adhesive, then seal the painted nails with a glossy top coat.
Deep burgundy adds warmth, silver brings winter shine, and the blush heart nails keep the set light and playful.
7. Pearly Pastel Nails with a Soft Winter Glow
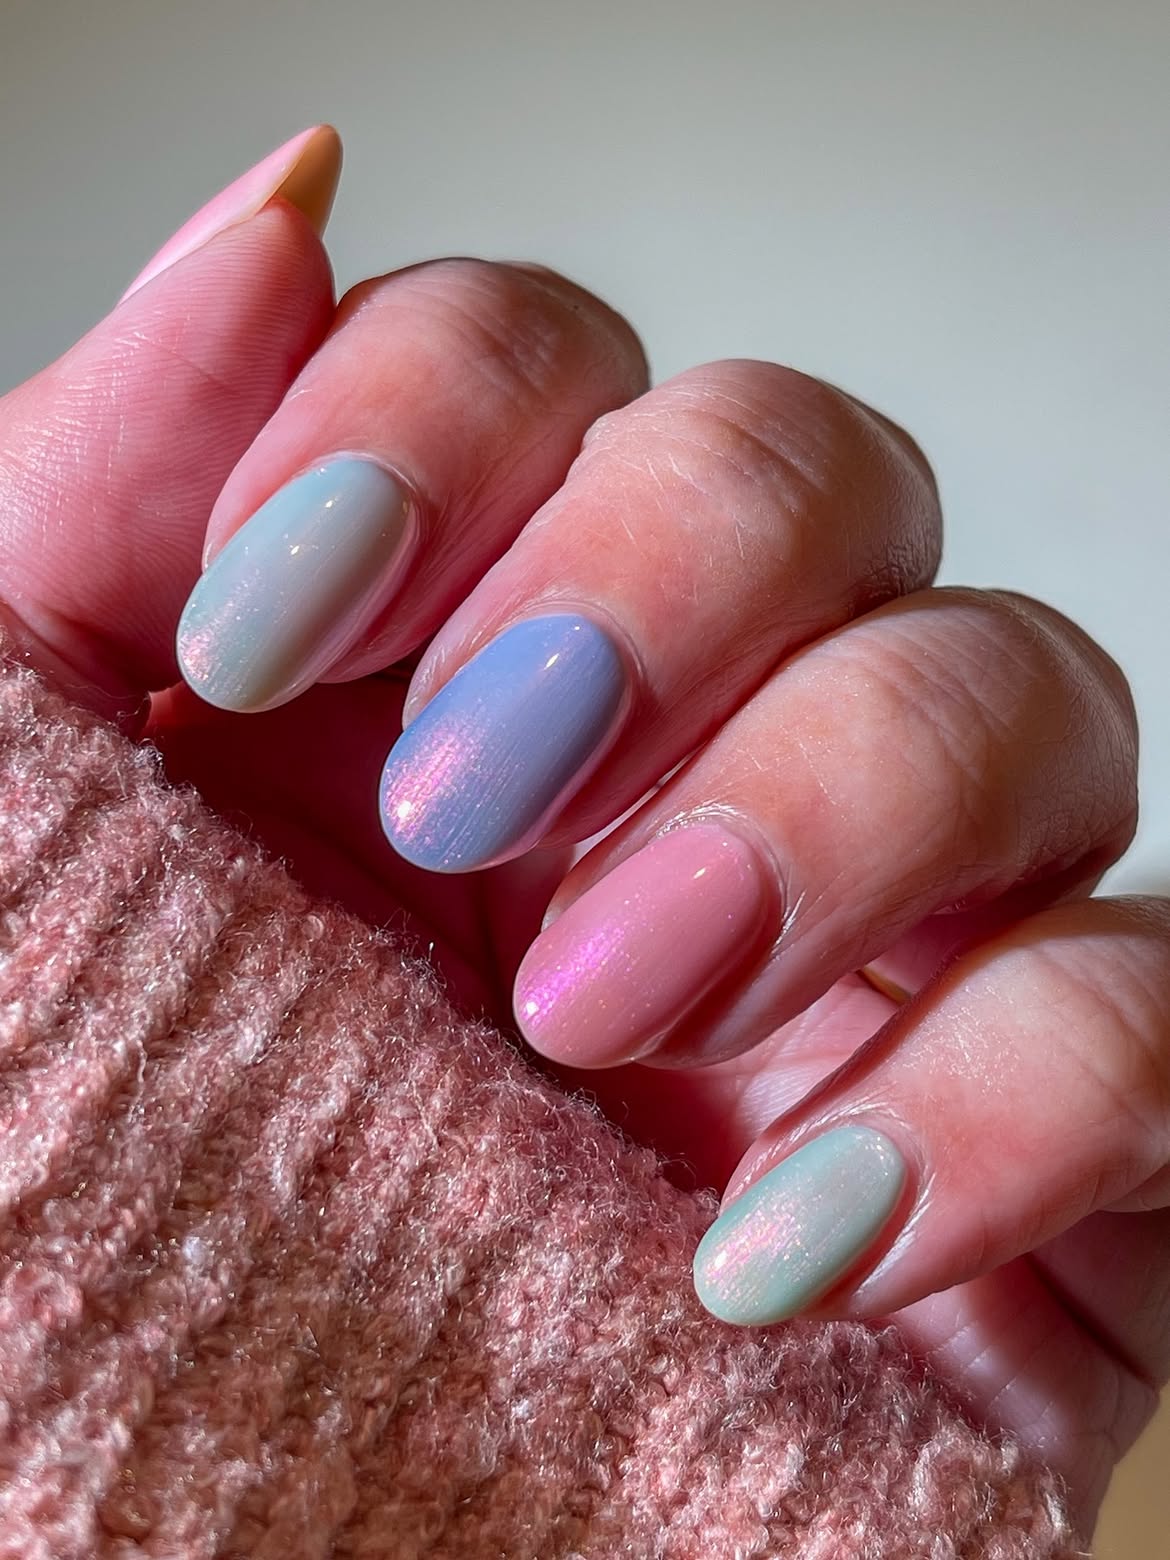
Pastel color meets pearly shine in this soft winter manicure. Each short oval nail uses a different milky shade, including ivory, lavender, pink, and pale mint. A fine shimmer catches the light with a pink glow, helping the separate colors feel like one set.
The smooth finish matters more than detailed nail art here. Apply each layer lightly and give it time to settle before adding the shimmer. Keep the nail shape rounded and even so the reflective finish looks clean from every angle.
What you need
- Milky ivory, lavender, pink, and mint polish
- A translucent pearly shimmer
- A smooth base coat
- A glossy top coat
- A small cleanup brush for the edges
| Pastel base | Pearly layer |
|---|---|
| Creates the soft ivory, lavender, pink, or mint tone | Adds a sheer pink glow when the light moves |
| Build with thin, even coats | Sweep on lightly so the base color stays visible |
8. Midnight Blue Nails with Silver Confetti Sparkle
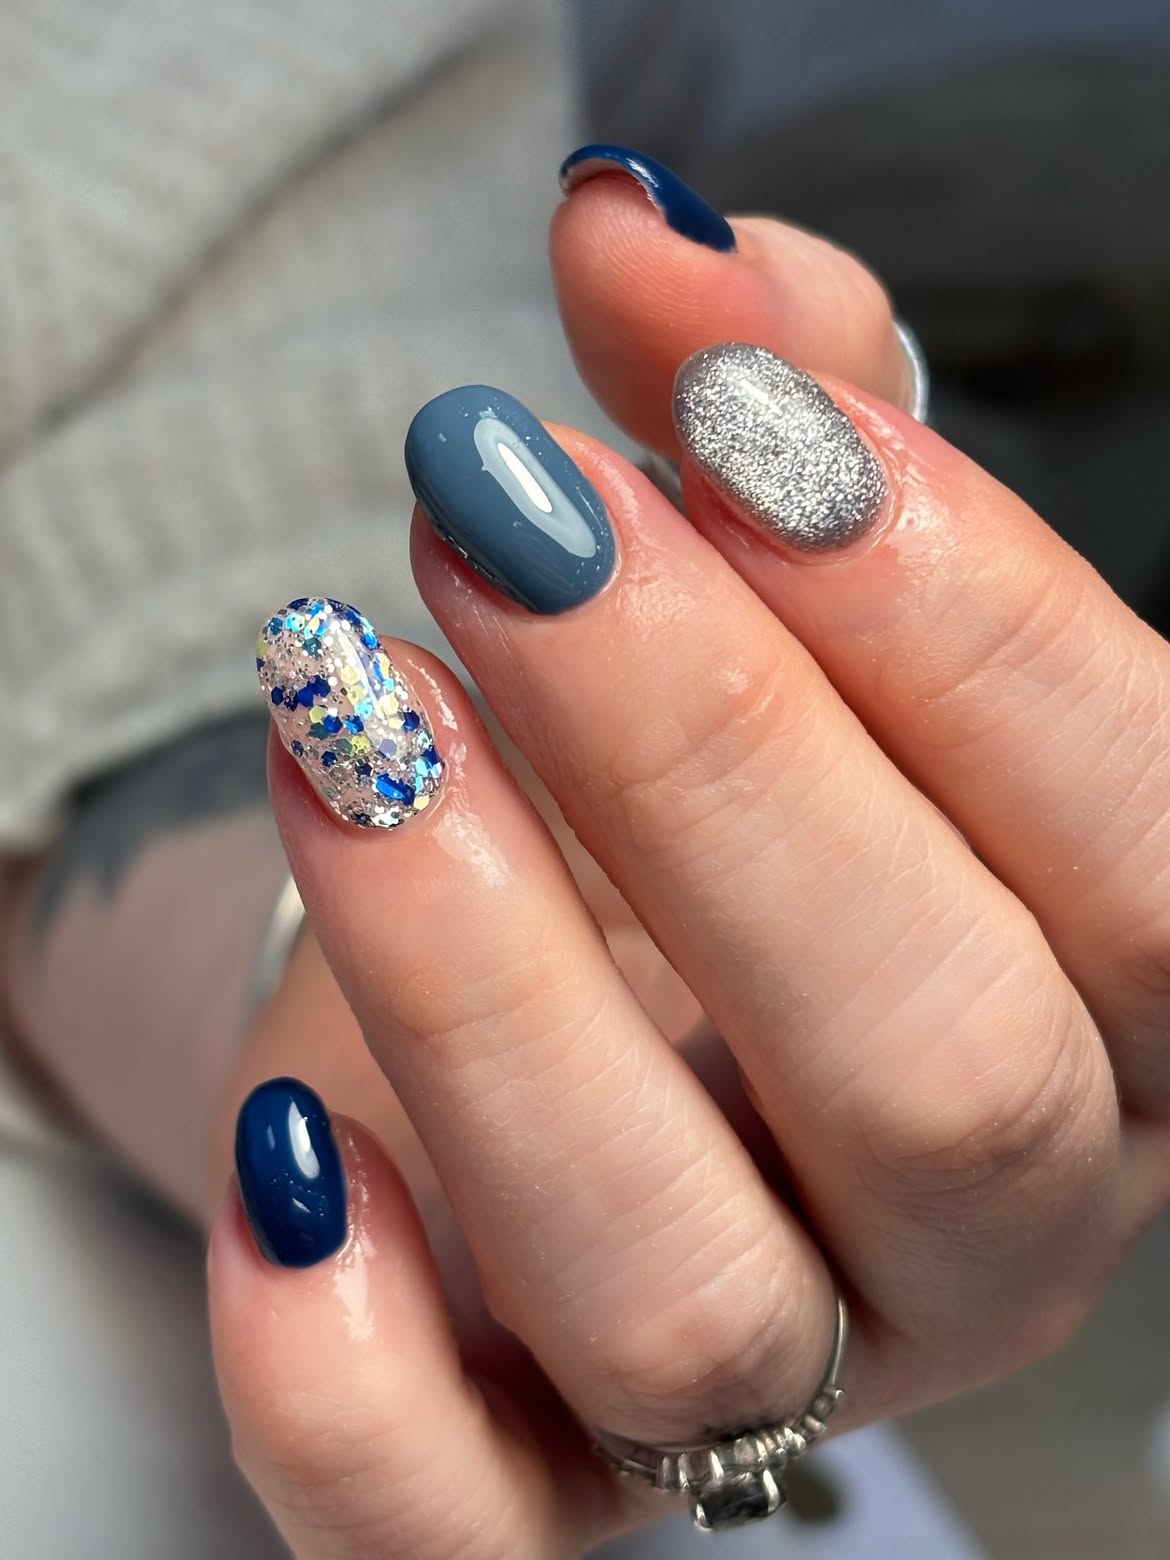
Cool blue polish and bright silver glitter give this manicure a crisp winter look. The set combines deep navy, muted slate blue, fine silver sparkle, and larger blue and silver glitter pieces across short rounded nails.
The solid colors keep the manicure grounded, while the two glitter finishes create different levels of shine. Fine silver glitter looks smooth and icy. The larger pieces feel bolder and work best as a single accent.
Paint the navy and slate nails first, then add one full silver nail. For the confetti accent, place the larger glitter pieces in thin layers so they do not gather at the tip or cuticle. Finish with enough clear top coat to smooth the textured surface.
💡 Quick Tip
Use glitter made for nails instead of craft glitter. Apply larger pieces with a small brush so you can control their placement and keep the edges smooth.
9. Metallic Blue Snowflake Nails with Wavy Winter Stripes
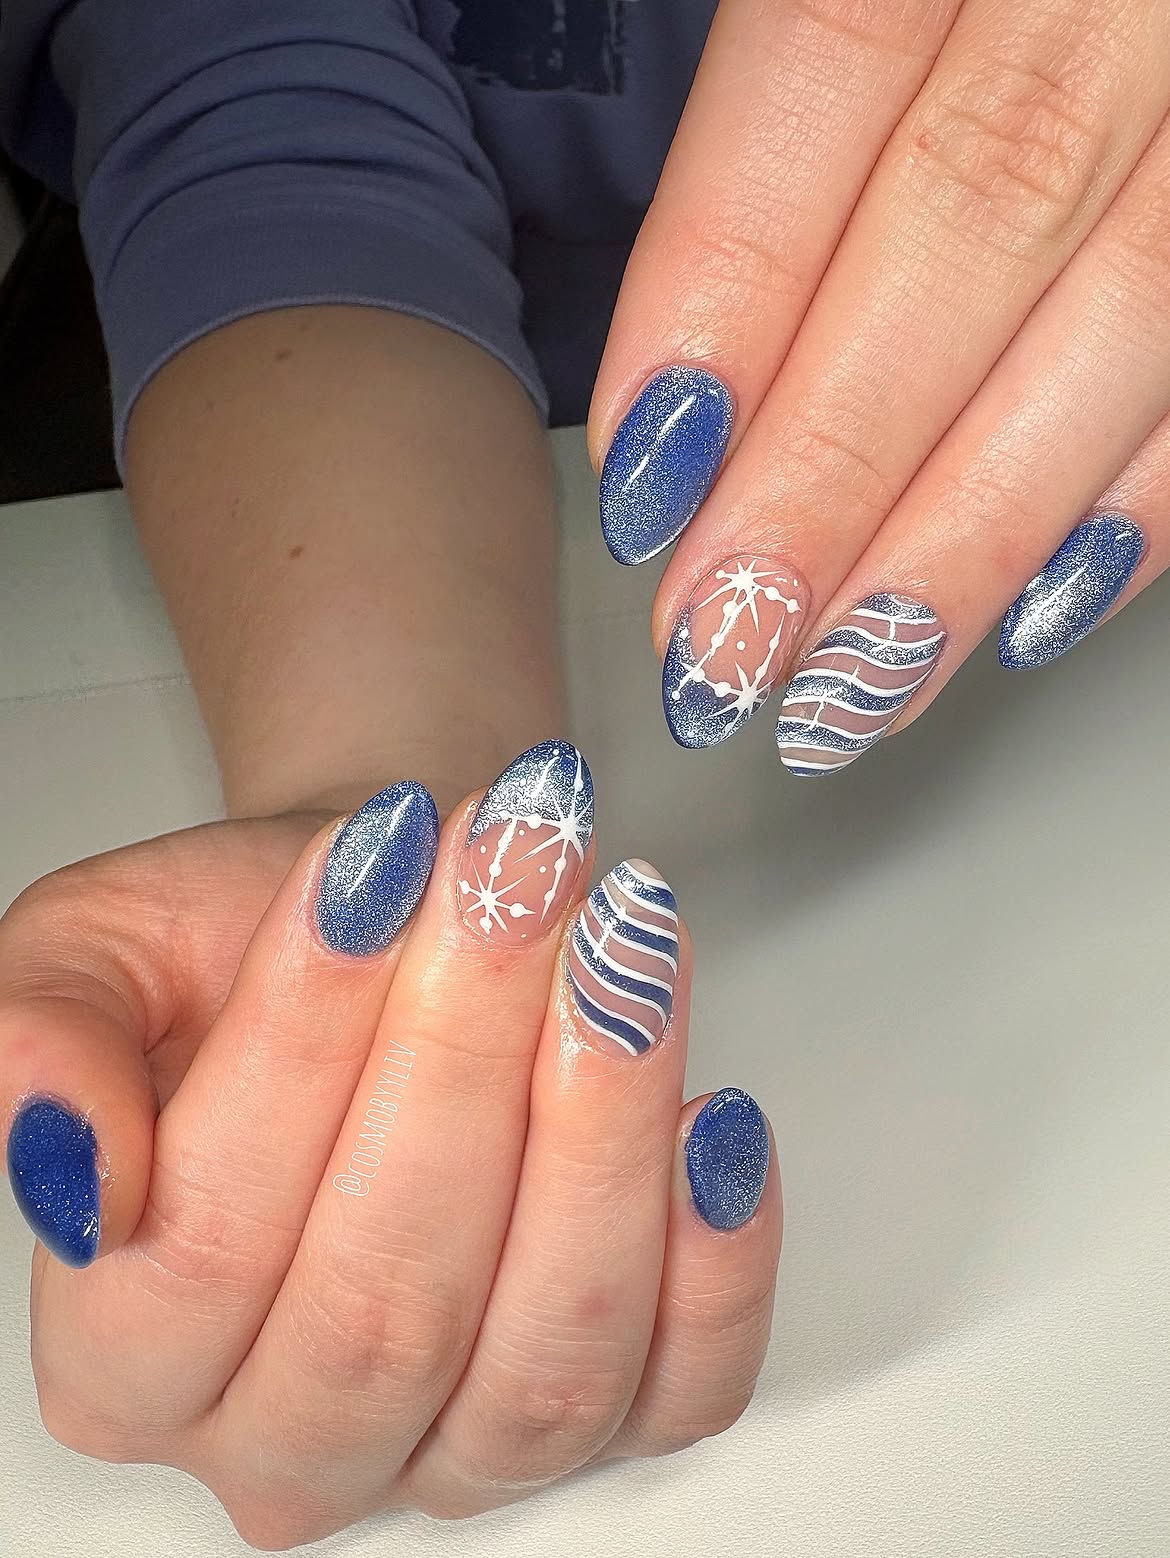
Snowflakes, metallic blue polish, and open nude space give this manicure a clear winter theme. The solid blue nails add depth, while the accent nails break up the darker color with white details.
One accent nail features fine snowflakes over a sheer nude base with a metallic blue tip. The other uses flowing blue, white, and silver lines, leaving slim nude spaces between them. The repeated blue shade connects every part of the set.
Paint the solid nails first. Once the nude base is dry, use a fine brush for the snowflakes and curved stripes. Keep the lines relaxed, since small changes in width help the striped pattern feel natural.
Tools to prepare
• Metallic blue shimmer polish
• Sheer nude polish
• White detail polish
• Silver glitter polish
• A fine liner brush
• A dotting tool or snowflake stickers
Use metallic blue on the solid nails and sheer nude on both accent nails.
Add white snowflakes, a blue tip, and curved stripes only after the base colors have settled.
If you like soft seasonal transitions, these [late summer early fall nails] are perfect for easing into autumn without going too dark.
10. Blush French Winter Nails with White Flowers and Gold Gems
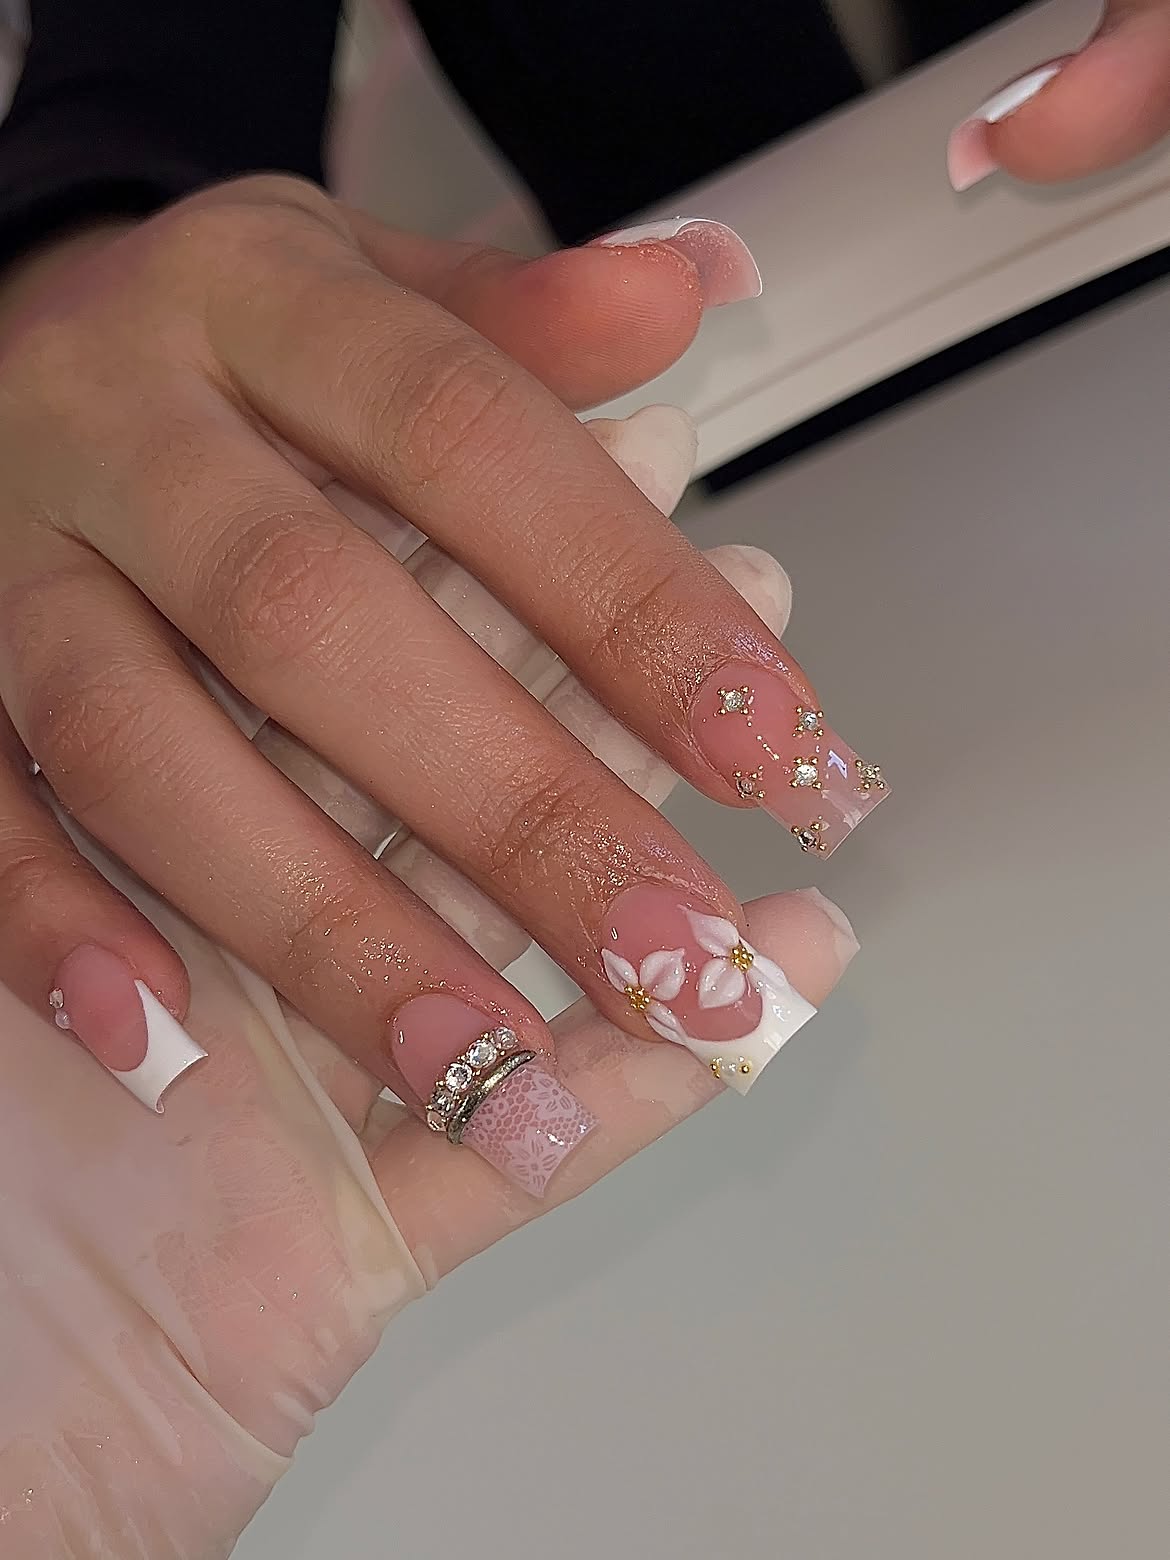
Jeweled accents turn a soft blush French manicure into a detailed winter party set. The nails combine sheer pink bases, white tips, raised flowers, tiny gold pieces, clear gems, and a delicate lace style pattern.
Each nail carries a different detail, but the repeated blush and white colors hold the set together. The long square tips also provide enough space for the flowers and gem clusters.
For an easier version at home, paint every nail with sheer blush polish and add white tips to only a few fingers. Use flat flower stickers if raised petals feel difficult. Place the gems in small clusters and leave some open space around them. Seal the painted areas carefully without pressing hard on the decorations.
Keep the blush base and white tips consistent.
Group gems around only one or two focal details.
Do not cover every nail with heavy decorations.
Do not brush roughly over raised flowers or gems.
11. Ruby Glass Winter Nails with Layered Red Shapes
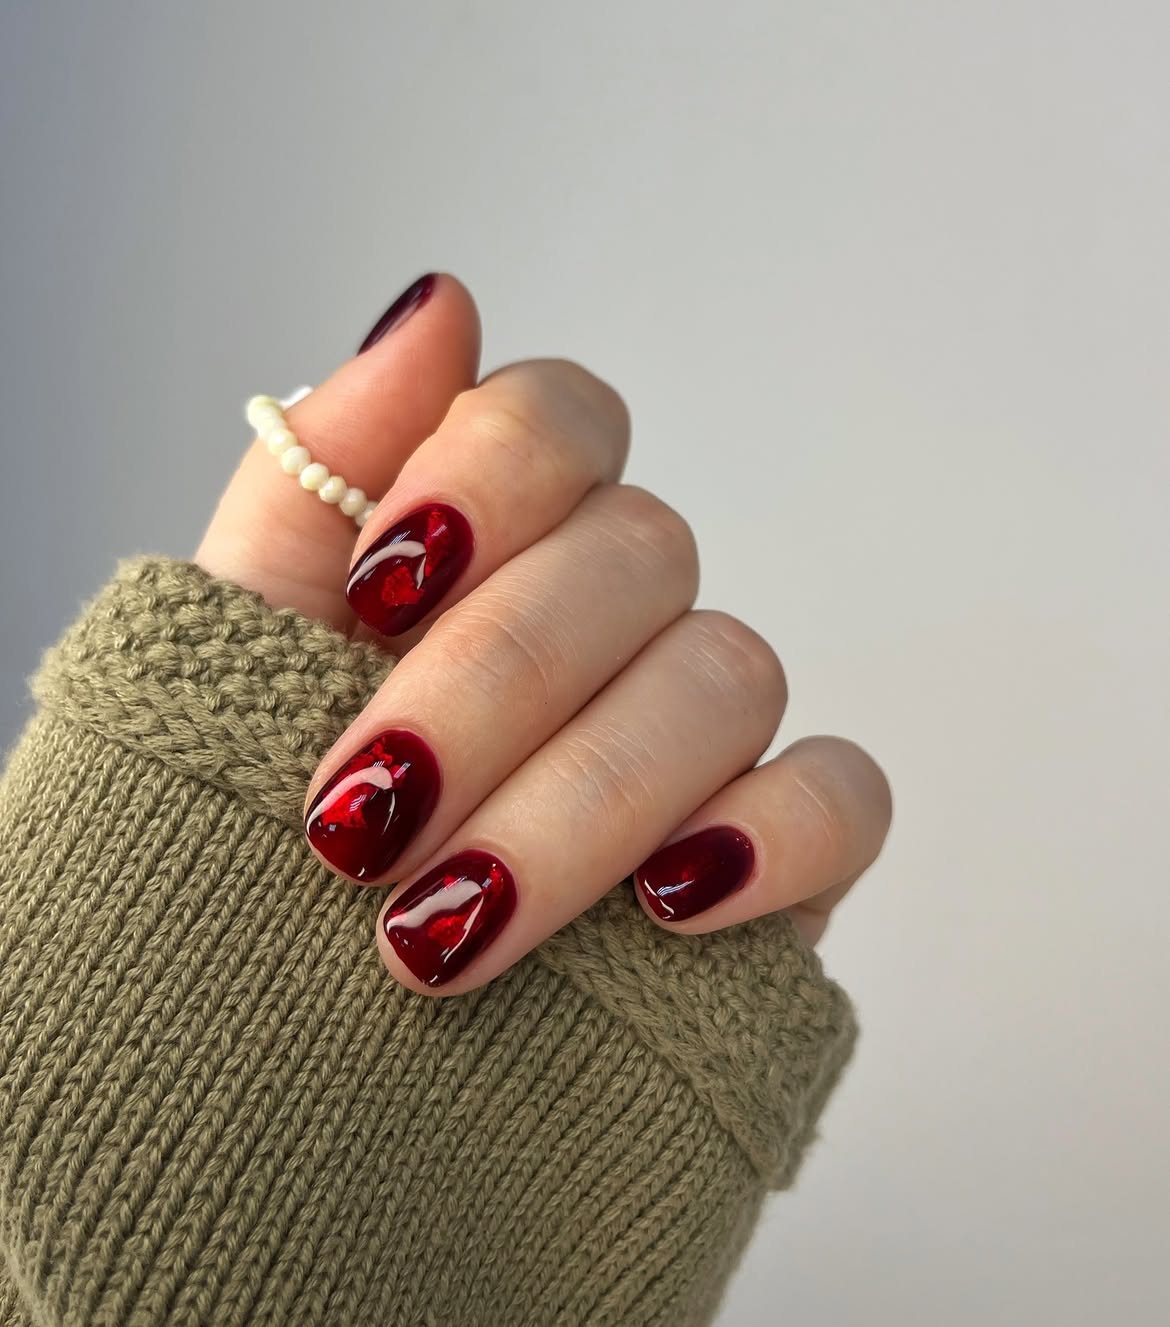
Light passing through the red layers gives these short nails a rich glass like depth. Most of the manicure stays within a ruby and burgundy palette, but a few nails contain darker curved shapes beneath the glossy surface.
The solid burgundy nails give the eye a place to rest. On the accent nails, the translucent layers create movement without relying on glitter, gems, or detailed line work.
Start with a sheer red base. Add a few irregular patches in a deeper red, keeping their edges curved and spaced apart. Brush another thin layer of sheer color over the design to soften the shapes. Finish with a generous glossy top coat so the separate layers appear smooth and connected.
12. Shimmering Berry Nails with a Lit From Within Glow
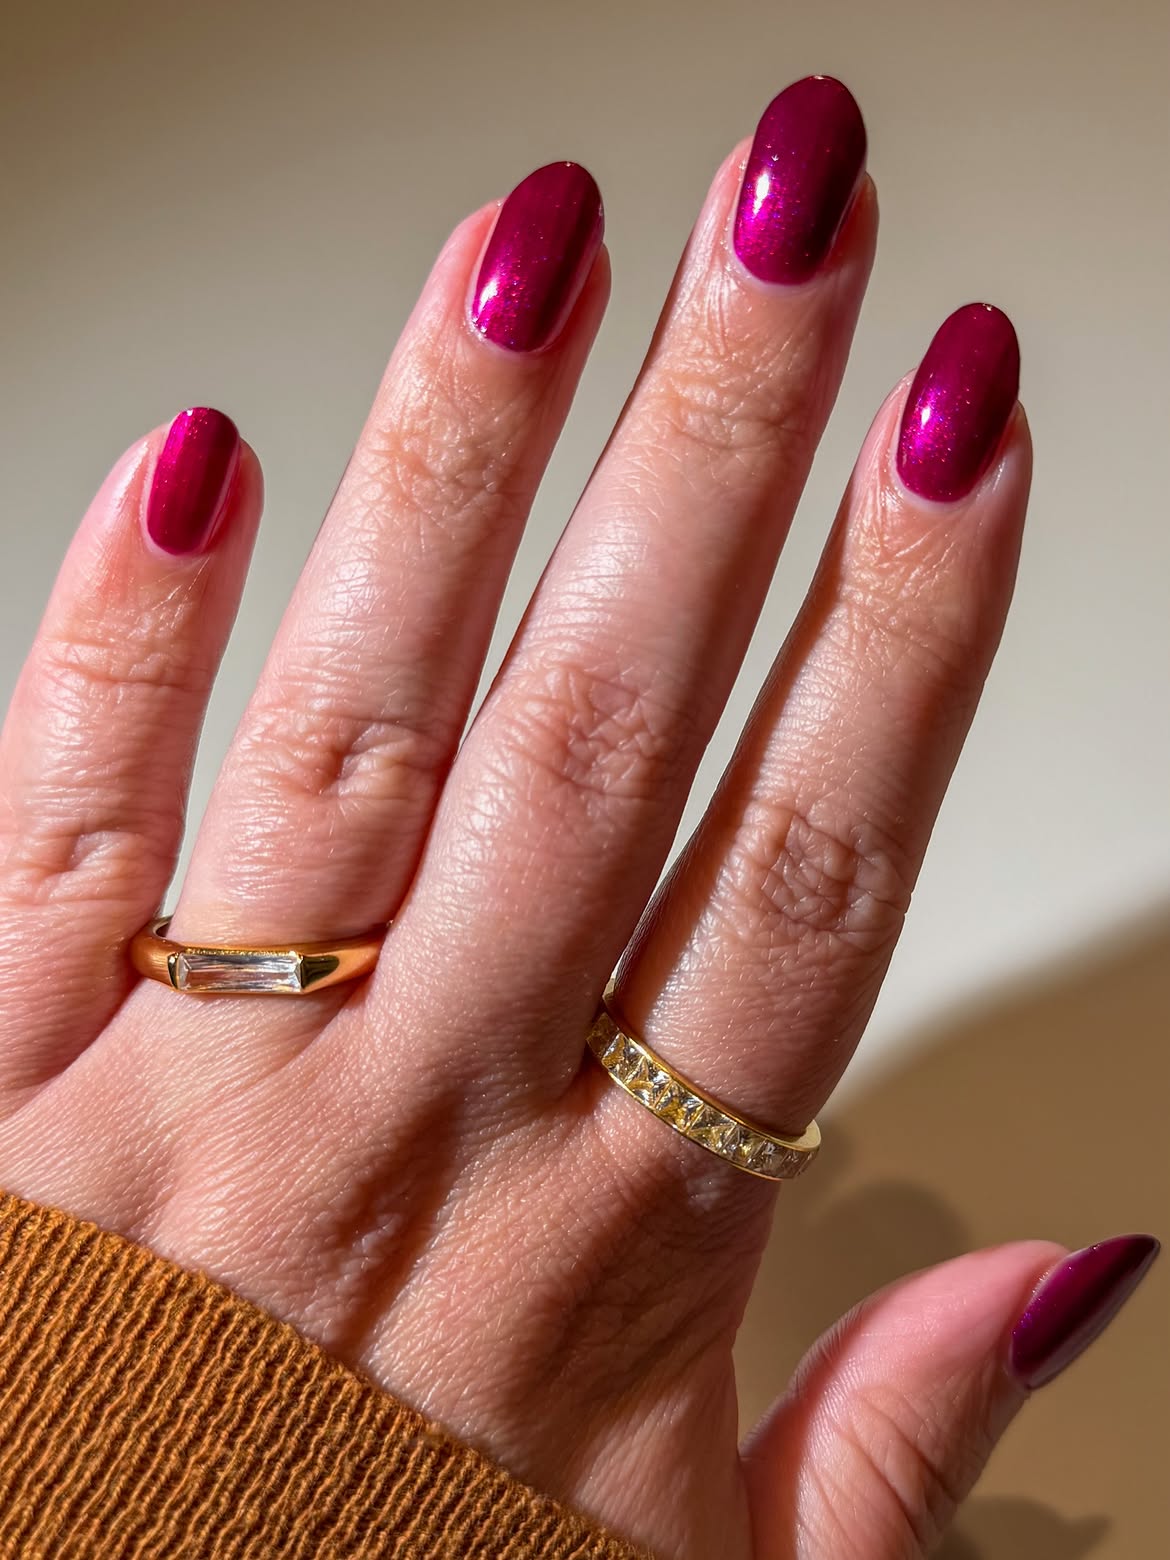
No extra nail art is needed when the polish creates this much depth on its own. The rich berry shade contains fine reflective shimmer that appears brighter through the center of each nail. A glossy finish sharpens the glow and keeps the surface looking smooth.
This style works well on natural oval nails because the rounded shape follows the soft reflection. Choose fine shimmer rather than large glitter pieces if you want the same even finish.
Apply the berry polish in thin layers, checking the edges before each coat settles. Keep the color close to the cuticle without touching the skin. Finish with a clear glossy coat to deepen the shade and bring out the pink reflection.
- ▸Use fine shimmer for a smooth glow.
- ▸Build the berry color with light coats.
- ▸Add a glossy top coat for extra depth.
13. Coral French Tips with Tiny White Winter Blooms
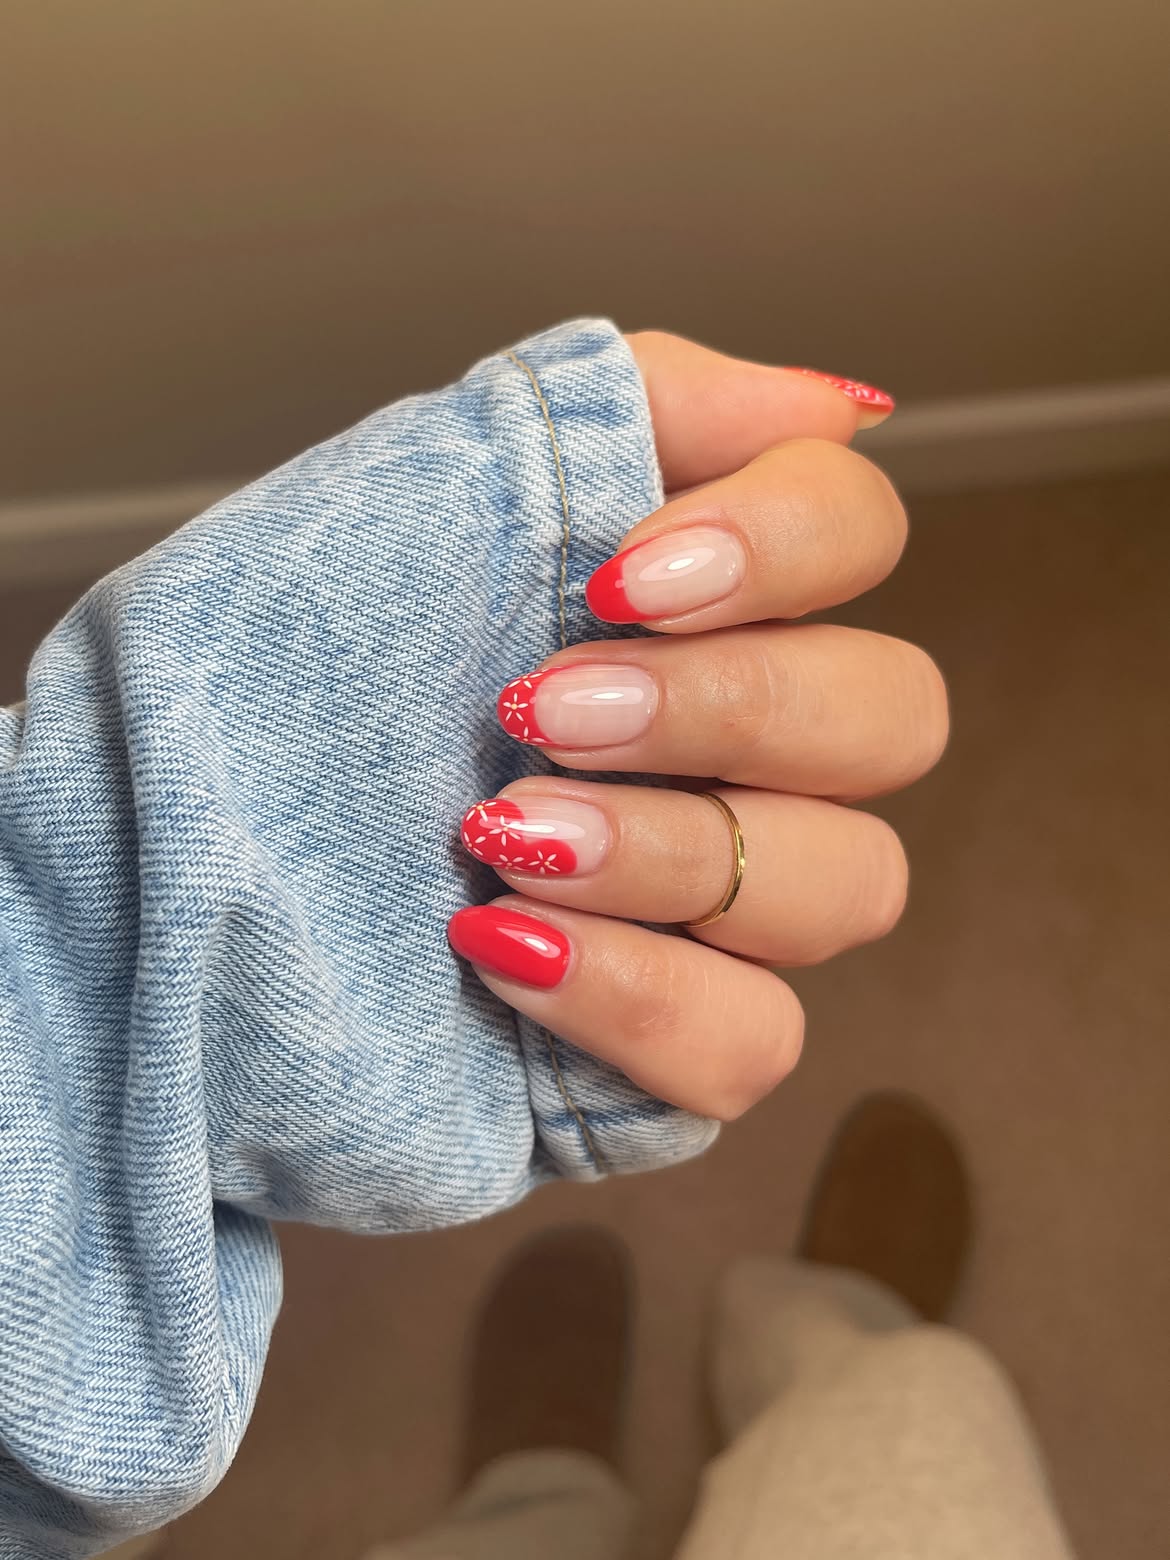
Warm coral brings energy to this short winter manicure without covering every nail. Some nails use solid coral polish, while others pair a sheer nude base with rounded coral tips. Tiny white flowers and dots decorate only a few tips, giving the set a light handmade detail.
Keep each French tip slim at the sides and slightly deeper through the center so it follows the rounded nail shape. Paint the white petals with short strokes, then add tiny dots in the open spaces. Leaving a few coral tips plain stops the pattern from becoming crowded.
Tools and colors to prepare
• Sheer nude polish
• Bright coral polish
• White detail polish
• A fine liner brush
• A small dotting tool
• Clear glossy top coat
Apply the sheer nude base and allow it to settle.
Paint rounded coral tips and choose a few nails for solid color.
Add small white flowers and dots, then seal everything with gloss.
14. Burgundy Outline Nails with Starbursts and Abstract Spots
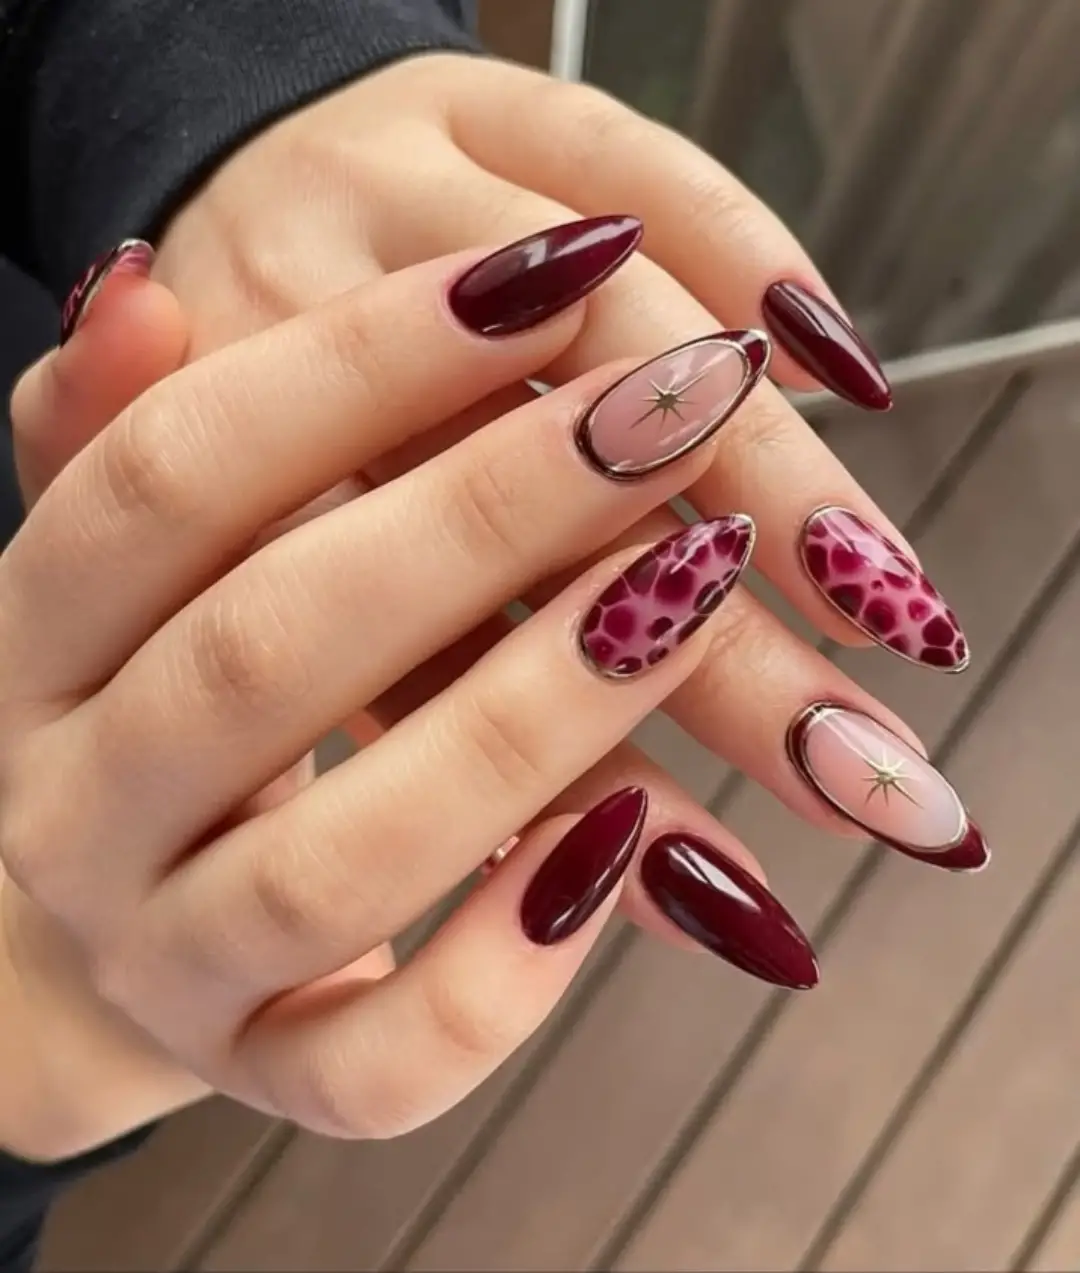
Three treatments share the same wine and blush palette in this bold winter set. Solid burgundy nails create a rich base, while the sheer pink accents add open space and finer detail.
Some accent nails are framed with a slim burgundy outline and finished with a small metallic starburst. Others use loose burgundy spots over a rosy pink base, with thin metallic edging around the nail.
Paint the solid nails first, then work on each accent style separately. Use a long liner brush for the borders, keeping your hand supported on a table. The spotted pattern can stay irregular, so vary the size and spacing rather than trying to match every mark. Finish with a glossy coat to connect all three designs.
15. Icy Blue Almond Nails with Fine Frosted Sparkle
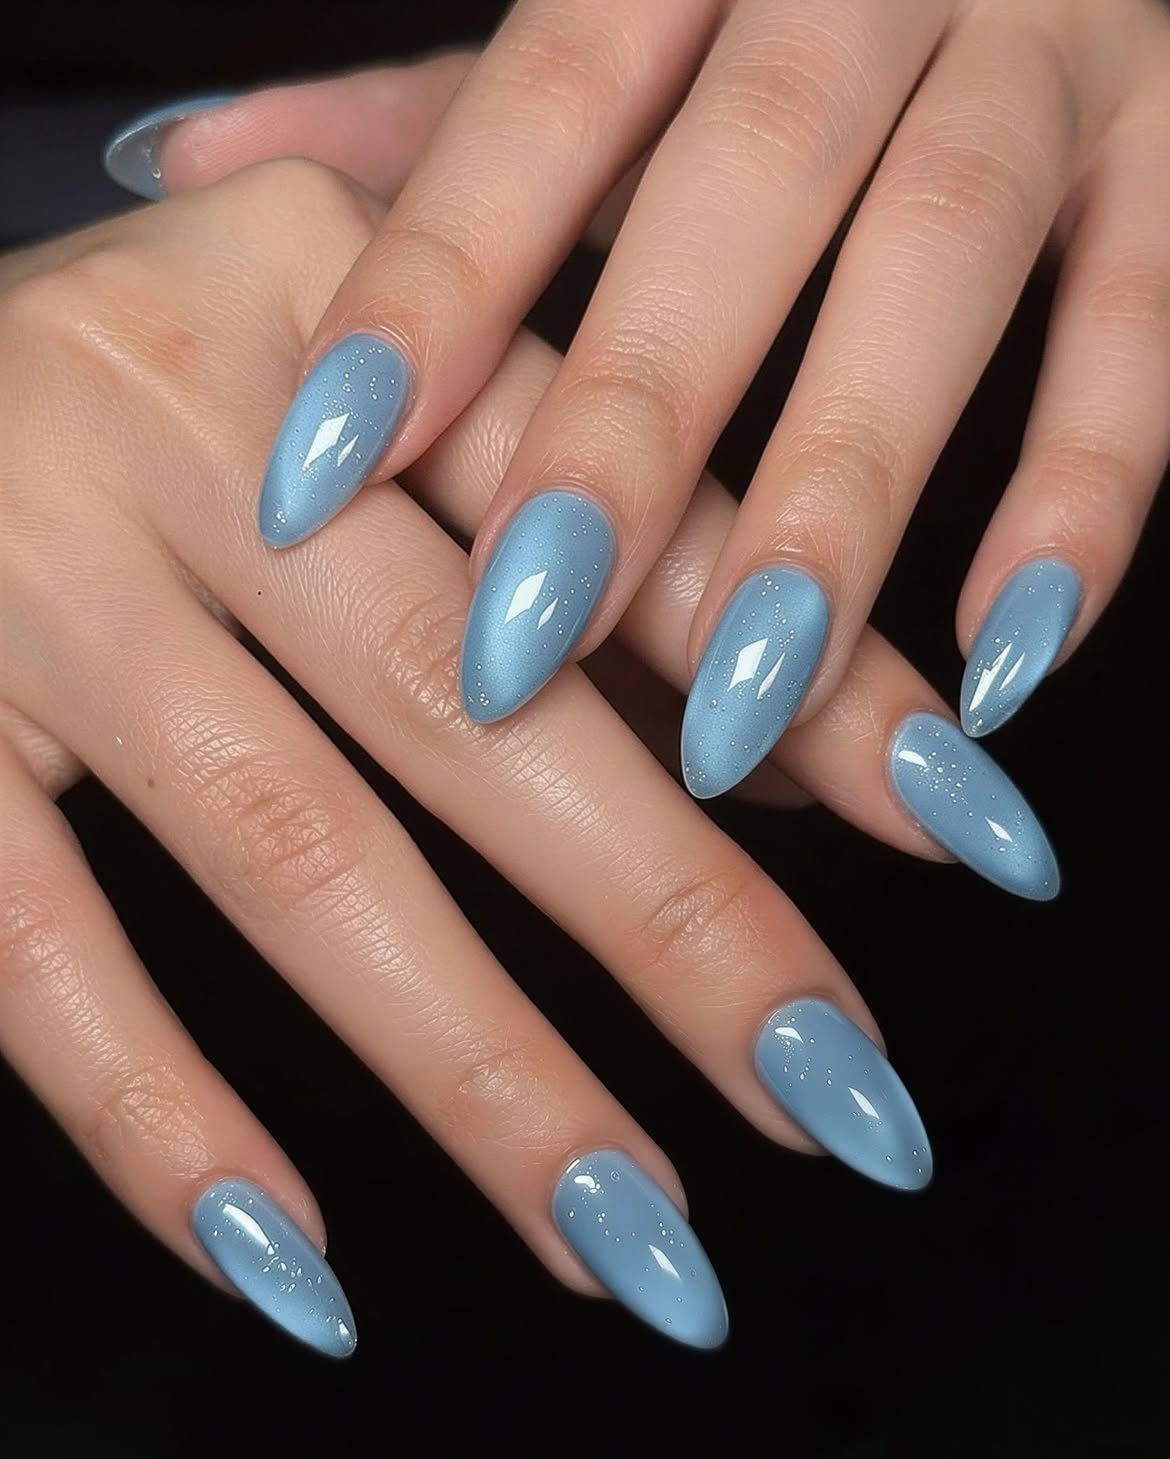
The appeal here comes from using one calm winter shade across every nail. Pale icy blue covers the long almond shape, while fine shimmer and tiny silver specks keep the color from looking flat.
Because there are no separate accent nails, preparation becomes the main focus. File each tip into a similar rounded point and smooth the nail surface before applying color. A polish with fine shimmer already mixed in will give the closest result with the least effort.
Build the blue with thin coats, then place a few tiny silver dots only where more sparkle is needed. Keep their spacing loose so they resemble frost rather than a strict pattern. Add a glossy top coat to sharpen the soft blue glow.
📌 Good To Know
Fine shimmer can draw attention to ridges. Start with a smooth base coat and let each blue layer settle before adding the next one.
16. Teal Glitter French Tips with Falling Snow Dots
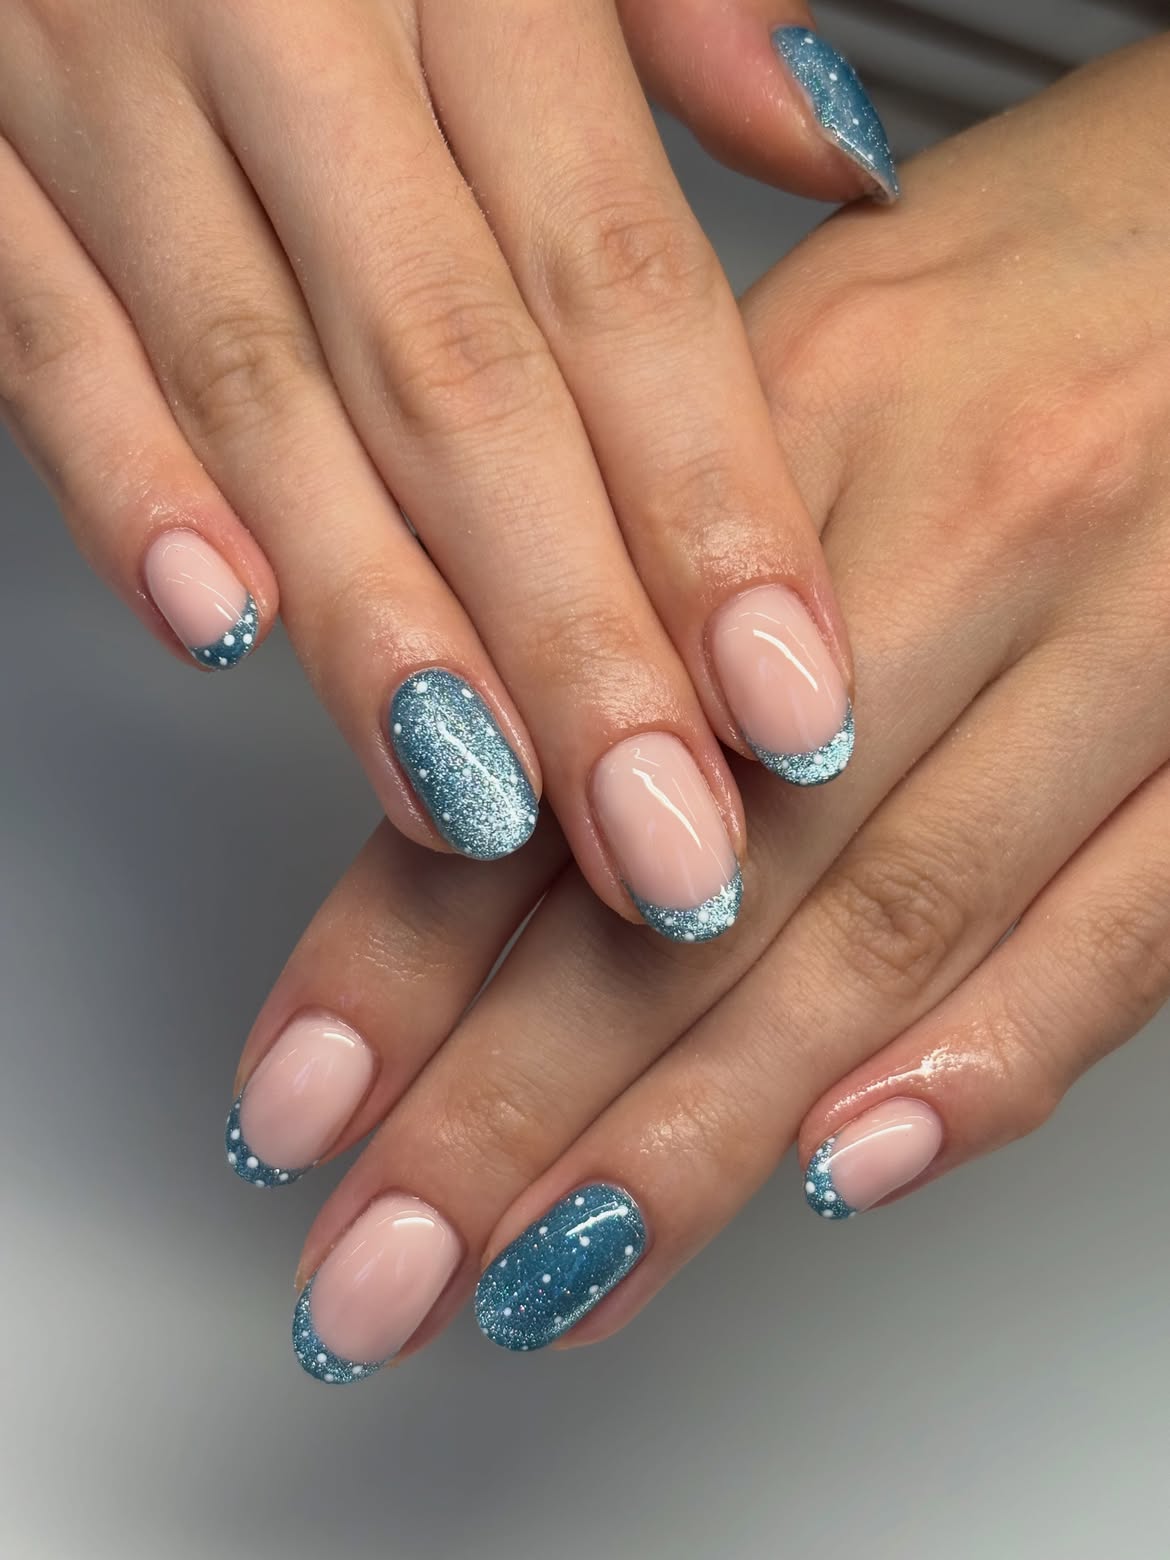
Tiny white dots make these teal glitter tips look like snow gathering along the edge of each nail. The sheer blush base keeps the manicure soft, while a few full glitter nails add a stronger burst of icy color.
Recreate the French tips with a curved band of teal glitter polish. Once it settles, add white dots in several sizes with a dotting tool or the rounded end of a small pin. Cluster more dots near the tip and use fewer as you move toward the center.
Paint one or two nails fully teal to break up the repeated French design. Add scattered white dots to those nails as well, then finish the whole set with a glossy top coat.
| Glitter French tips | Full glitter nails |
|---|---|
| Keep the set light and show the blush base | Add a stronger block of winter color |
| Cluster white dots close to the curved tip | Scatter white dots across the entire nail |
17. Lavender and Ice Blue Pearl Nails with a Soft Glow
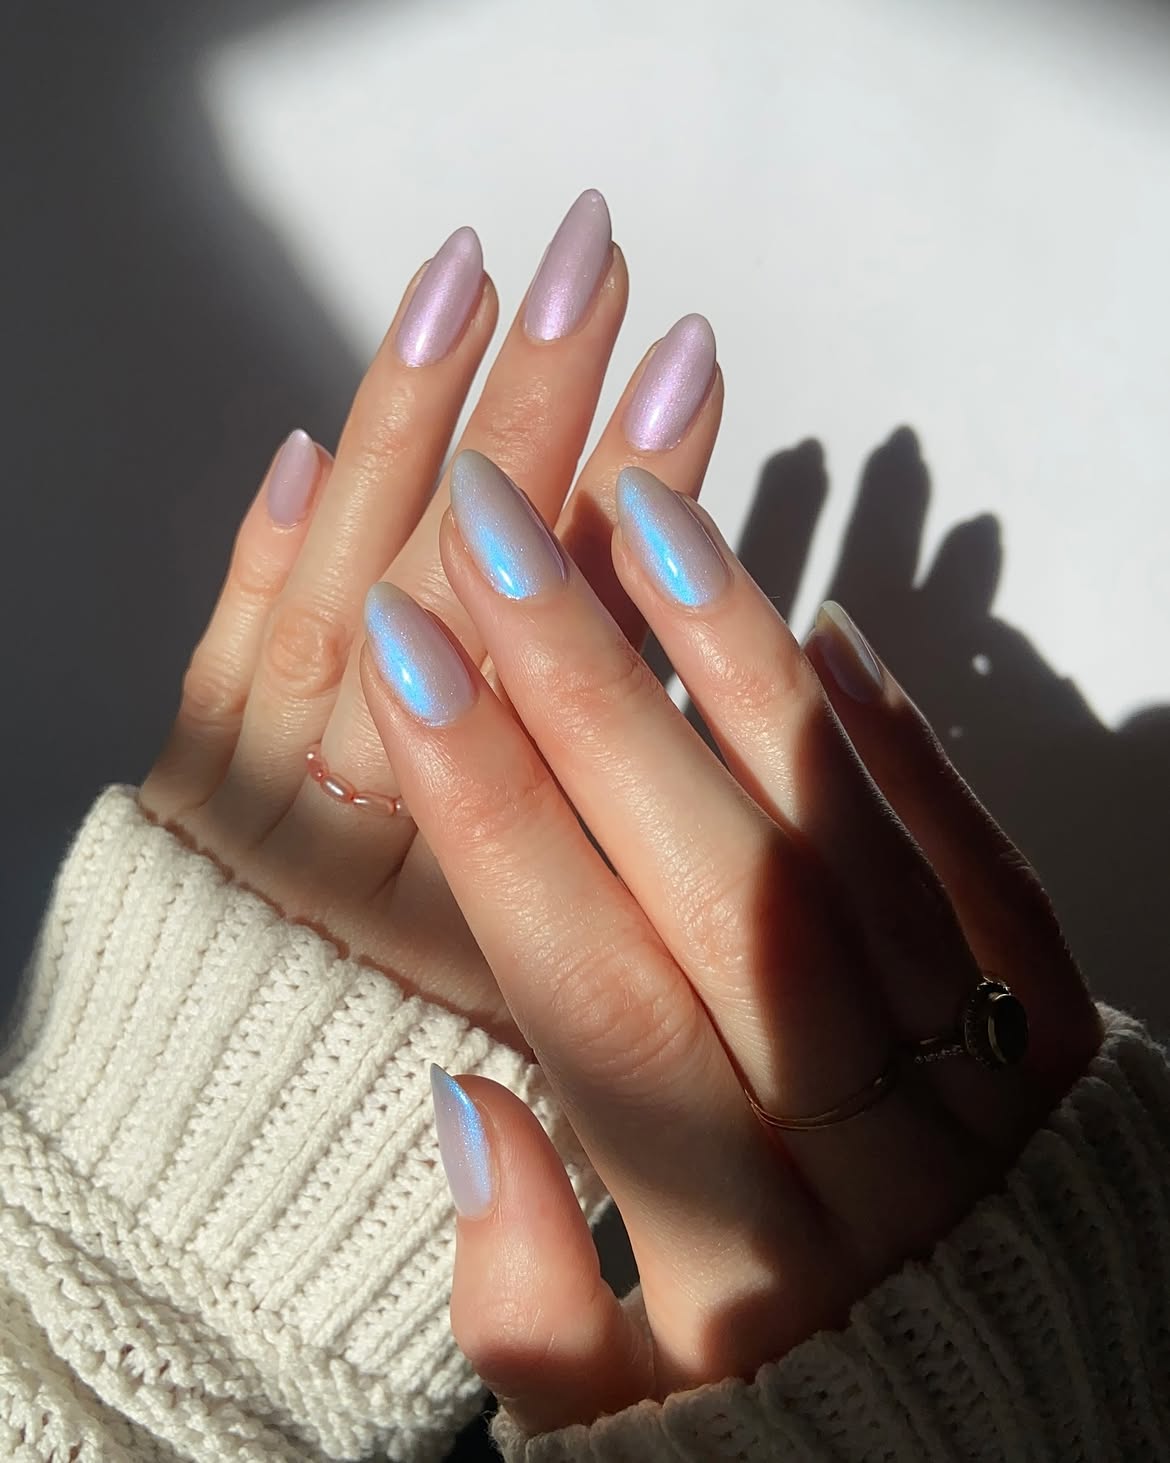
Two cool pastels split this manicure into a coordinated winter pair. One hand uses pale lavender with a soft pink reflection. The other uses icy blue with a brighter turquoise glow. Matching almond shapes and the same pearly finish keep the colors connected.
Use one shade on each hand, or alternate the colors if you prefer a mixed set. File every nail before painting so the rounded points stay even. Choose polishes with similar fine pearl particles rather than combining a smooth shimmer with chunky glitter.
Apply light coats and avoid brushing the same area too many times while it is wet. A clear glossy coat will deepen the soft color shift and help the reflection move across the nail.
Soft, cool, and slightly pink when the light reaches the center.
Crisp and bright with a stronger turquoise reflection.
18. Navy and Sage Plaid Nails for a Cozy Winter Look
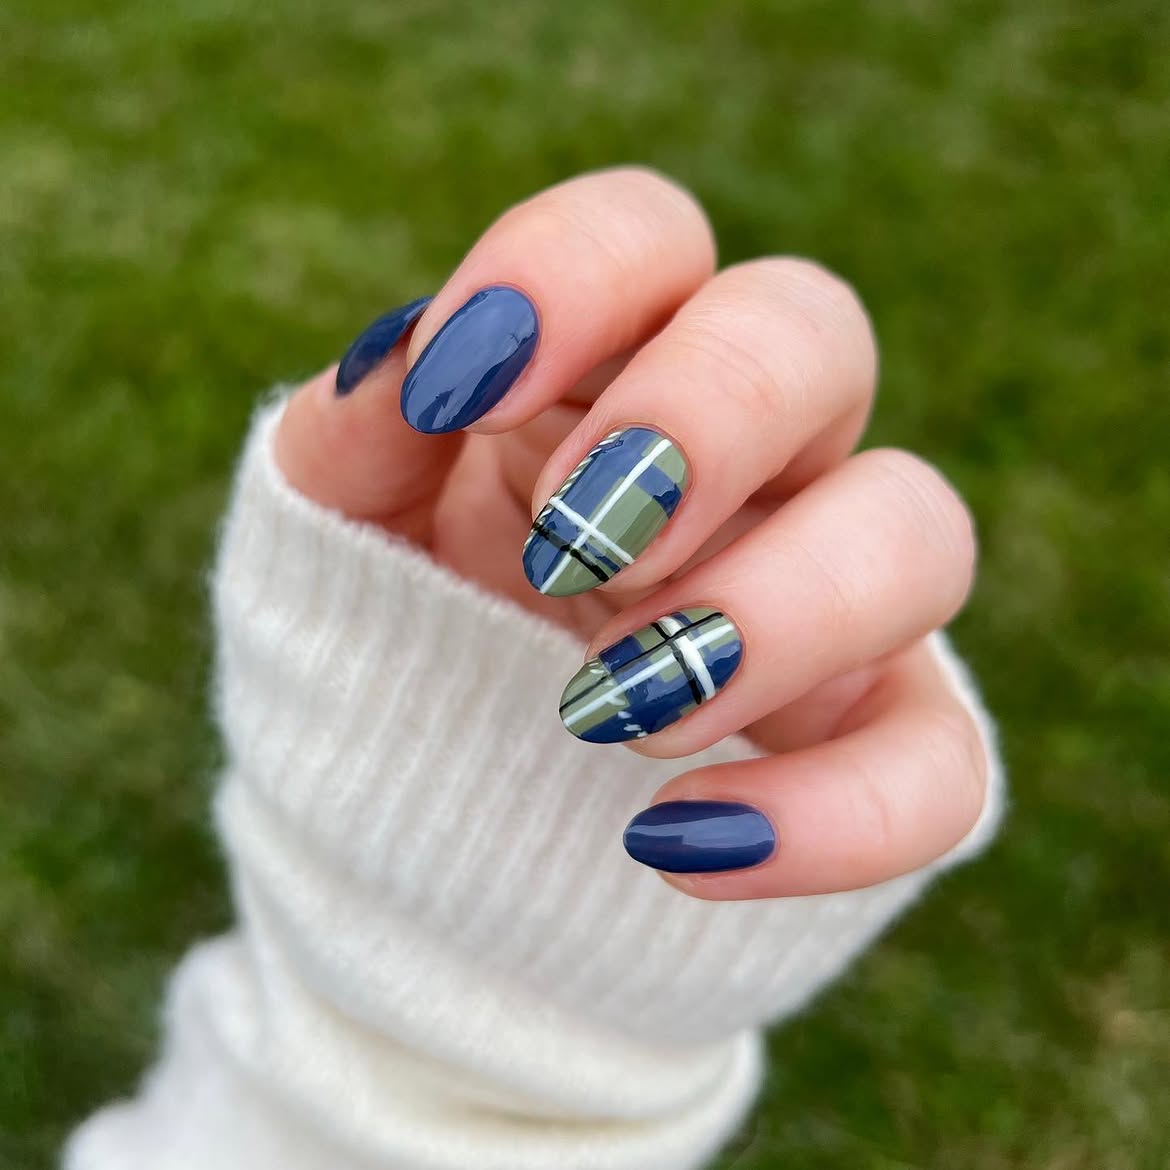
Deep navy polish gives this short manicure a calm, polished base. Two accent nails bring in a plaid pattern made from sage green blocks, broad navy bands, crisp white lines, and slim black details.
The plaid works because the lines have different weights. Wide bands form the main pattern, while the finer lines add definition. Keep the solid navy nails plain so the detailed accents remain easy to notice.
Paint the plaid in layers and let each color settle before crossing it with another line. A long liner brush will help you pull the stripes across the nail in one steady motion.
Plaid paint order
• Sage green base
• Wide navy bands
• Thin white lines
• Fine black accents
• Clear glossy top coat
Solid navy nails calm the set, while two plaid accents add enough pattern to create a cozy winter mood.
19. Cobalt Blue Shimmer Winter Nails You Can Do at Home
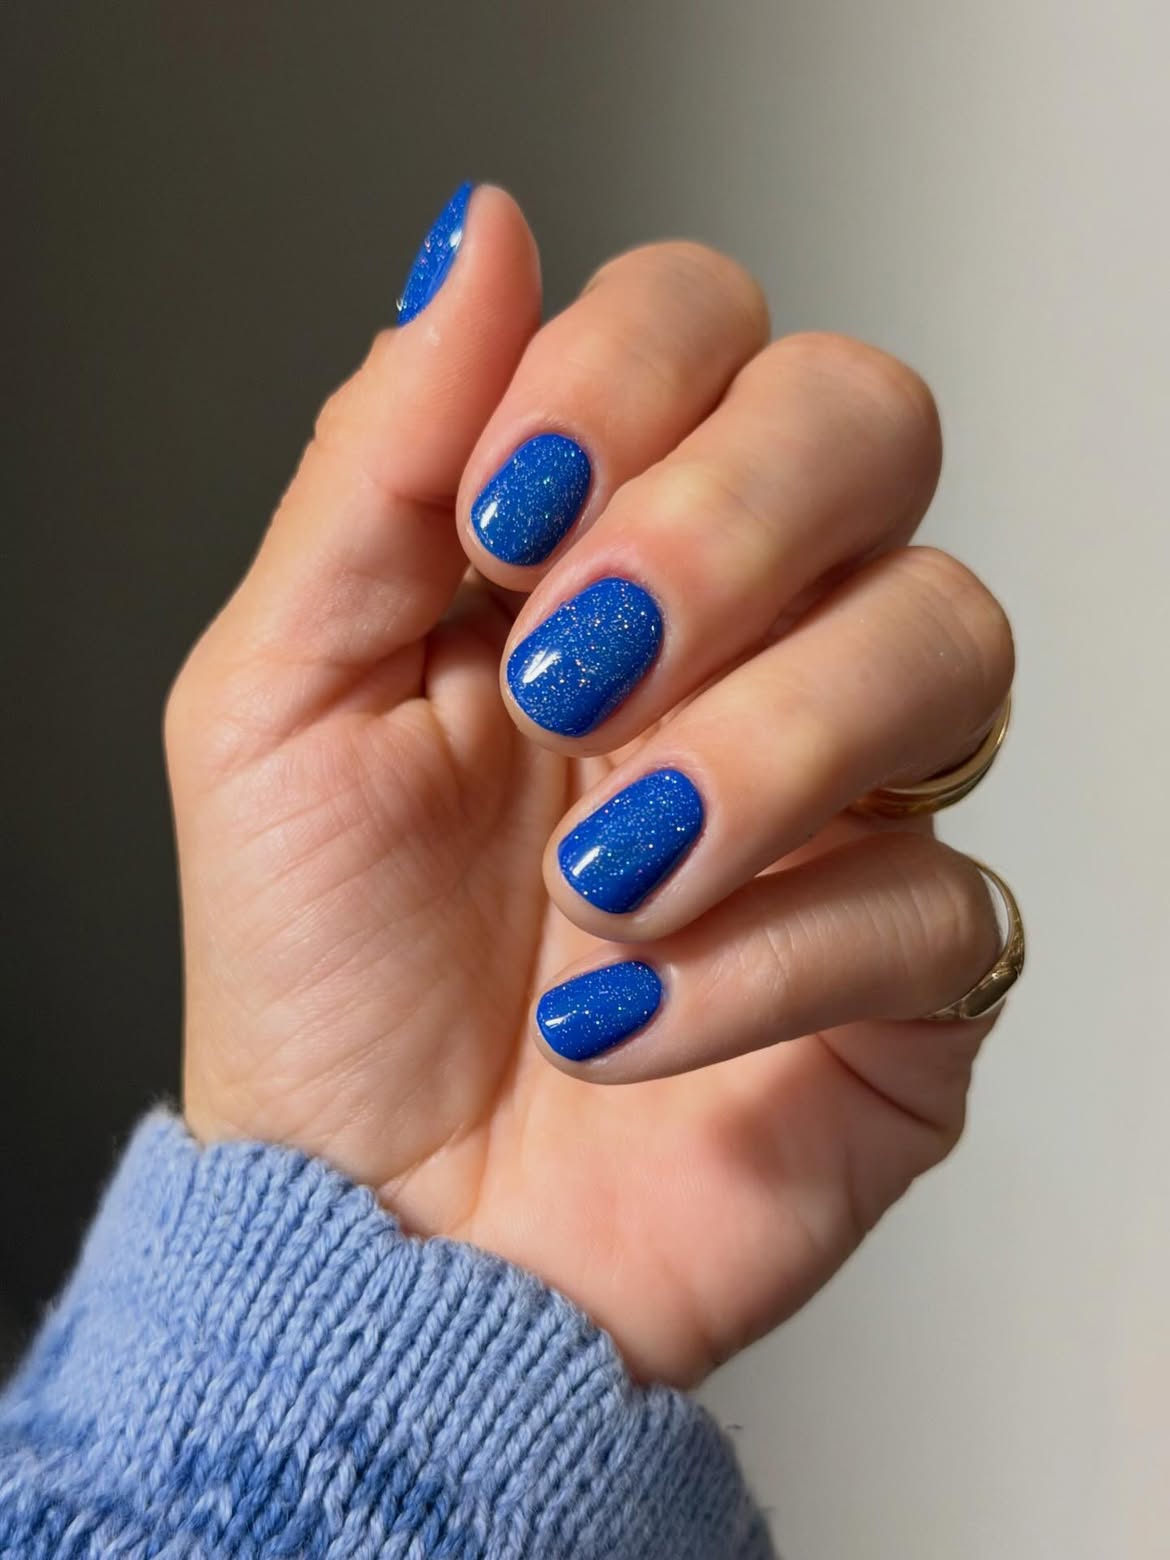
Short nails make this intense cobalt color feel neat and easy to wear. Fine reflective particles are scattered through the blue polish, adding tiny points of light without changing the smooth finish.
The softly squared shape gives the bold shade a clean outline. Since every nail uses the same polish, careful edges and even coverage become the main details.
Start with a smooth base coat, then apply the cobalt shimmer in light layers.
- Wipe excess polish from the brush before working close to the cuticle.
- If the first coat looks slightly uneven, allow it to settle before adding more color.
- Finish with a glossy top coat and brush it across the tips to help protect the manicure.
Get this smooth finish
20. White and Gold French Tips for Winter Celebrations
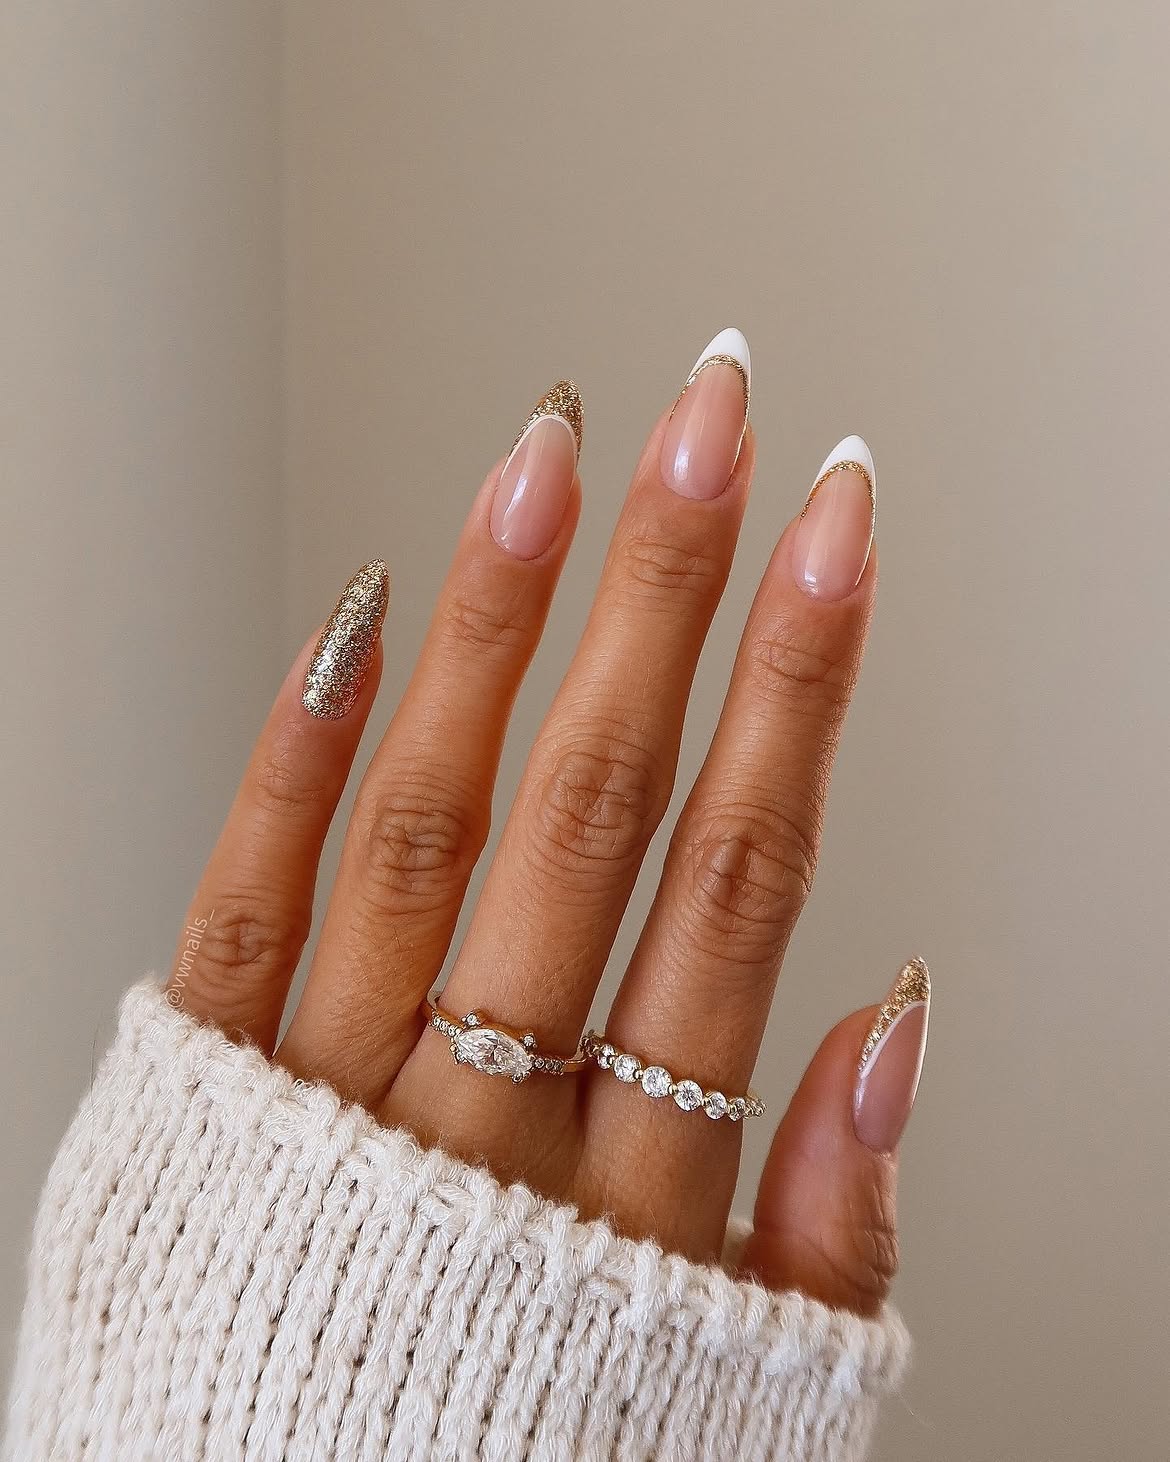
Gold glitter plays three different roles in this polished winter manicure. It forms a slim border around crisp white French tips, fills several tips completely, and covers one full accent nail. The sheer blush base keeps all that sparkle from feeling too heavy.
Begin with the blush base, then map the curved tips with a fine brush. Paint some tips white and fill the others with gold glitter. Once the white polish has settled, trace a narrow gold line along its lower edge.
Keep the glitter borders slim so the white tips remain visible. If the gold polish feels textured, add an extra layer of clear top coat to smooth the surface and sharpen the shine.
Repeat the same curved tip shape across every nail.
Use gold as a border, a tip color, and one full accent.
Do not make the gold borders thick enough to hide the white.
Do not leave rough glitter uncovered at the tips.