16 Brown and Green Nails With Bold Designs, Playful Details
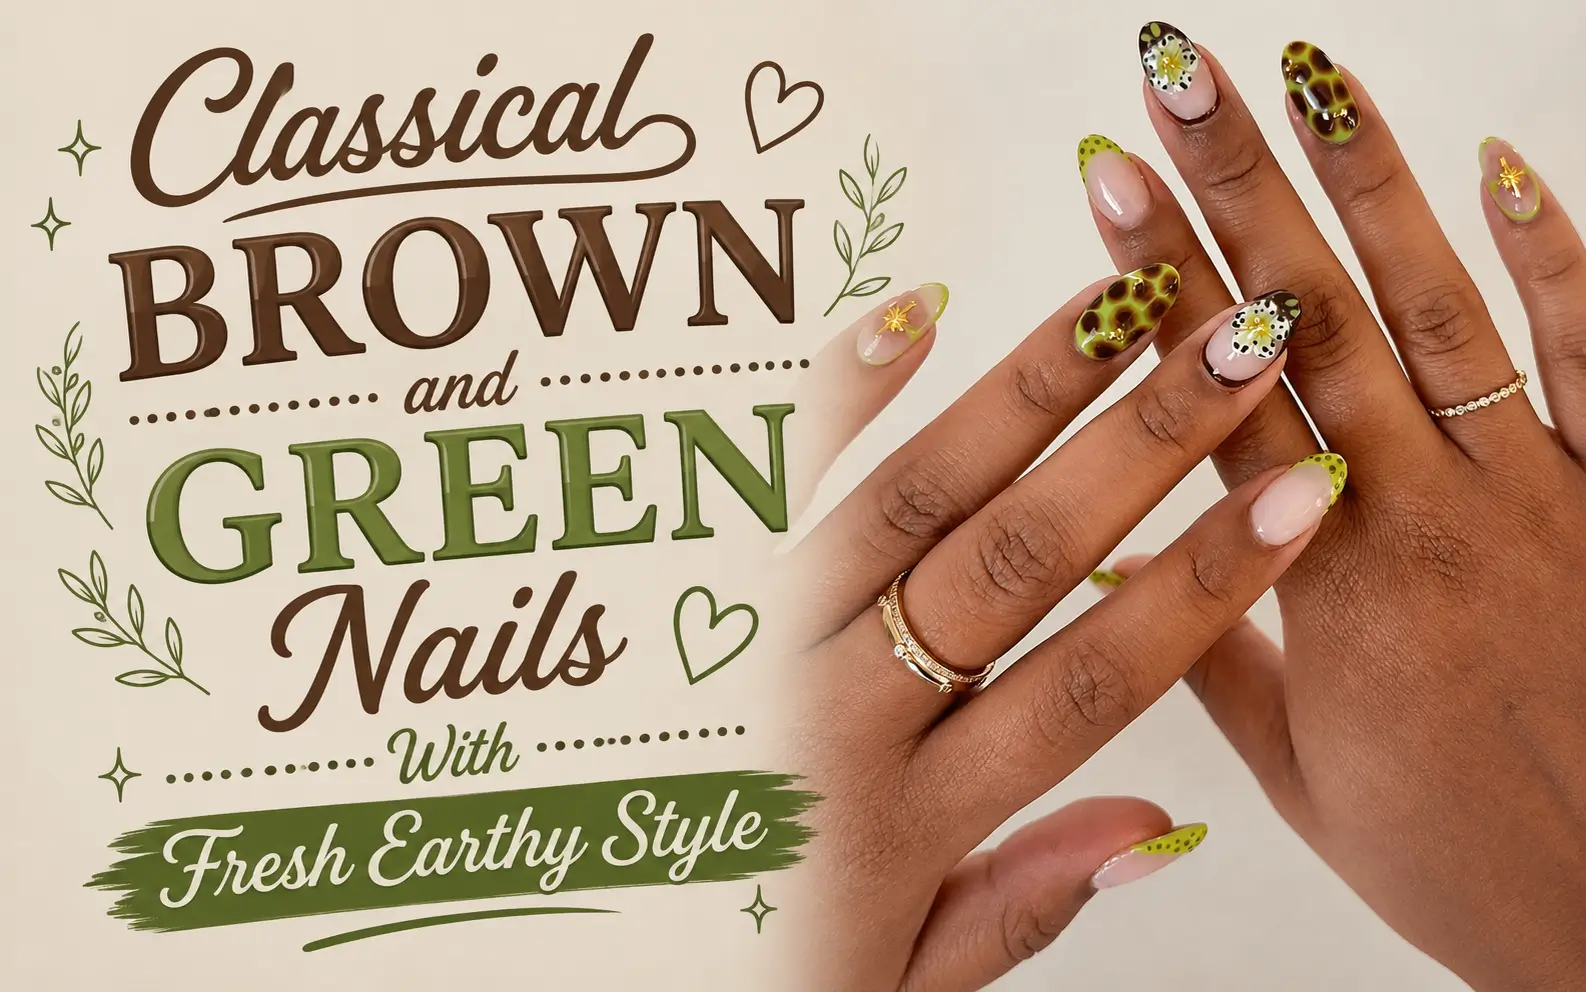
Brown and green may sound like a quiet pair, but on nails they can look playful, rich, graphic, or soft. This roundup of Brown and Green Nails shows how much range two earthy colors can offer when you change the shade, finish, and pattern.
You will find deep chocolate paired with neon lime, soft mint beside tortoiseshell, and olive green balanced with caramel and blush. Some designs stay clean with simple dots, stripes, curved lines, or French tips. Others use smoky marble, jelly layers, flowers, gold details, metallic shine, and raised droplets for more texture.
Each idea handles the color balance differently. A single accent nail can keep the set calm, while reversed colors across both hands create stronger contrast. Short square nails feel neat and practical, while long almond shapes leave more room for flowing artwork. Save the looks that match your usual nail length and personal style, then borrow the color placement, finish, or one small detail for your next manicure.
16 Trendy Brown and Green Nails 2026
1. Mix Tortoiseshell Brown With Soft Moss Green
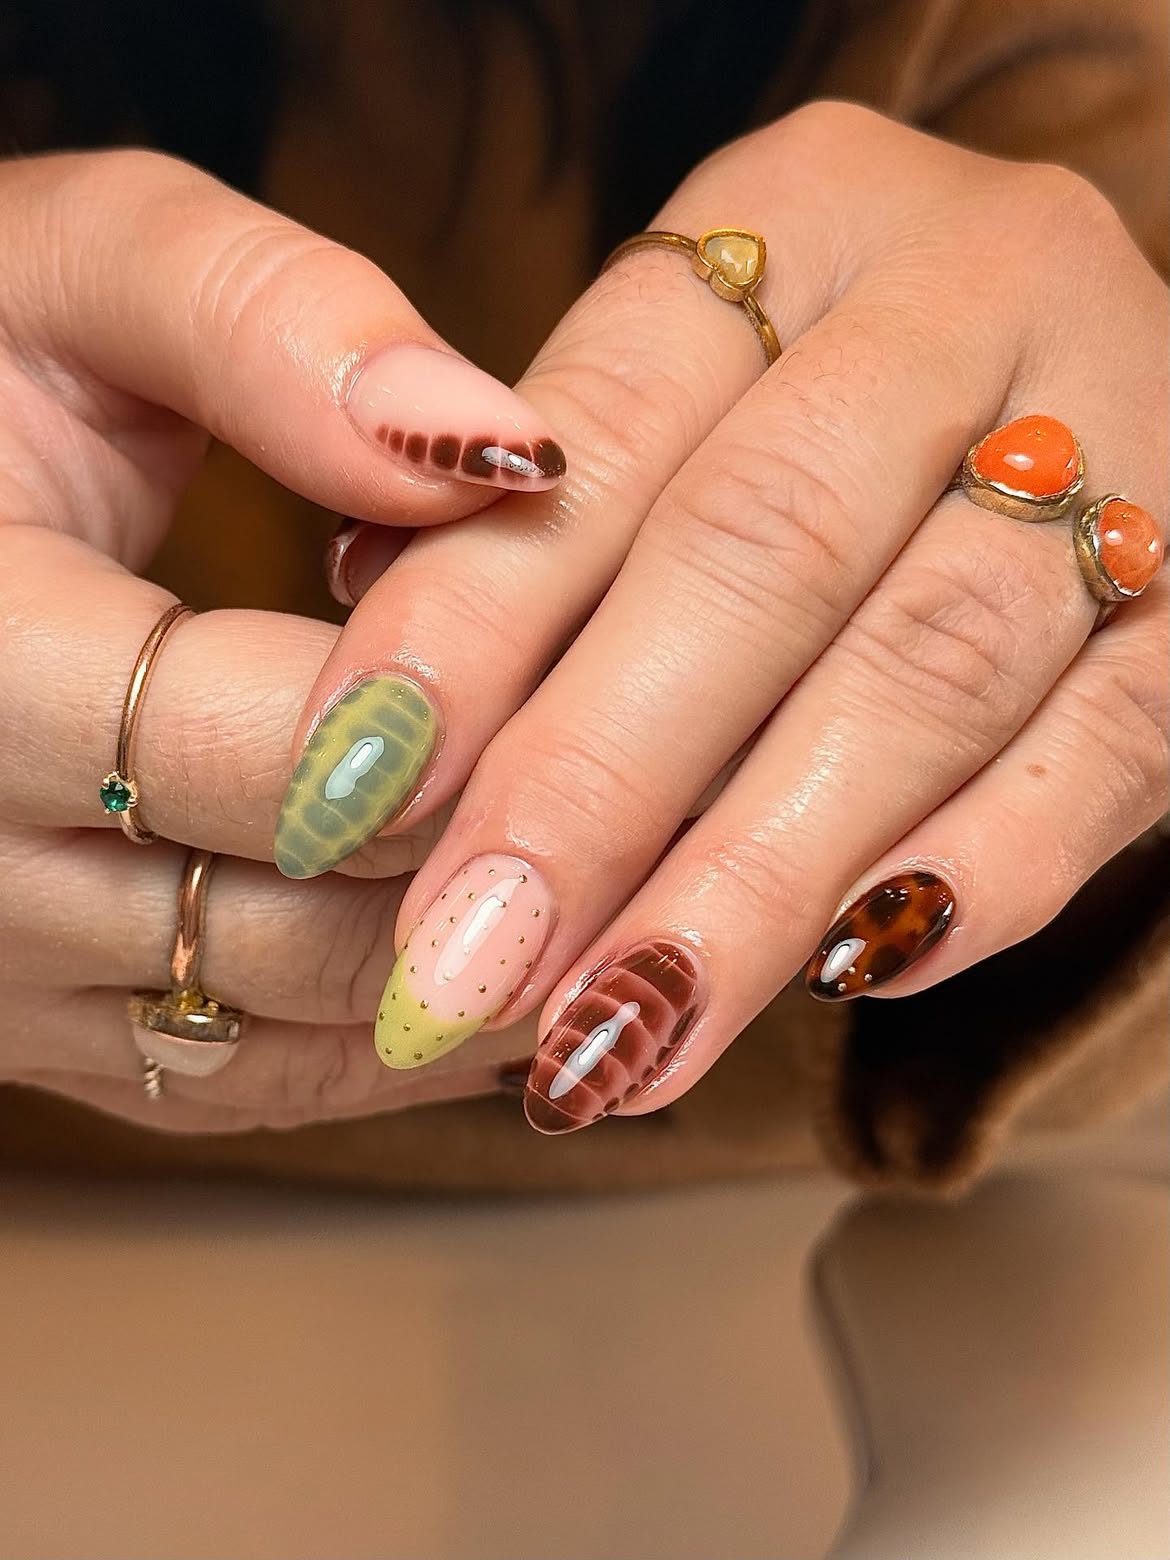
Rich amber brown and muted green give this almond shaped manicure a warm, earthy feel. The set stays interesting because every nail uses the colors differently.
What works here
• Translucent tortoiseshell patterns add depth without looking heavy.
• A cloudy moss green nail brings a softer contrast.
• The pale blush base creates breathing room between darker designs.
• Tiny gold dots connect the manicure with the warm brown tones.
Keeping the same glossy finish and almond shape helps these varied patterns feel like one complete set. For a calmer version, use tortoiseshell on two nails, green on two nails, and leave the remaining nail mostly neutral.
Pair detailed tortoiseshell nails with quieter green and blush designs.
Repeat the same glossy finish across the full set.
Do not place dots and stripes on every nail.
Avoid giving every shade the same visual weight.
3. Give Brown and Green Nails a Neon Retro Twist
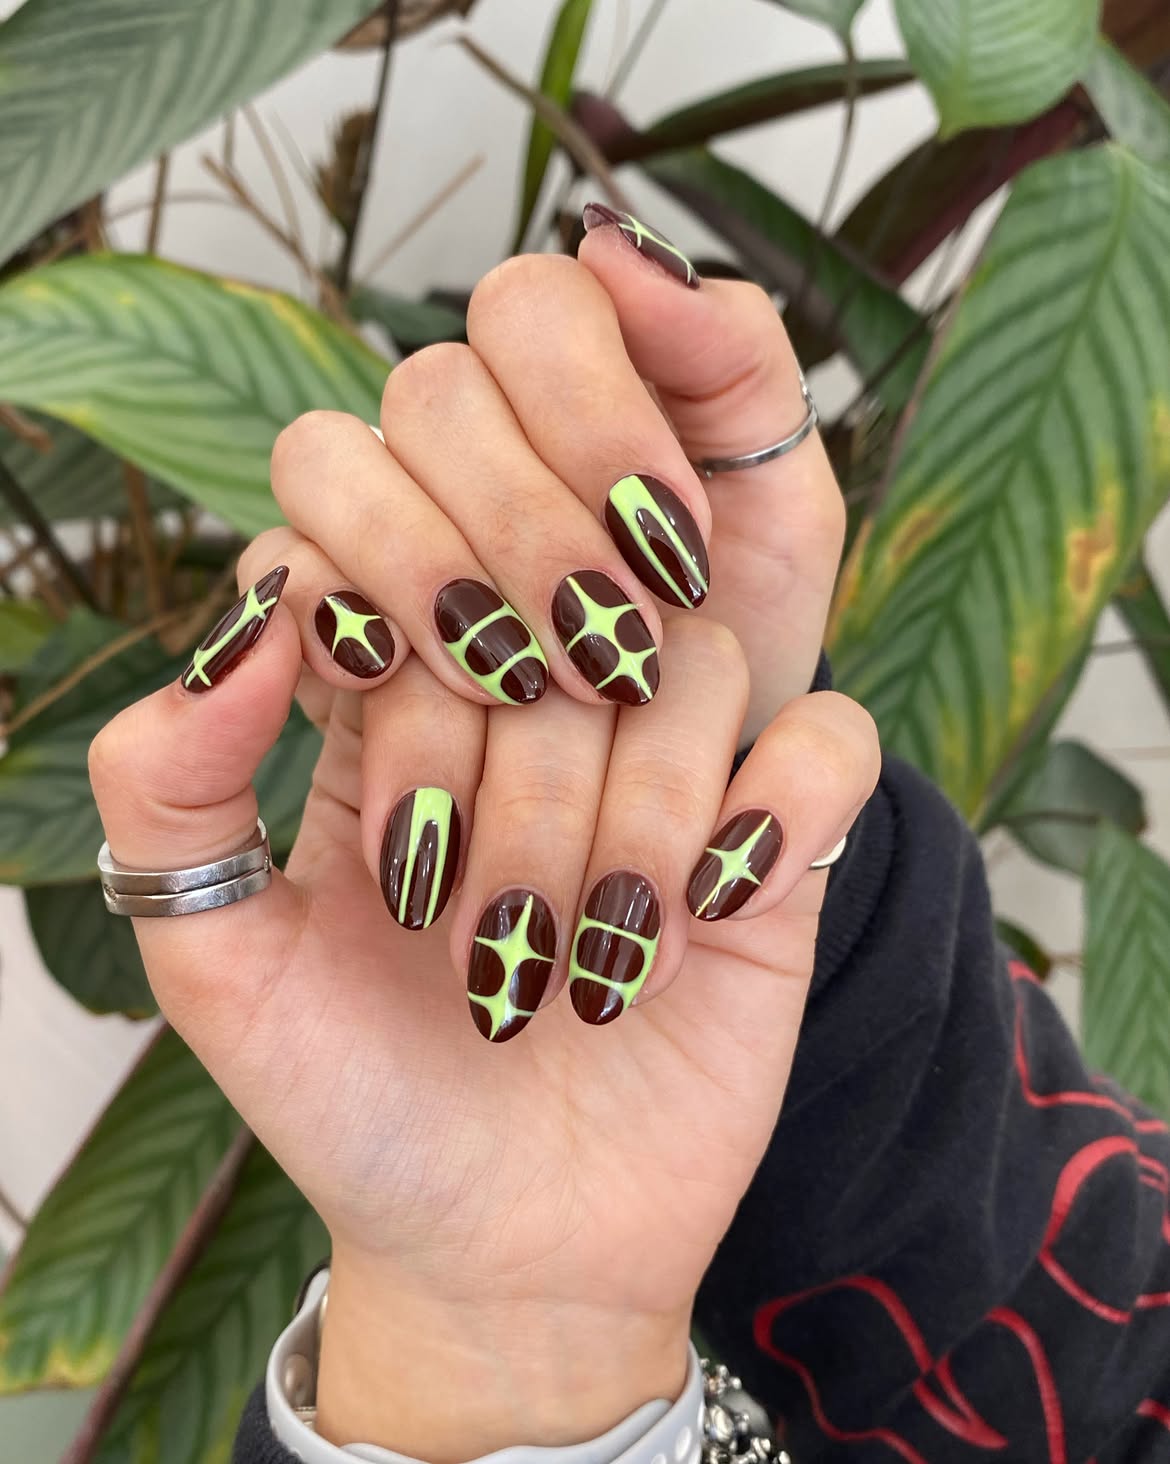
Deep chocolate brown creates a rich base, while sharp lime green lines make the manicure feel graphic and playful. The contrast is strong, but the thin green details allow the brown polish to remain the main color.
Bold nails: Four point stars and rounded grid patterns create the strongest focal points.
Quieter nails: Long green loops and slim crossing lines give the set visual breathing room.
The repeated colors and glossy finish connect every design, even though each nail carries a different pattern. Ask for a dark translucent brown base if you want extra depth. A solid chocolate shade will create a denser, cleaner result.
3. Soften Brown and Green Nails With Blush Pink
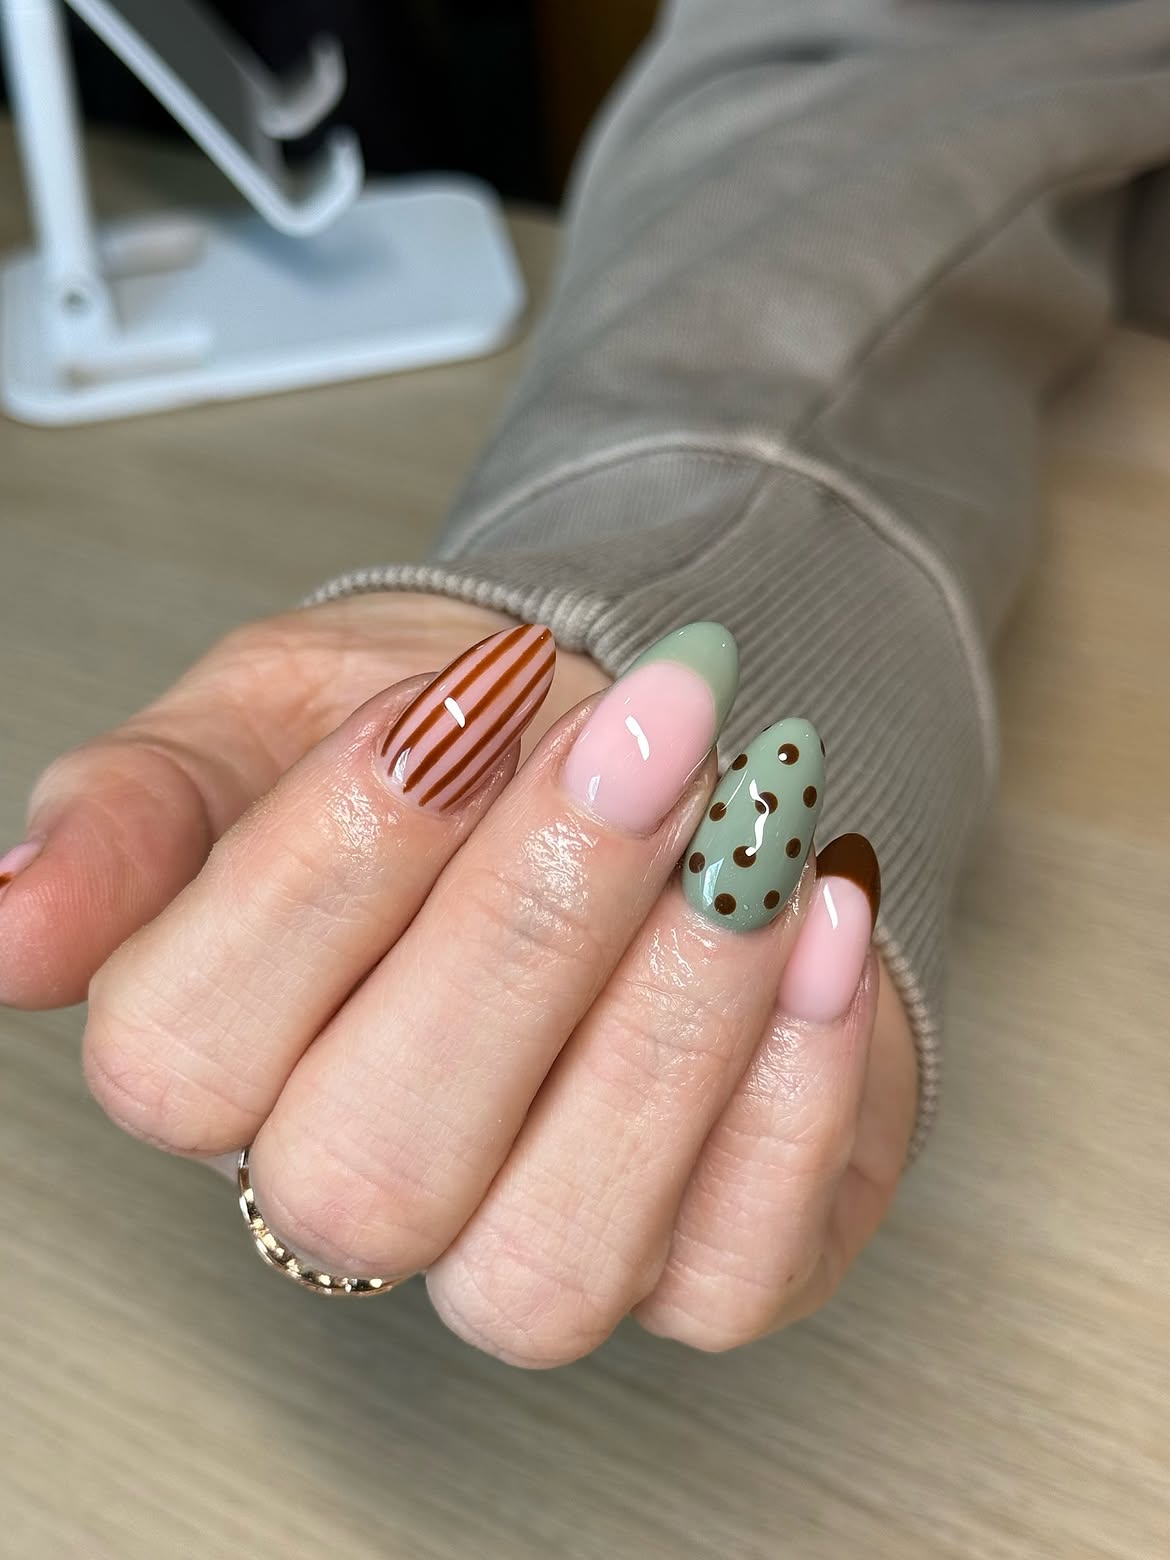
Muted sage green, warm brown, and milky pink create a softer version of this earthy color pairing. The almond shape keeps the mixed patterns neat, while the glossy finish gives every nail the same polished surface.
How to build the look
- Start with a sheer blush base on the striped and French tip nails.
- Add sage green as a full accent color and as a softly curved tip.
- Use brown for narrow stripes, small dots, and one rounded French tip.
Changing the placement of each color prevents the manicure from feeling repetitive. The dotted green nail works as the playful focal point, while the simpler pink and green nail gives the eye a quiet place to rest.
💡 Detail Tip
Keep the brown stripes narrow and the dots small. Matching their visual weight helps three different patterns sit together without making the set look crowded.
If you love earthy color pairings with a festive twist, you may also enjoy these 17 Red and Green Nails for more bold seasonal manicure ideas.
4. Choose Brown and Green Jelly Nails for a Glassy Finish
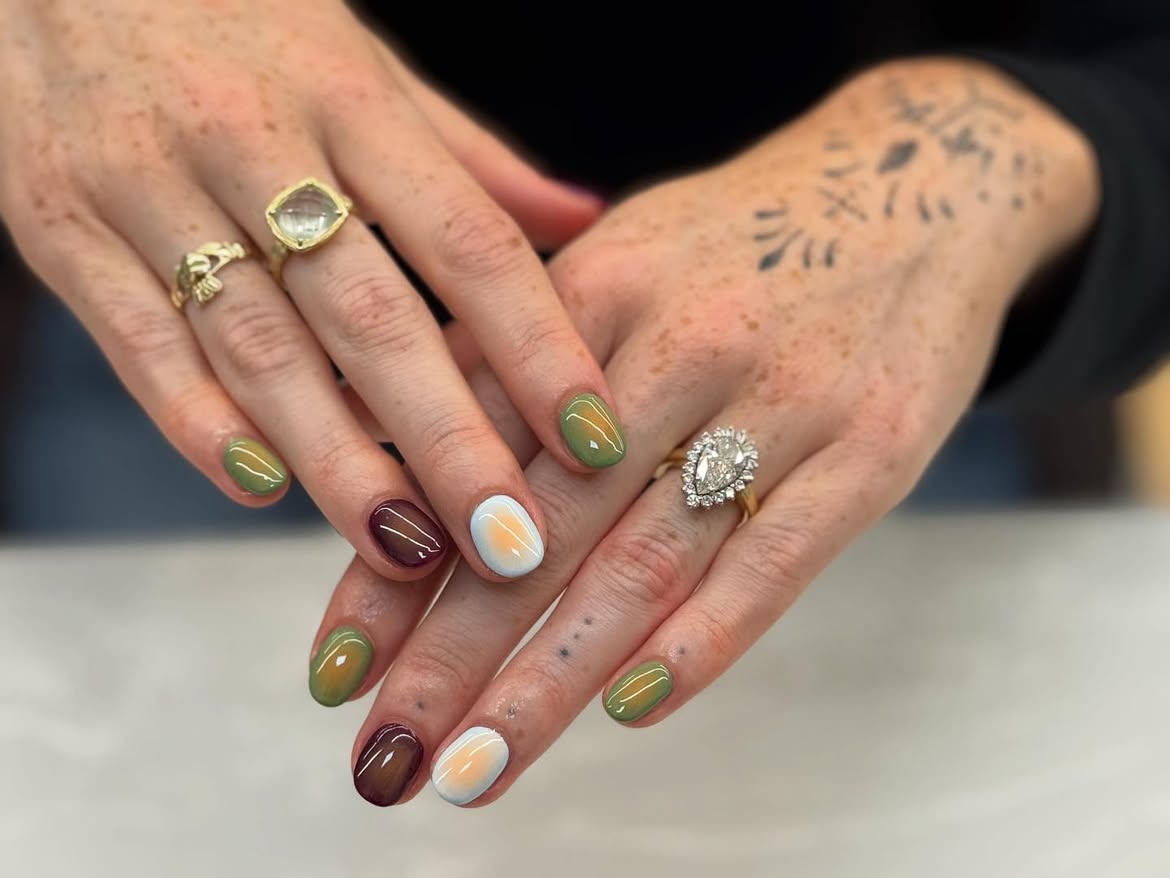
These short oval nails use translucent color to give an earthy palette more depth. Olive green appears across most of the set, while deep brown adds a richer contrast without taking over.
Color balance: Warm amber shading shows through the center of several green and brown nails, making the colors look layered rather than flat.
Accent choice: Two milky nails carry a soft blue edge and a peachy glow. These lighter details break up the darker shades and keep the set gentle.
Shape and finish: The rounded length feels practical, while the smooth shine strengthens the glass like effect. This design works especially well when you prefer blended color over detailed line art.
Ask for thin layers of sheer green and brown polish. Building the color slowly preserves the warm glow at the center instead of creating one dense block of color.
5. Frame Mint Green Nails With Smoky Brown Marble
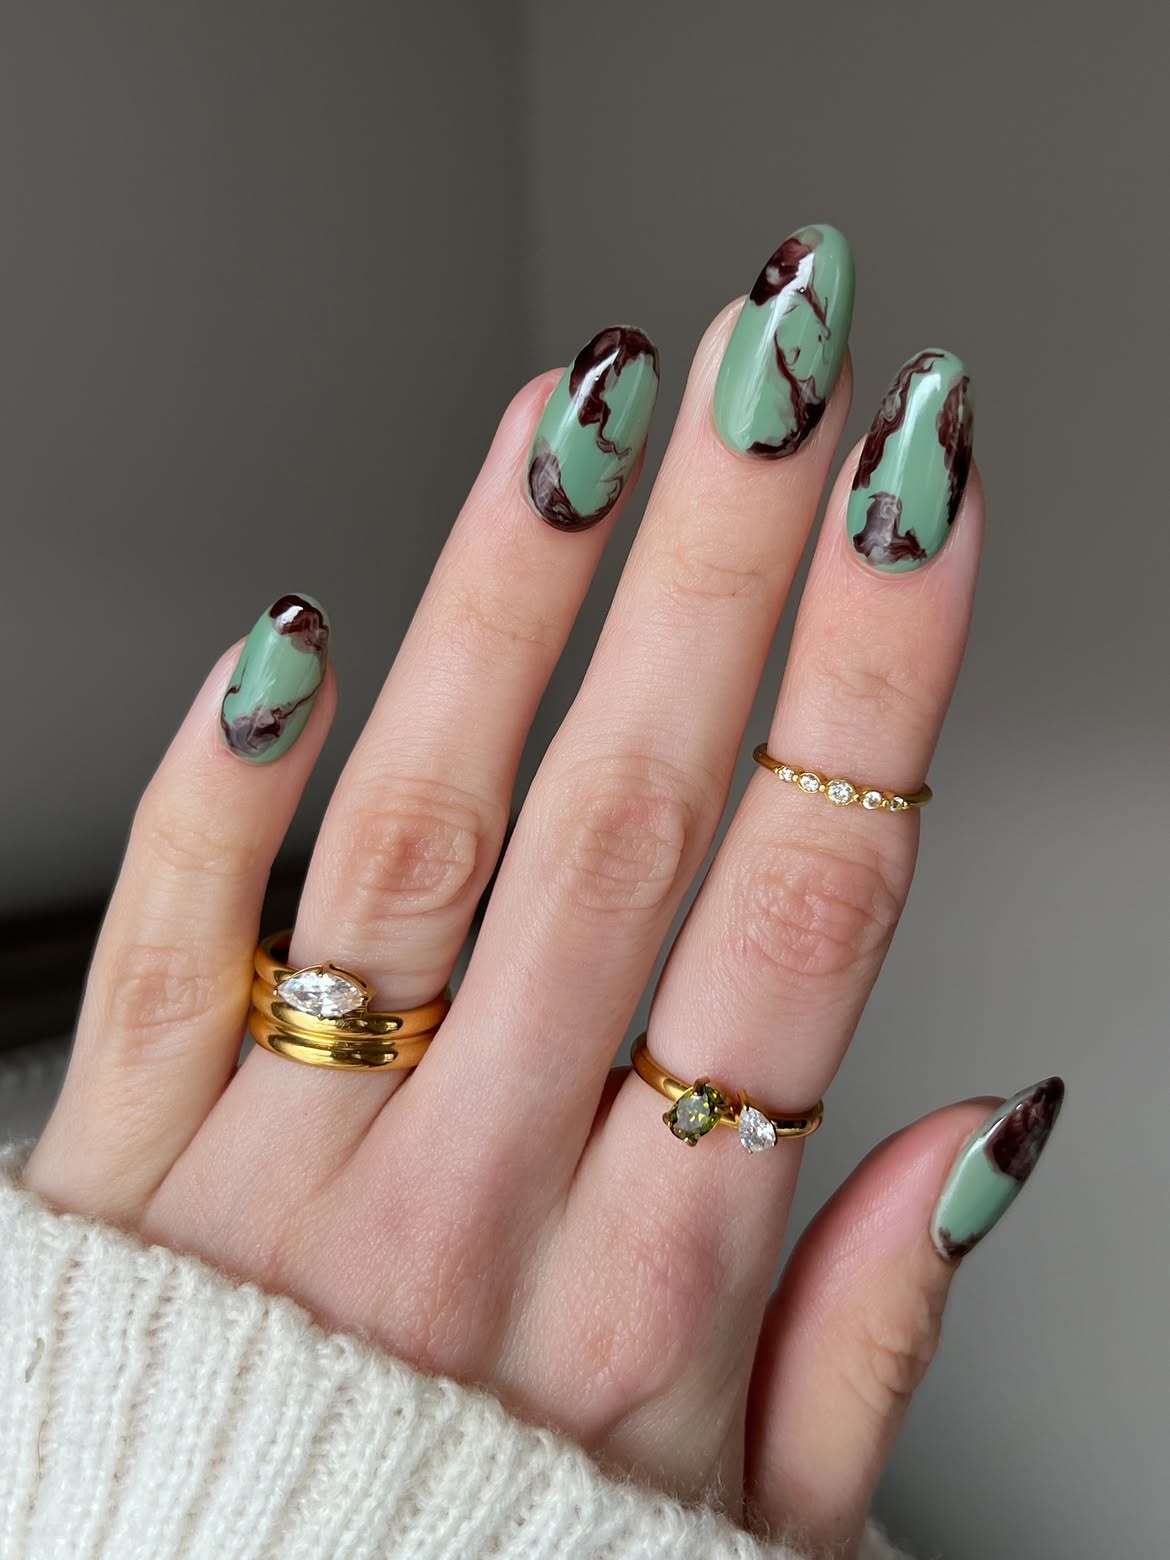
Fresh mint green fills the center of these long almond nails, while deep brown marble gathers around the tips and edges. The uneven placement makes the color look smoky and fluid rather than carefully outlined.
The smartest detail is the open space. Most of the green remains visible, so the darker brown adds depth without covering the base.
- Brown patches stay irregular from nail to nail.
- Fine wisps move inward from the heavier edges.
- A clear glossy coat smooths the layered artwork.
Ask for soft, flowing brown lines instead of crisp swirls. Slight changes in thickness will help the marble look natural across the full set.
6. Pair Spotted Brown and Green Nails With Floral Details
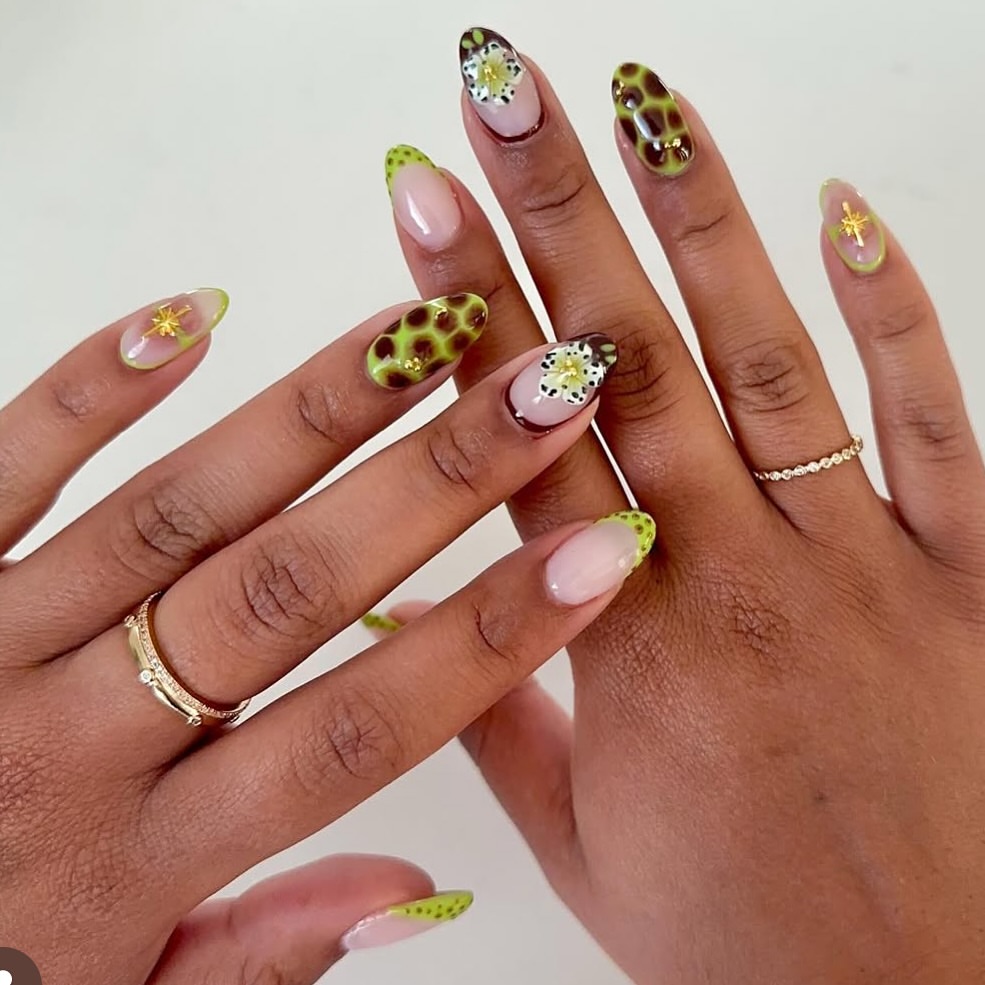
This playful set combines organic brown spots, bright green tips, sheer pink bases, and small floral artwork. Each almond nail carries a different design, yet the repeated lime green keeps the manicure connected.
The bolder nails use irregular brown shapes over green, creating a lively spotted pattern. Two nails feature pale flowers with dark speckles and warm yellow centers. Calmer nails leave more of the pink base visible, using dotted green tips, thin outlines, and small gold star details.
The mix feels busy in a controlled way because the full coverage designs sit beside nails with plenty of open space. Keep the same green shade across every pattern to hold the look together.
| Statement Nails | Supporting Nails |
|---|---|
| Brown and green organic spots | Sheer pink with green tips |
| Layered flower artwork | Thin outlines and gold details |
| Rich color and pattern | More visible pink space |
7. Keep Spotted Brown and Green Art on the French Tips
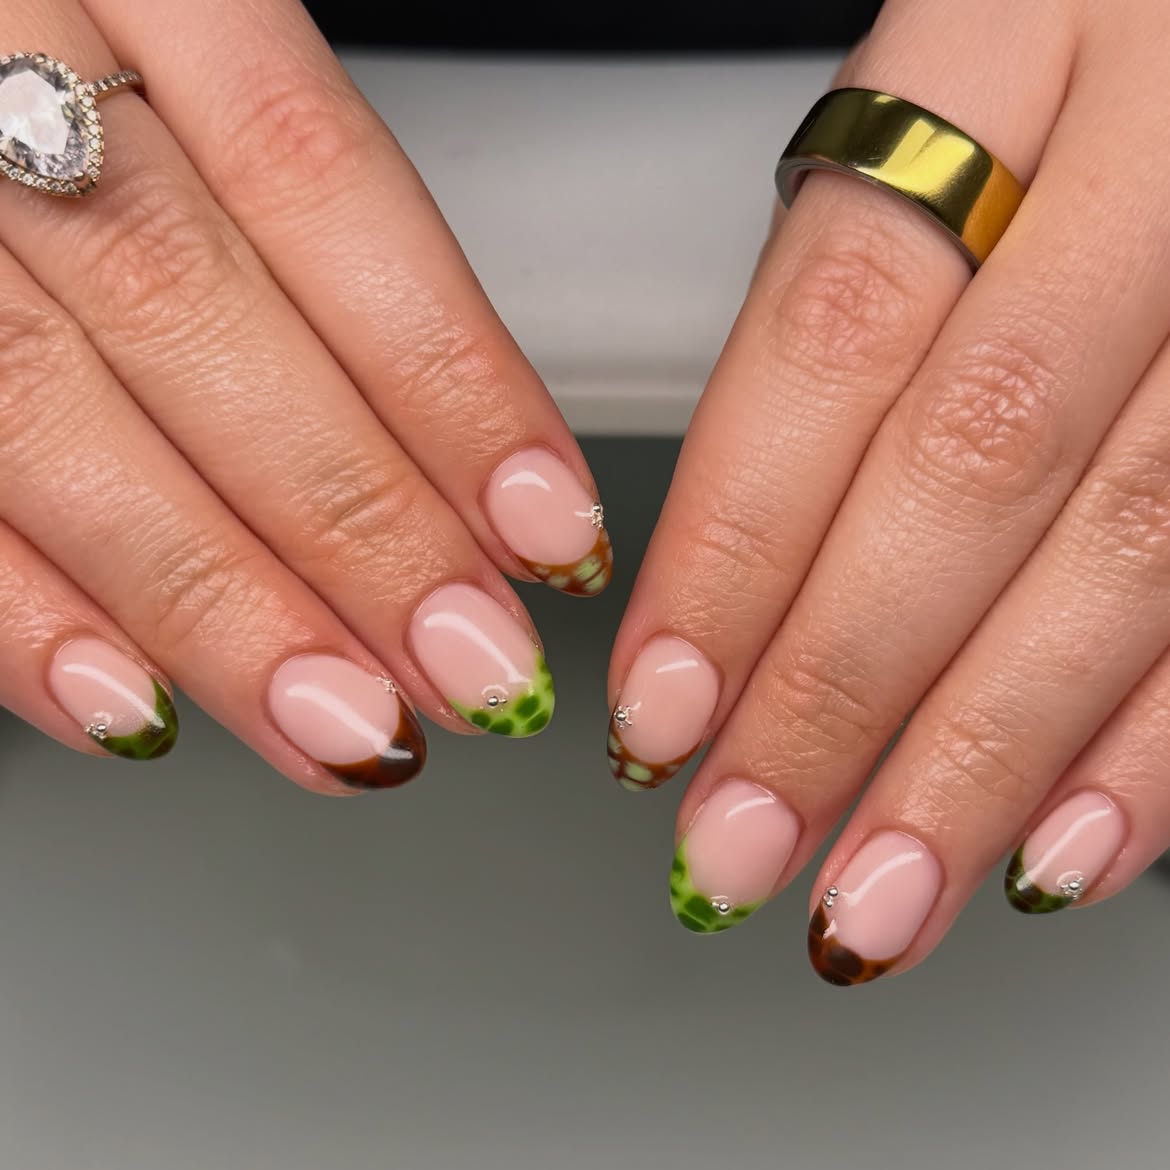
Limiting the pattern to the tips gives these brown and green nails a clean, wearable finish. The sheer blush base remains visible across most of each short rounded nail, so the detailed color never feels heavy.
Some tips use warm caramel brown with darker tortoiseshell patches. Others switch to vivid green with olive spots. Alternating the two versions creates variety while the matching tip depth keeps the manicure orderly.
Tiny silver details sit close to the curved smile line, adding a little light between the neutral base and patterned edge. This is a smart choice when you enjoy bold nail art but want the overall set to remain neat and practical.
Recreate This Look
8. Add Coral Flowers to Brown and Green Polka Dot Nails
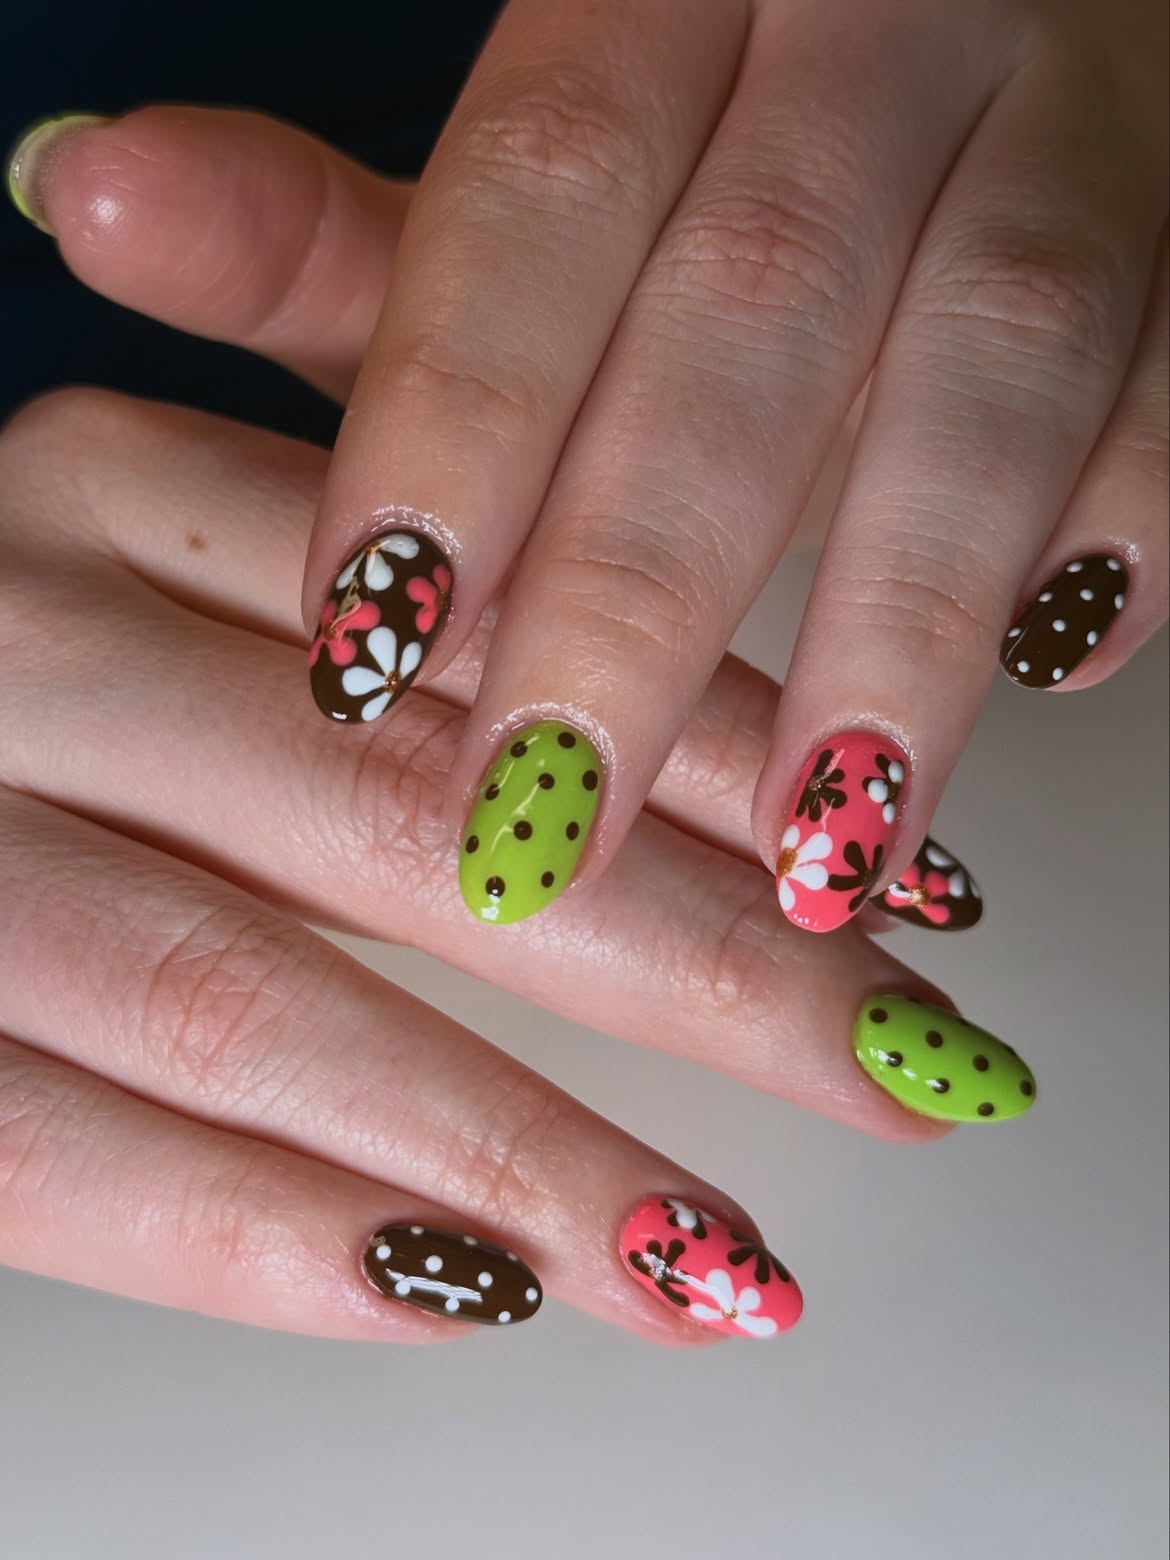
Coral pink brings a cheerful lift to this earthy brown and green manicure. The rounded oval nails alternate between simple dots and larger floral designs, creating a clear rhythm across both hands.
- Brown nails carry small white dots, while lime green nails repeat the pattern in dark brown.
- The coral nails feature broad white and brown flowers with warm metallic centers.
- A brown floral nail repeats the coral petals, helping the accent color travel through the full set.
The matching shine and nail shape keep these different designs connected. Use fewer flowers and more dotted nails if you want the same color story with a quieter finish.
Chocolate brown and lime green create a strong grounded pairing.
Coral flowers and white petals add contrast without removing the brown and green focus.
9. Layer 3D Droplets Over Brown and Green Nails
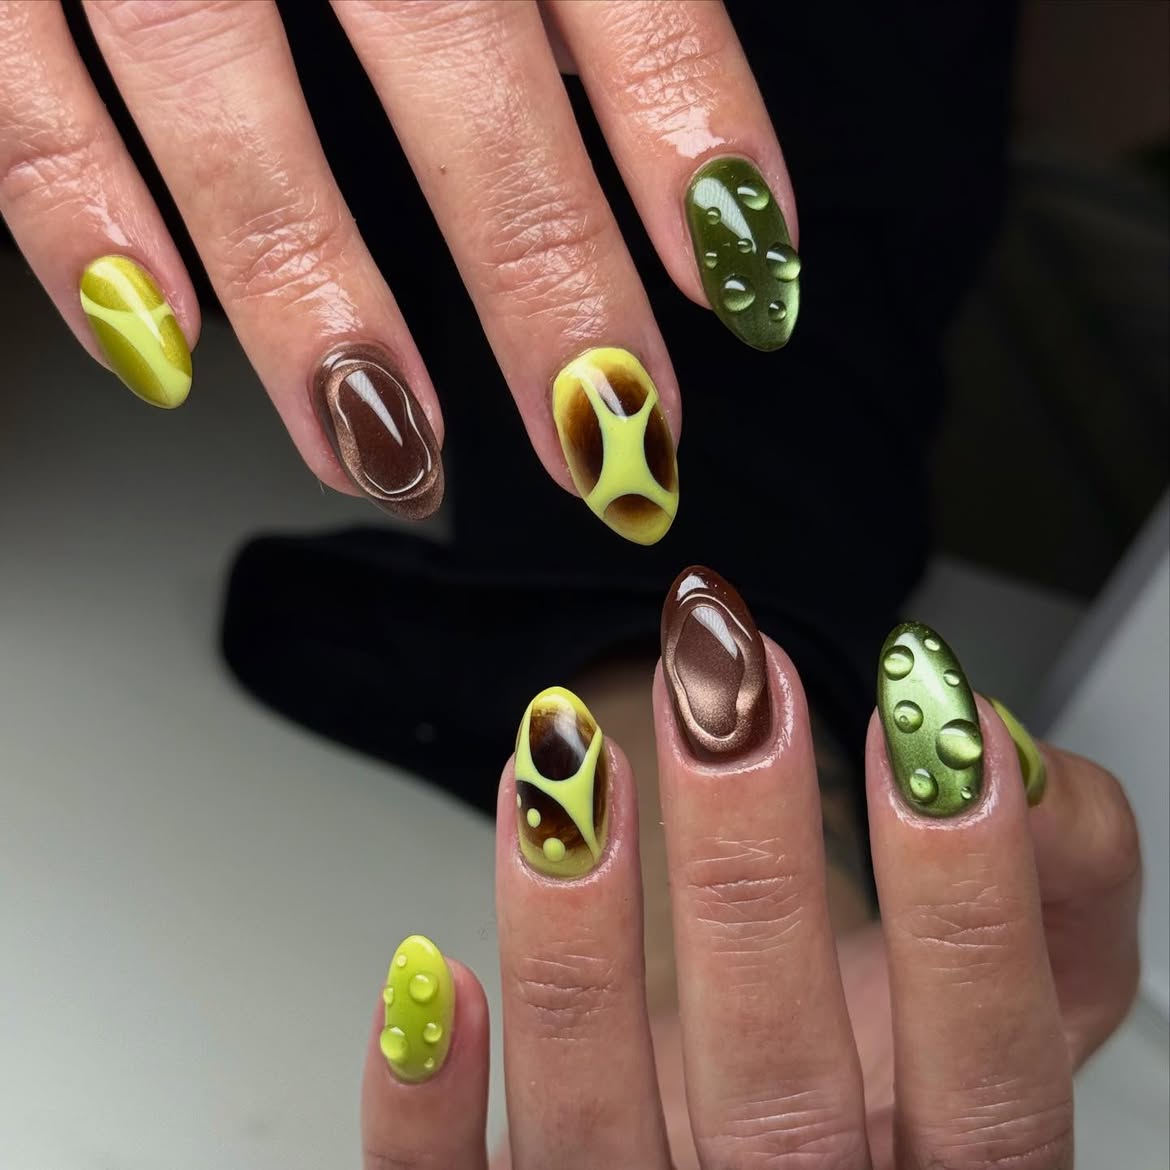
Raised droplets give this almond manicure a bold, sculpted finish. Olive green nails carry clear rounded beads that look like water resting on a metallic surface. Bright chartreuse nails repeat the texture in matching color, creating a playful contrast.
Smooth brown nails provide a calmer break between the textured designs. Their soft metallic glow connects with the reflective green polish, while the abstract chartreuse and brown nails bring both colors together.
The droplets vary in size and placement, which makes them feel organic. Keep the tallest details away from the nail edges so the manicure remains easier to wear.
Choose olive green, chartreuse, and warm brown as the shared palette.
Mix smooth metallic nails with curved brown and green artwork.
Add raised drops in several sizes, leaving some nails smooth for balance.
- If you want a moodier color mix with the same fresh energy, these 18 Purple and Green Nails bring bold contrast, soft glam, and playful nail art ideas together.
10. Use Gold Details to Connect Brown and Green Nails
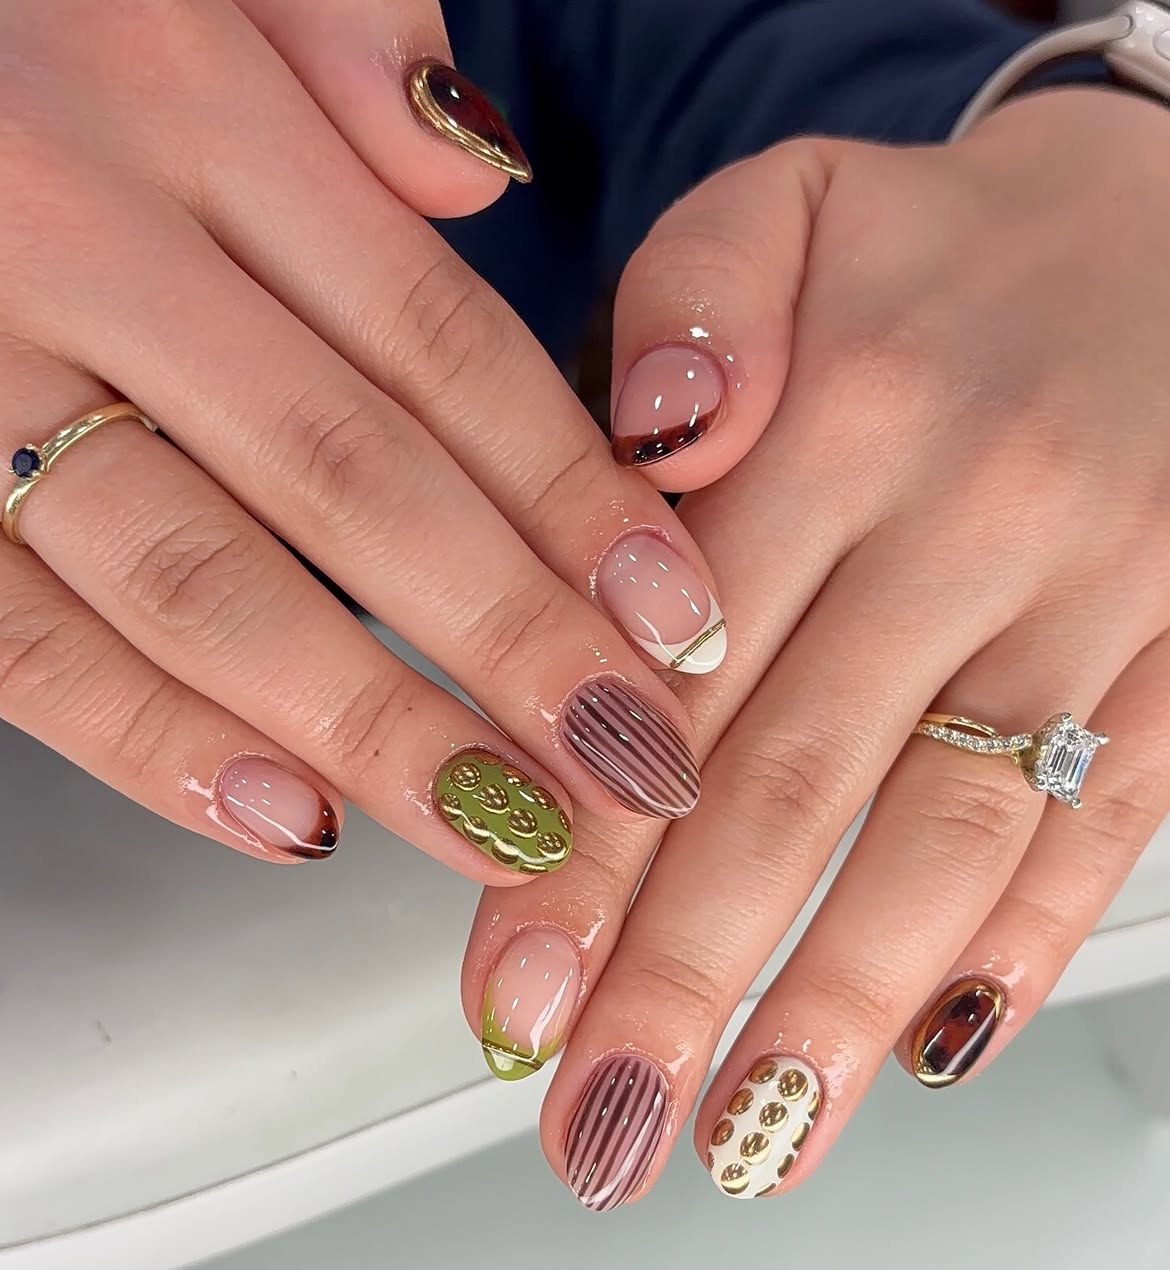
Gold gives this mixed manicure a clear visual thread. The short rounded nails combine olive French tips, brown stripes, translucent tortoiseshell accents, and raised metallic dots without losing their polished look.
- The smooth striped nails feel neat and tailored.
- Embossed gold circles bring texture to the olive and ivory accent nails, while slim metallic borders frame the darker tortoiseshell designs.
- A sheer pink base leaves enough open space around the detailed artwork.
Repeating gold on several nails is what holds the set together. Keep the olive and brown shades muted so the reflective details remain noticeable without making the manicure feel crowded.
- ▸Ask for a sheer pink base on most nails.
- ▸Mix olive tips with brown stripes and tortoiseshell accents.
- ▸Repeat metallic gold through borders, lines, and raised circles.
- ▸Leave a few nails smooth to balance the textured details.
11. Break Up Solid Brown and Green Nails With One Spotted Accent
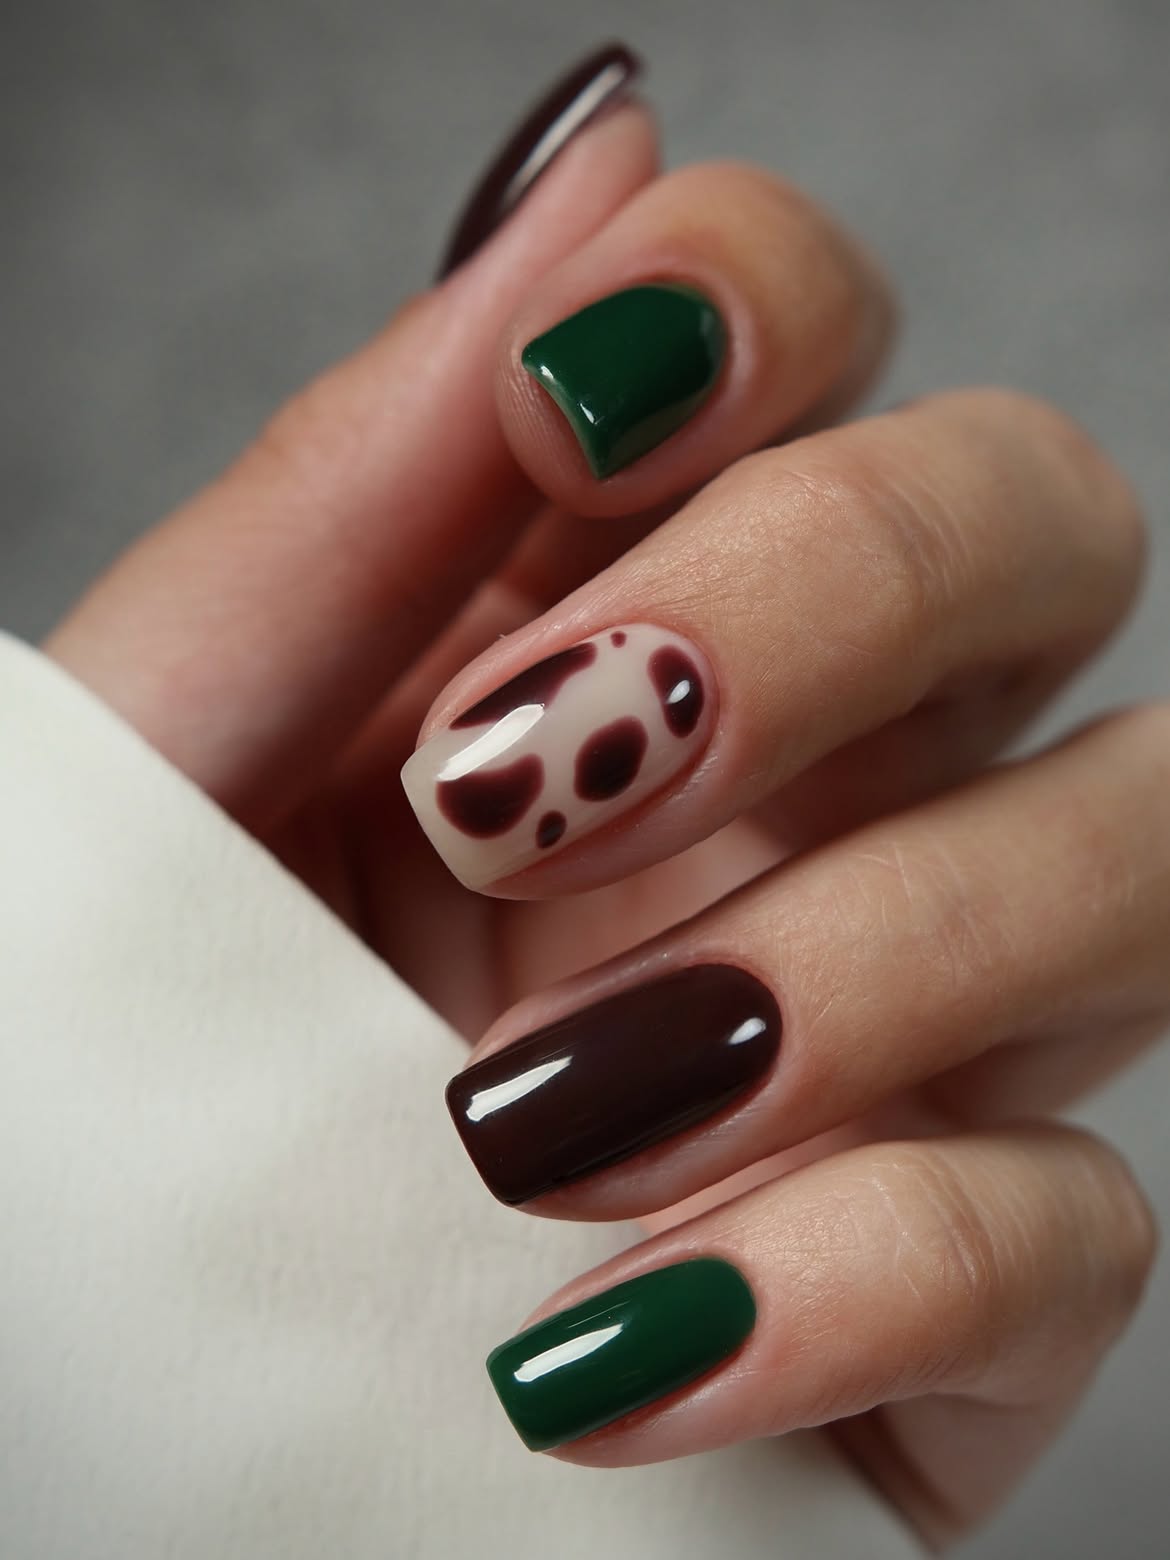
A single patterned nail gives this glossy square manicure just enough movement. Deep forest green and dark chocolate brown cover most of the set, creating a rich color block effect.
The accent nail uses a milky beige base with soft brown spots in several sizes. Its pale background separates the two darker shades and makes the pattern easy to notice.
Why it feels balanced: Four solid nails support one detailed design. The matching square shape and glassy shine keep every color connected. Place the spotted nail in the center if you want it to become the clear focal point, or move it to the ring finger for a quieter arrangement.
12. Stretch Brown and Green Nails With Vertical Stripes
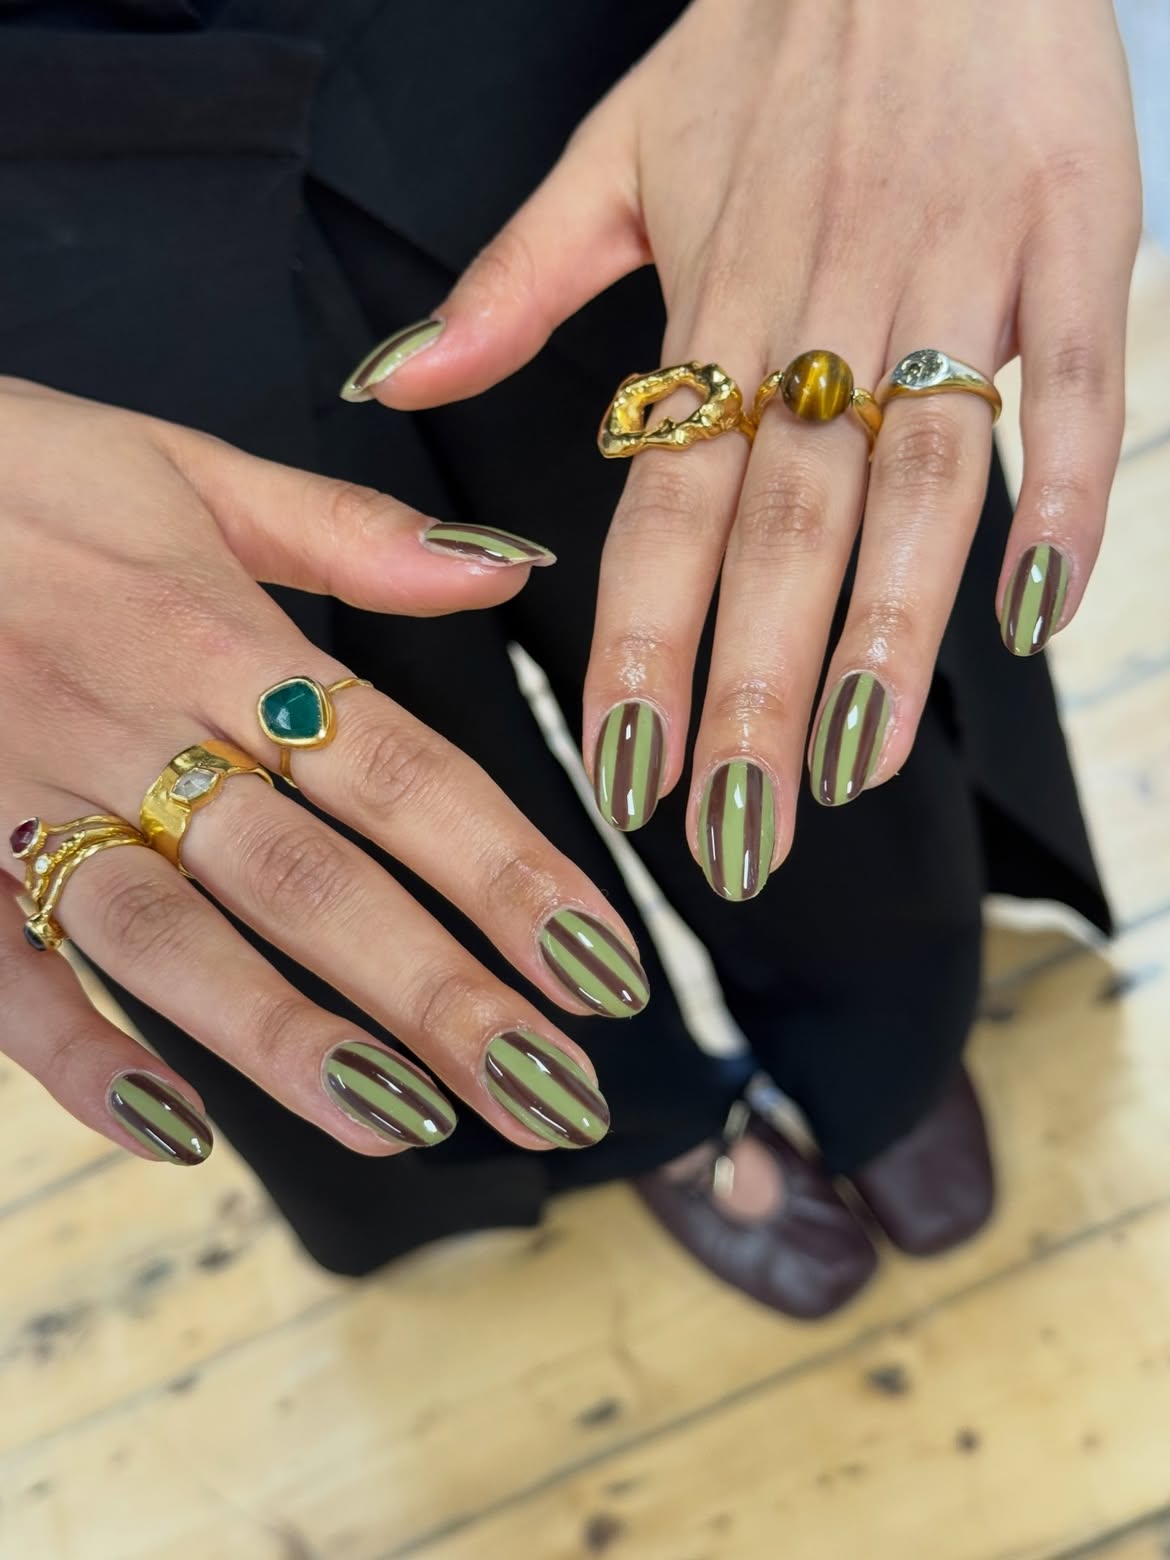
Long chocolate lines draw the eye from cuticle to tip, making these rounded nails appear even more elongated. A muted olive base keeps the contrast soft and gives the manicure a warm retro mood.
Some nails place one broad green stripe between brown side panels. Others use thinner brown lines over a larger green area. Switching the stripe widths prevents the repeated pattern from looking mechanical.
The strongest detail is consistency. Every line follows the length of the nail, and the glossy finish smooths the graphic artwork. Keep the stripes parallel and leave a narrow gap between them for a cleaner result.
Run every stripe from cuticle to tip.
Change the widths while keeping the direction consistent.
Do not mix vertical and horizontal lines in the same set.
Do not crowd too many thin stripes onto one nail.
13. Reverse Brown and Green Nails From Hand to Hand
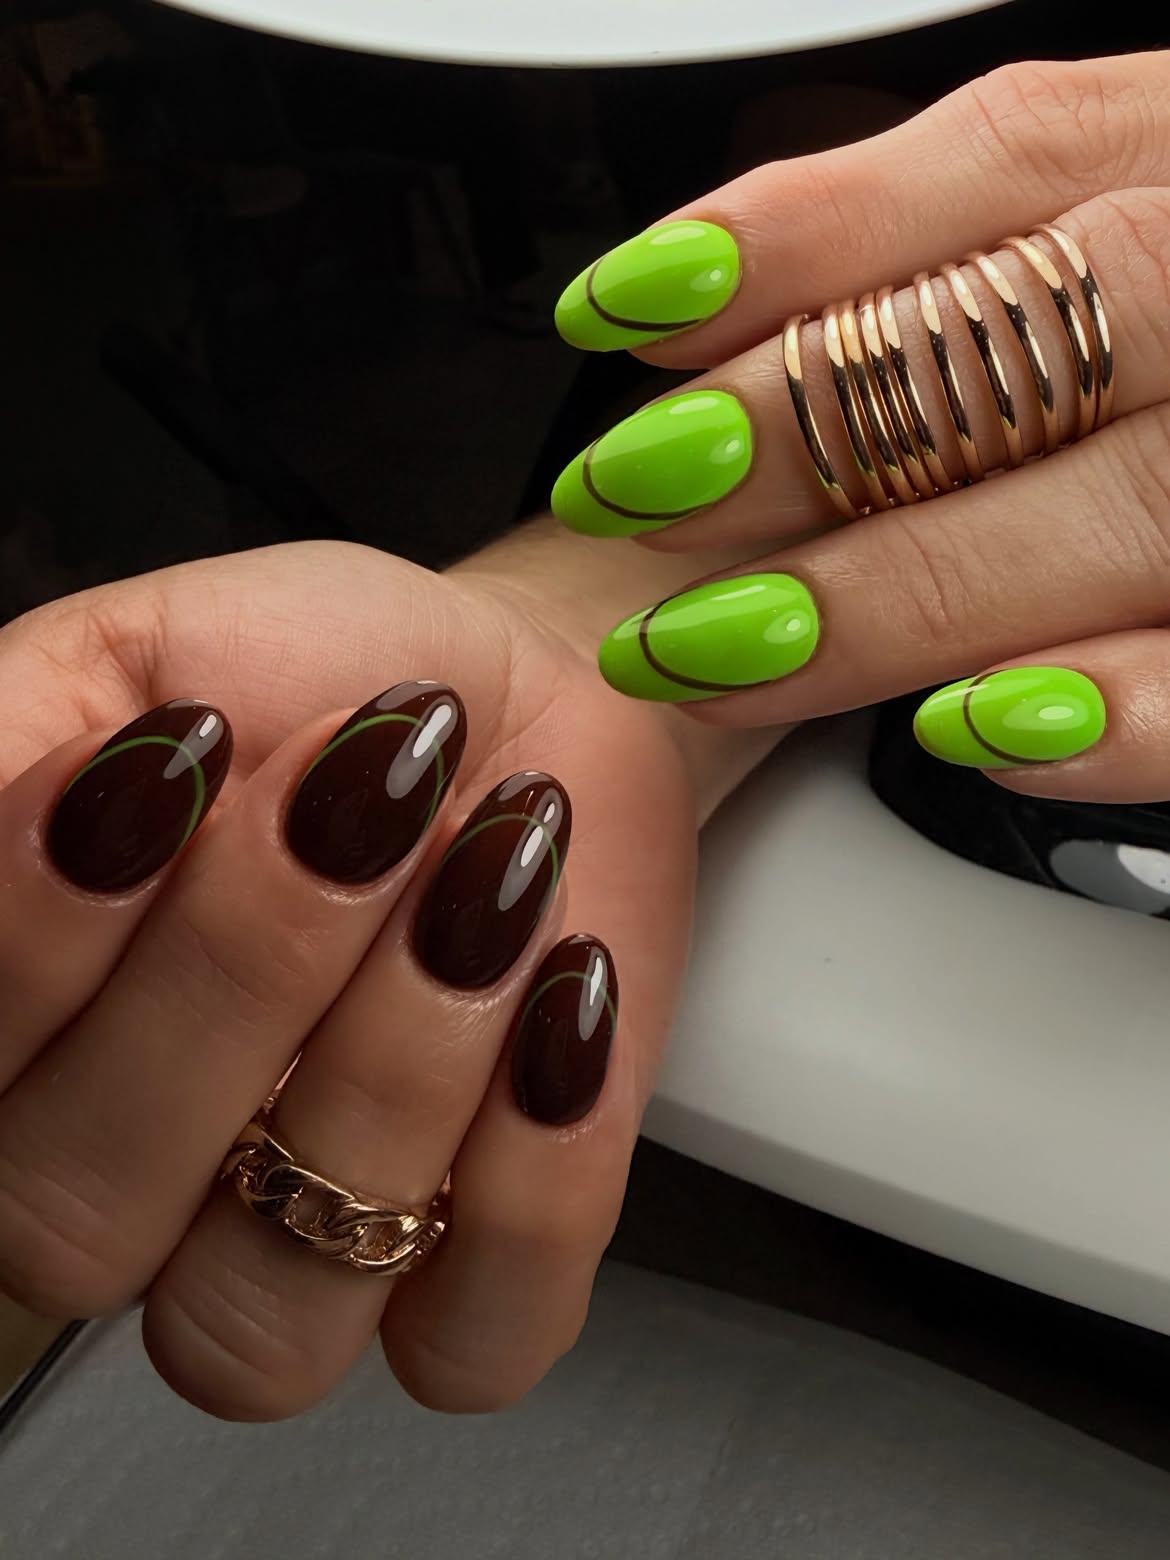
One hand uses vivid green as the main color, while the other switches to deep glossy brown. This reversed arrangement creates strong contrast without requiring a different design on every nail.
Thin curved lines link the two sides. Brown arcs sweep across the green nails, and muted green arcs repeat over the brown set. Placing the lines near the tips leaves each solid base clear and easy to read.
The shared almond shape and glassy finish make both hands feel connected. Keep the curved lines slim and repeat their placement across every nail. The result feels coordinated rather than mismatched.
| Green Hand | Brown Hand |
|---|---|
| Bright green base | Deep brown base |
| Slim brown curve | Slim green curve |
| Bold and bright | Rich and grounded |
14. Frame Olive Green With Chocolate Lines and Gold Bands
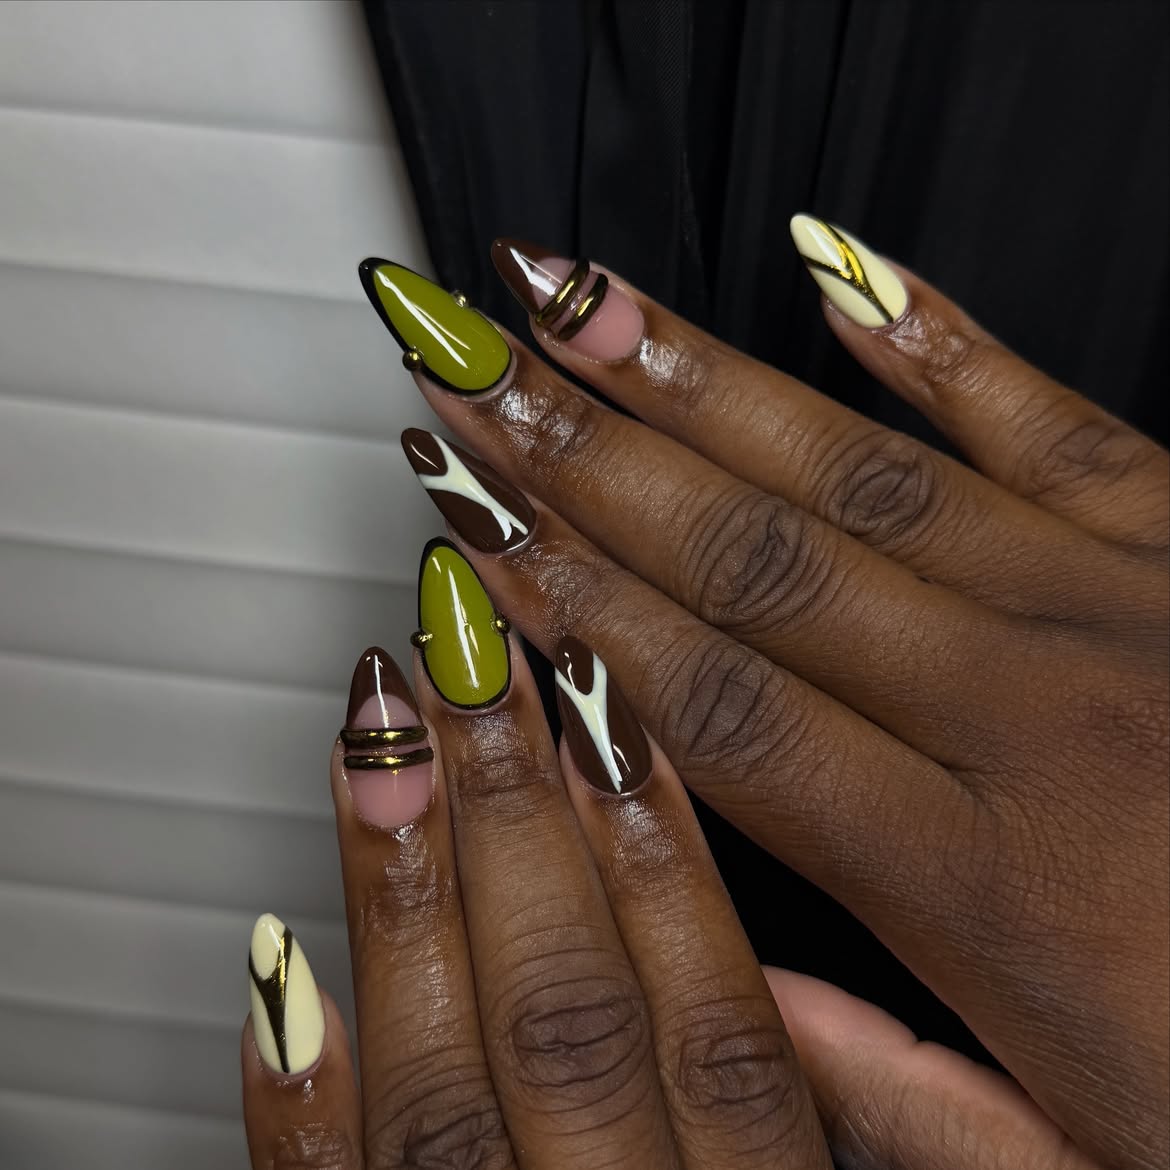
Dark outlines give the olive accent nails a crisp, jewel shaped finish. Small metallic beads sit near the sides, making the solid green designs feel connected to the gold details elsewhere in the set.
Chocolate brown appears in pointed tips and flowing blocks over a creamy base. The pale nails use slim metallic lines, while the sheer pink nails carry brown tips with raised gold bands.
What makes it cohesive
The same three elements keep returning: curved shapes, dark borders, and warm metal. This repetition allows every nail to carry different artwork without making the manicure feel scattered. The tapered almond shape gives the large patterns enough room to stay clear.
Dark borders define the green and brown shapes, while repeated gold details give every design one shared finish.
15. Add One Flowing Green Accent to Solid Autumn Nails
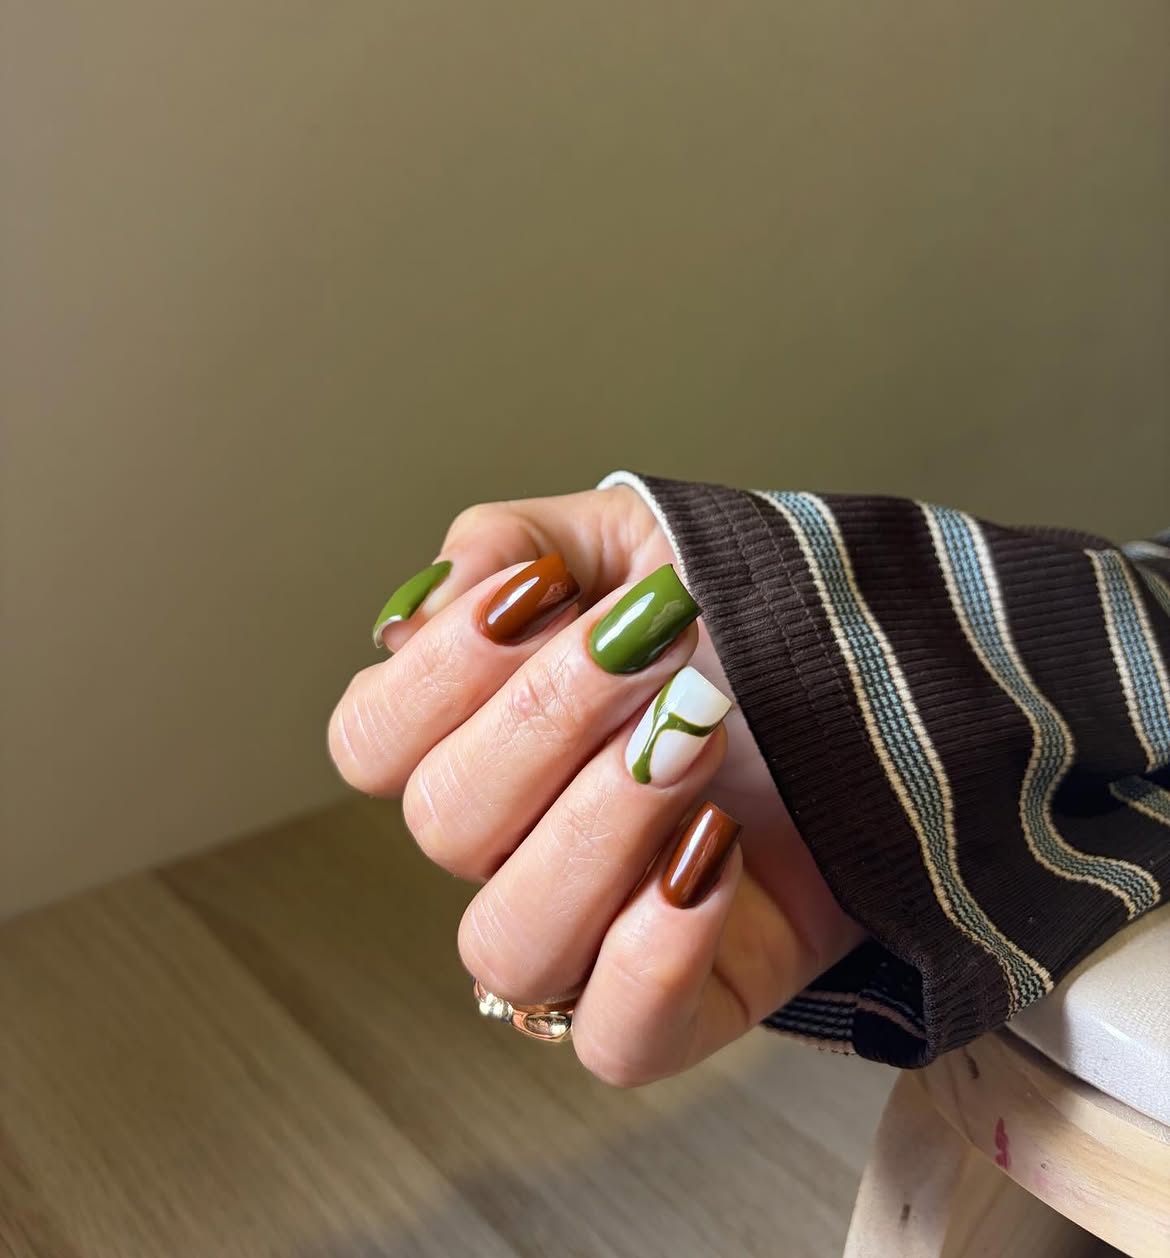
Glossy olive green and warm caramel brown create a calm autumn palette on these short square nails. Most of the set stays solid, allowing the colors and smooth finish to do the work.
A creamy white accent nail carries one curved green line that dips toward the tip like a loose ribbon. The small brown detail near the curve quietly connects it with the caramel nails.
This design feels clean because the artwork appears only once. Keep the accent line thin and slightly uneven so it retains its relaxed, hand painted character. A high shine top coat will help all three colors look equally rich.
16. Reverse Polka Dots Across Mint and Brown Nails
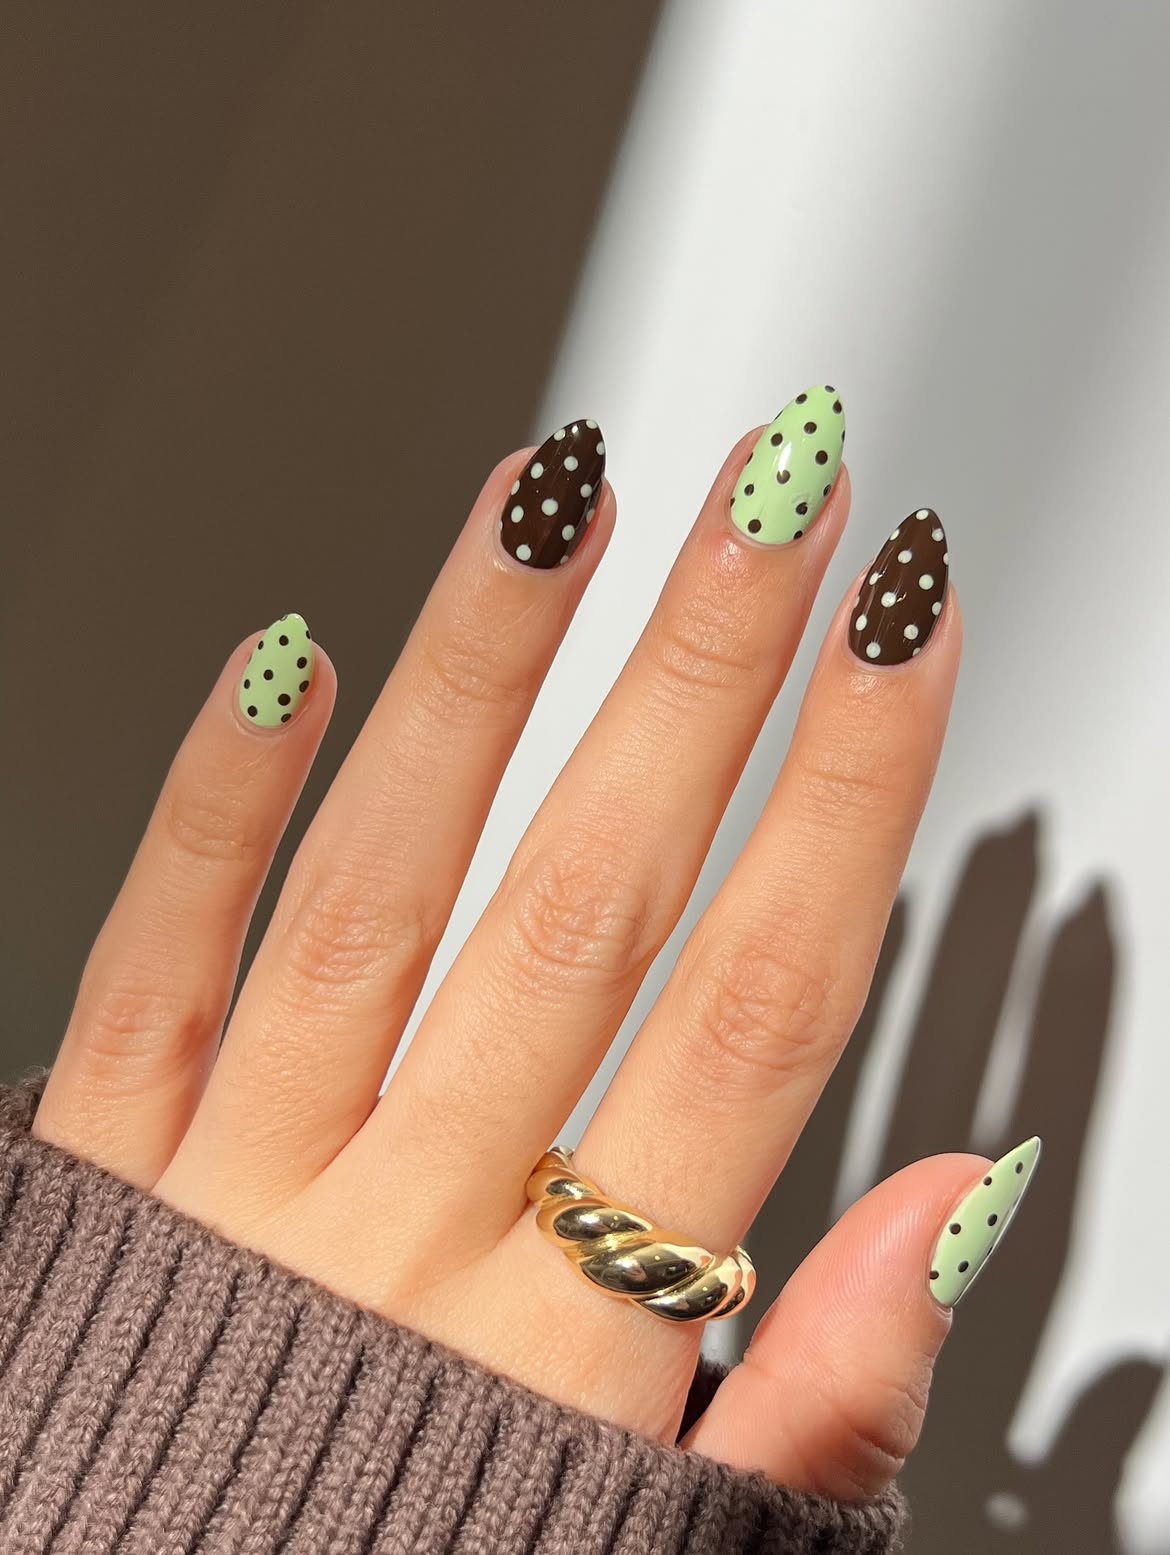
This almond manicure uses one simple pattern in two opposite color arrangements. Soft mint nails carry small chocolate dots, while deep brown nails repeat the look with pale mint spots.
Alternating the base colors keeps the set lively without introducing extra artwork. The dots remain small, loosely spaced, and similar in size across every nail. That consistency makes the color reversal easy to notice.
A glossy top coat gives the light and dark shades the same smooth finish. For a tidy result, place the larger dots first, then fill wide gaps with smaller ones. Leave enough background visible so each color remains clear.
Mint base
Finish with small chocolate brown dots.
Brown base
Reverse the pattern with pale mint dots.