How to Minimalist Christmas Nails for Elegant Holiday Looks
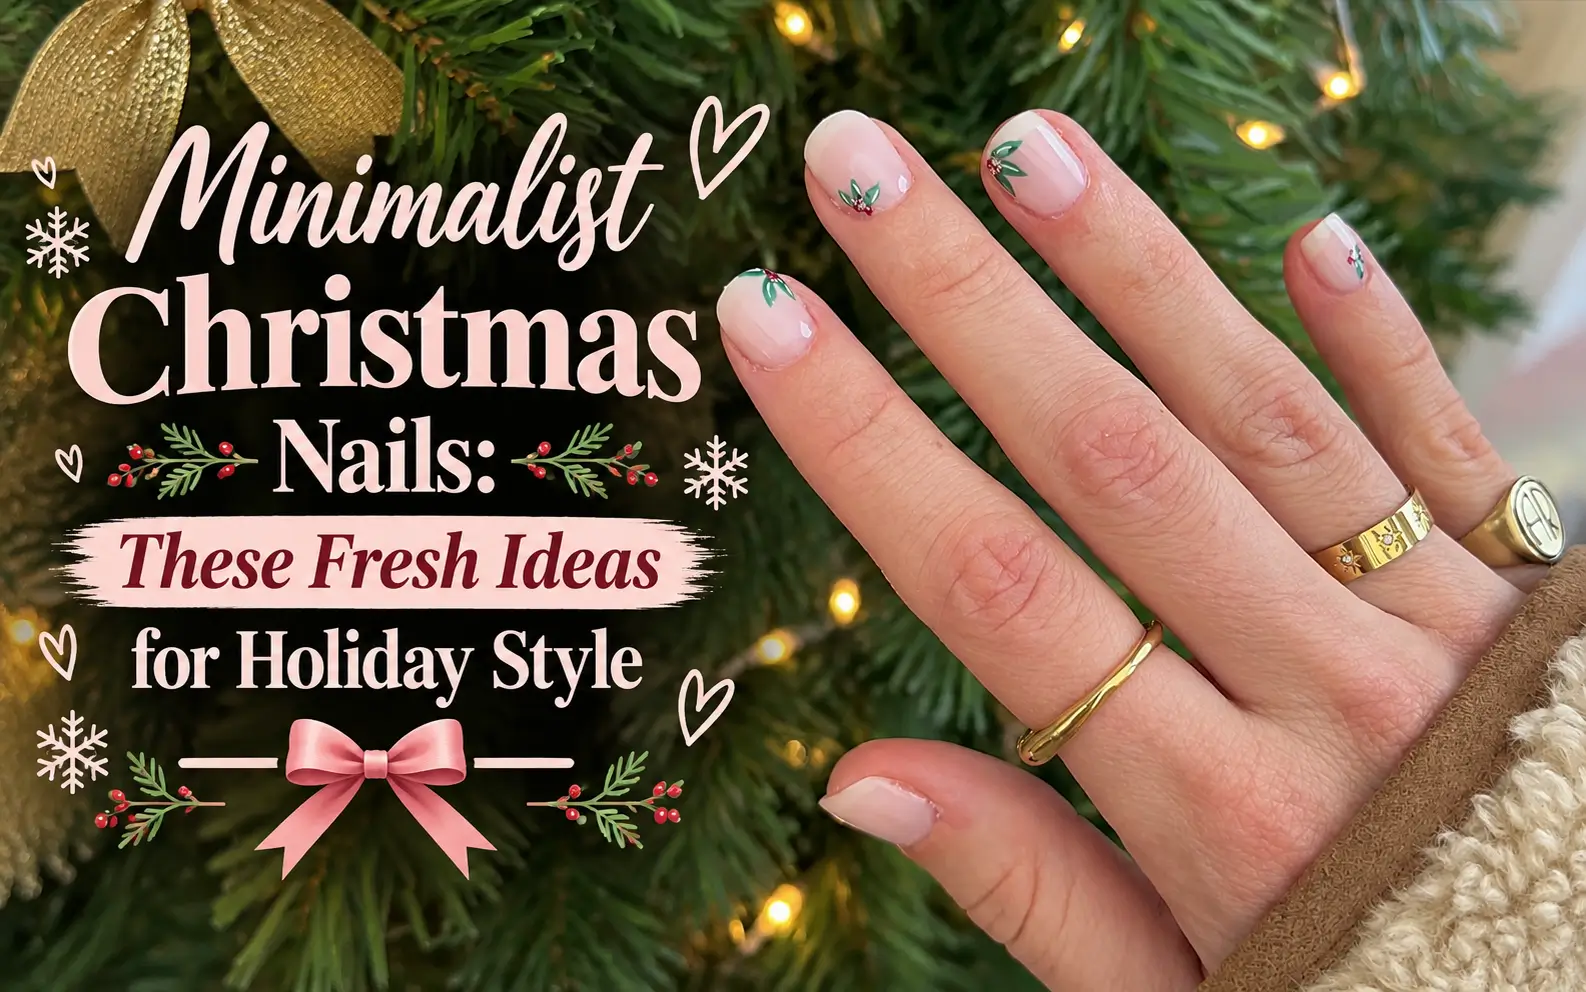
Minimalist Christmas nails prove that festive beauty can feel polished, modern, and wonderfully understated. Instead of covering every nail with busy artwork, these designs use sheer bases, fine French tips, tiny bows, delicate stars, scattered foil, and carefully placed seasonal details. The result is a manicure that captures the holiday spirit while still looking elegant enough for dinners, parties, and everyday winter style.
This collection brings together 16 graceful ideas for short, almond, oval, and square nails. You will find classic red and green accents alongside blush pink, milky white, champagne shimmer, deep burgundy, and soft metallic touches. Use these looks as salon inspiration or simplify your favorite design for an easy manicure at home.
15+ Minimalist Christmas Nails Designs 2026
1. Tiny Holly French Tips on a Sheer Pink Base
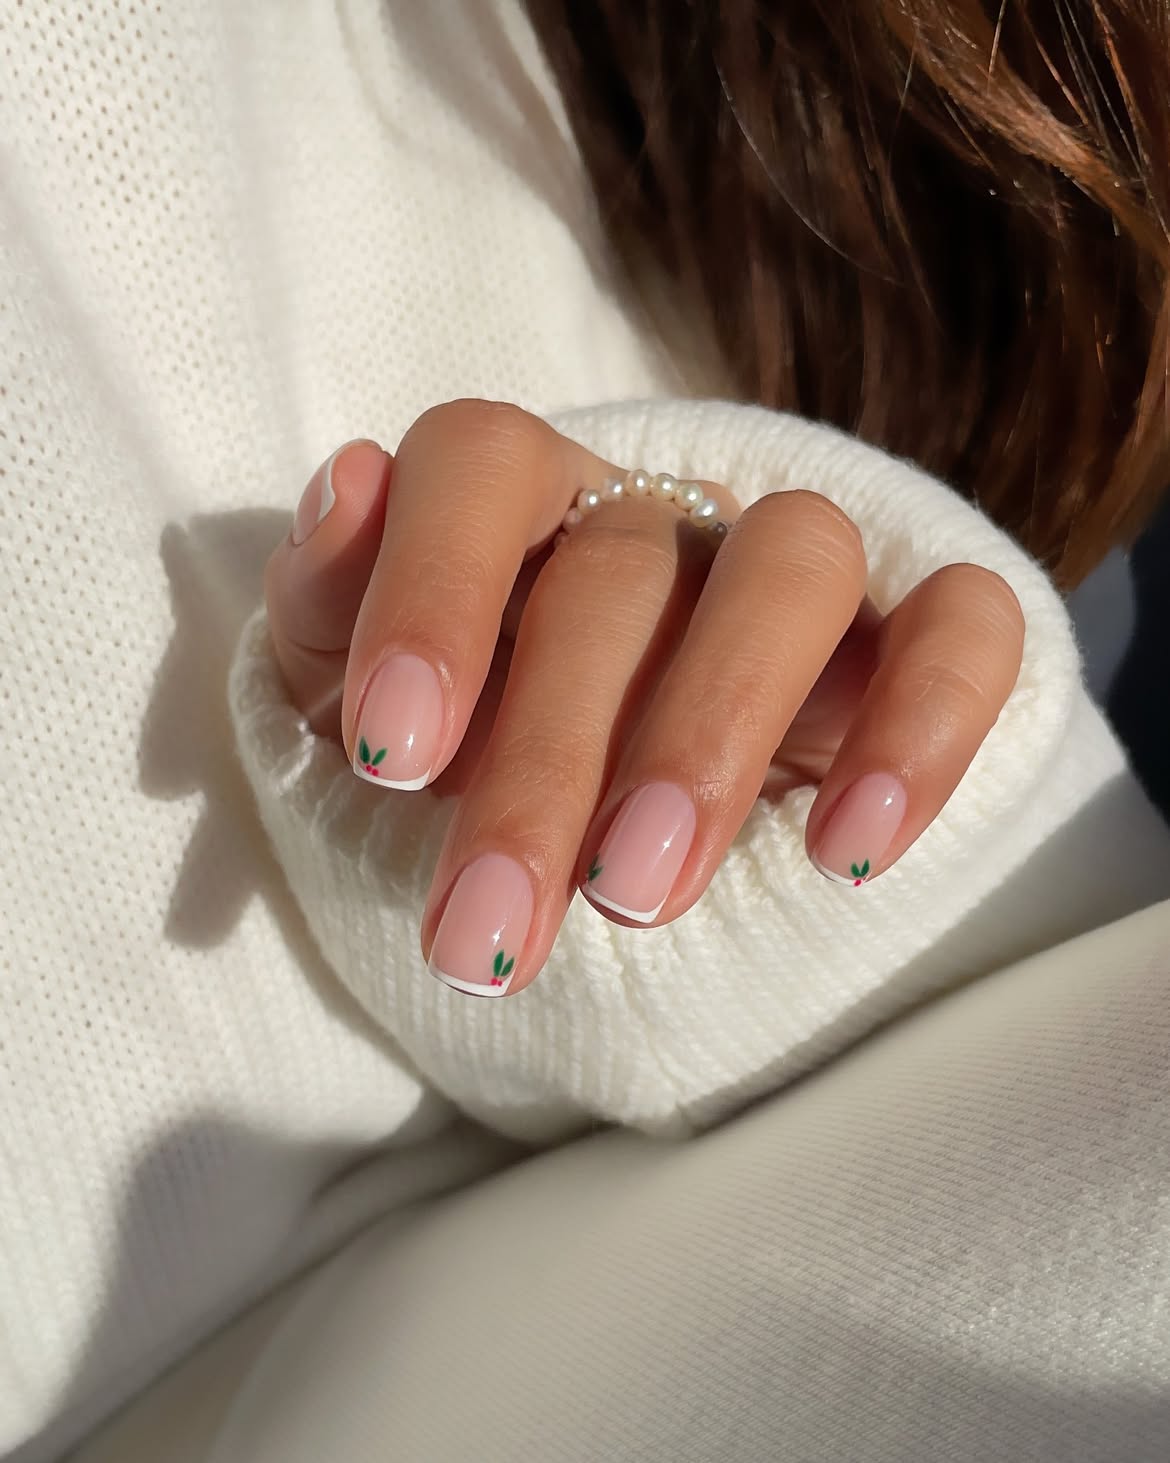
A soft blush base gives these minimalist Christmas nails a clean and natural finish. The thin white French tips frame each short, softly squared nail without hiding the delicate pink color underneath.
What makes the design festive: Tiny green leaves and red berry dots sit near the corners of the tips. Their placement changes slightly across the set, adding interest while keeping the overall look neat and balanced.
Ask for a sheer pink base, slim white tips, and small holly details placed close to the corners. The glossy finish helps the fine lines look crisp and gives the red berries a gentle shine. This design suits short nails because the artwork follows the edge instead of crowding the nail plate.
2. Mixed Metal Starbursts with Clean White Tips
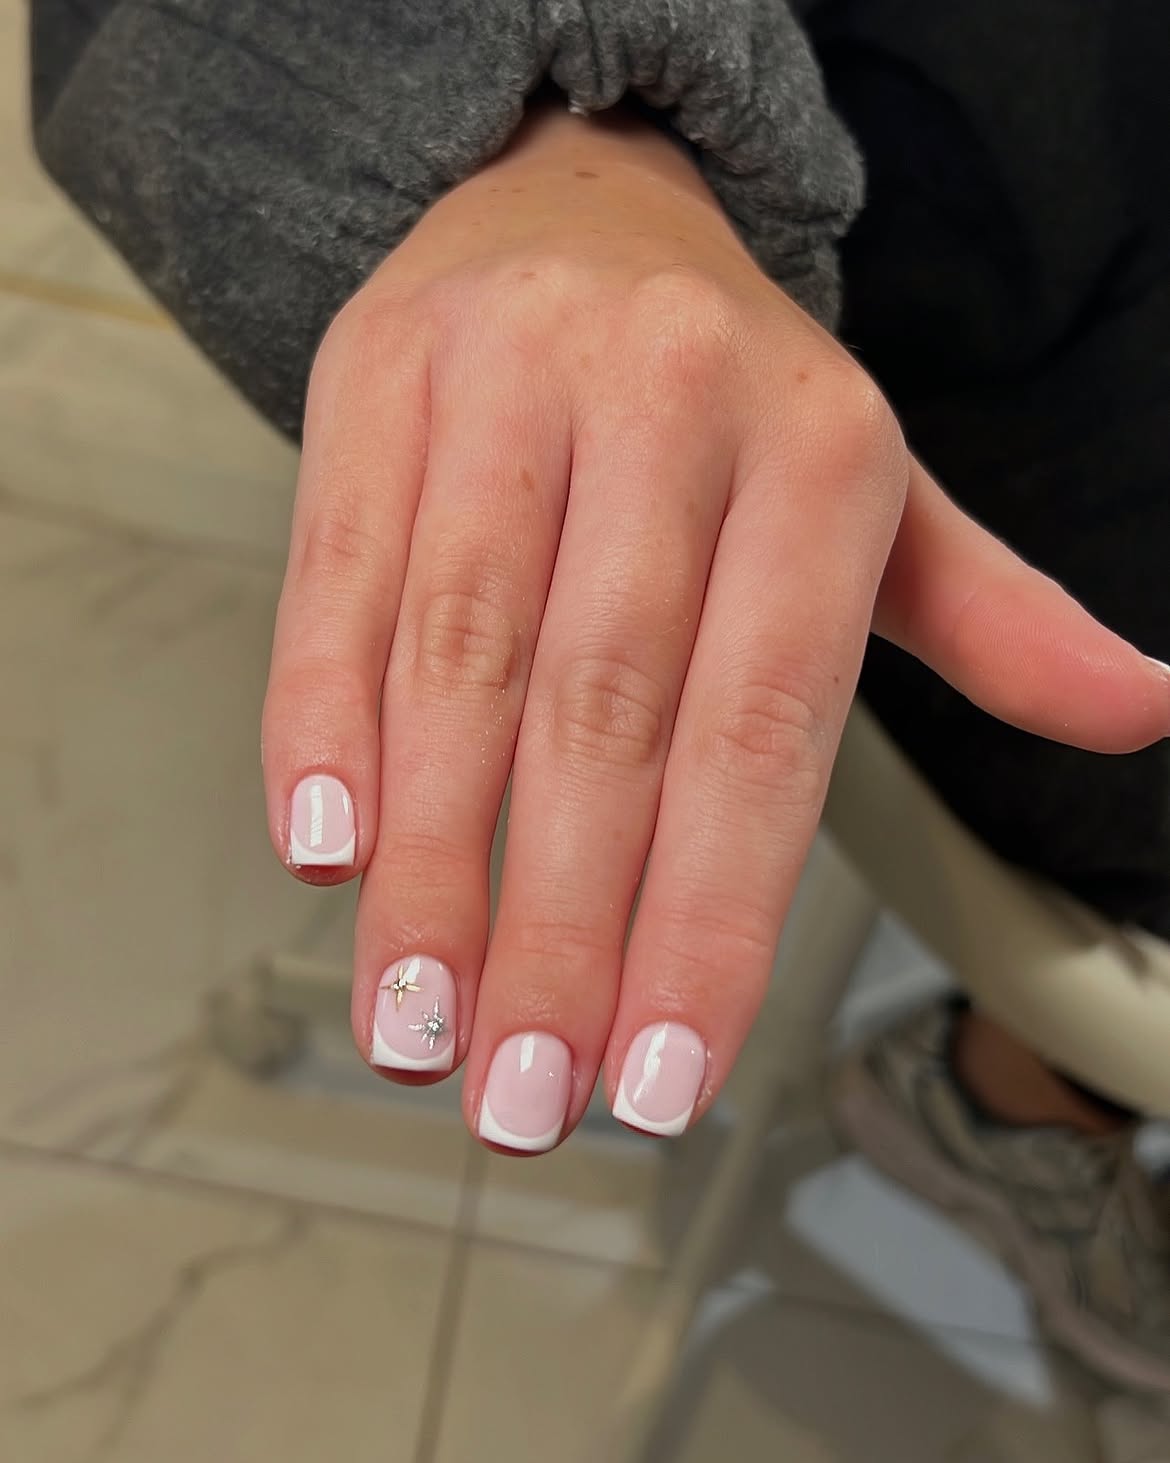
Metallic starbursts bring a quiet holiday sparkle to this neat French manicure. Most nails use a milky pink base and curved white tips, while one accent nail carries two tiny stars in gold and silver.
The restrained placement is what makes the set feel polished. The stars are small, spaced apart, and surrounded by plenty of bare pink. A bold white corner detail on another nail adds a graphic twist without competing with the metallic accents.
To recreate it, keep the nails short with gently rounded square edges. Use a translucent pink base, crisp white polish, and only one or two miniature metallic details. Finish with a smooth glossy coat so the accents look neatly sealed and the white tips stay sharp.
| Gold Star | Silver Star |
|---|---|
| Creates a warm festive gleam | Adds a cool winter shine |
| Works well with warm neutral outfits | Looks crisp beside grey and white clothing |
3. Champagne Shimmer Nails Wrapped in Red Ribbons
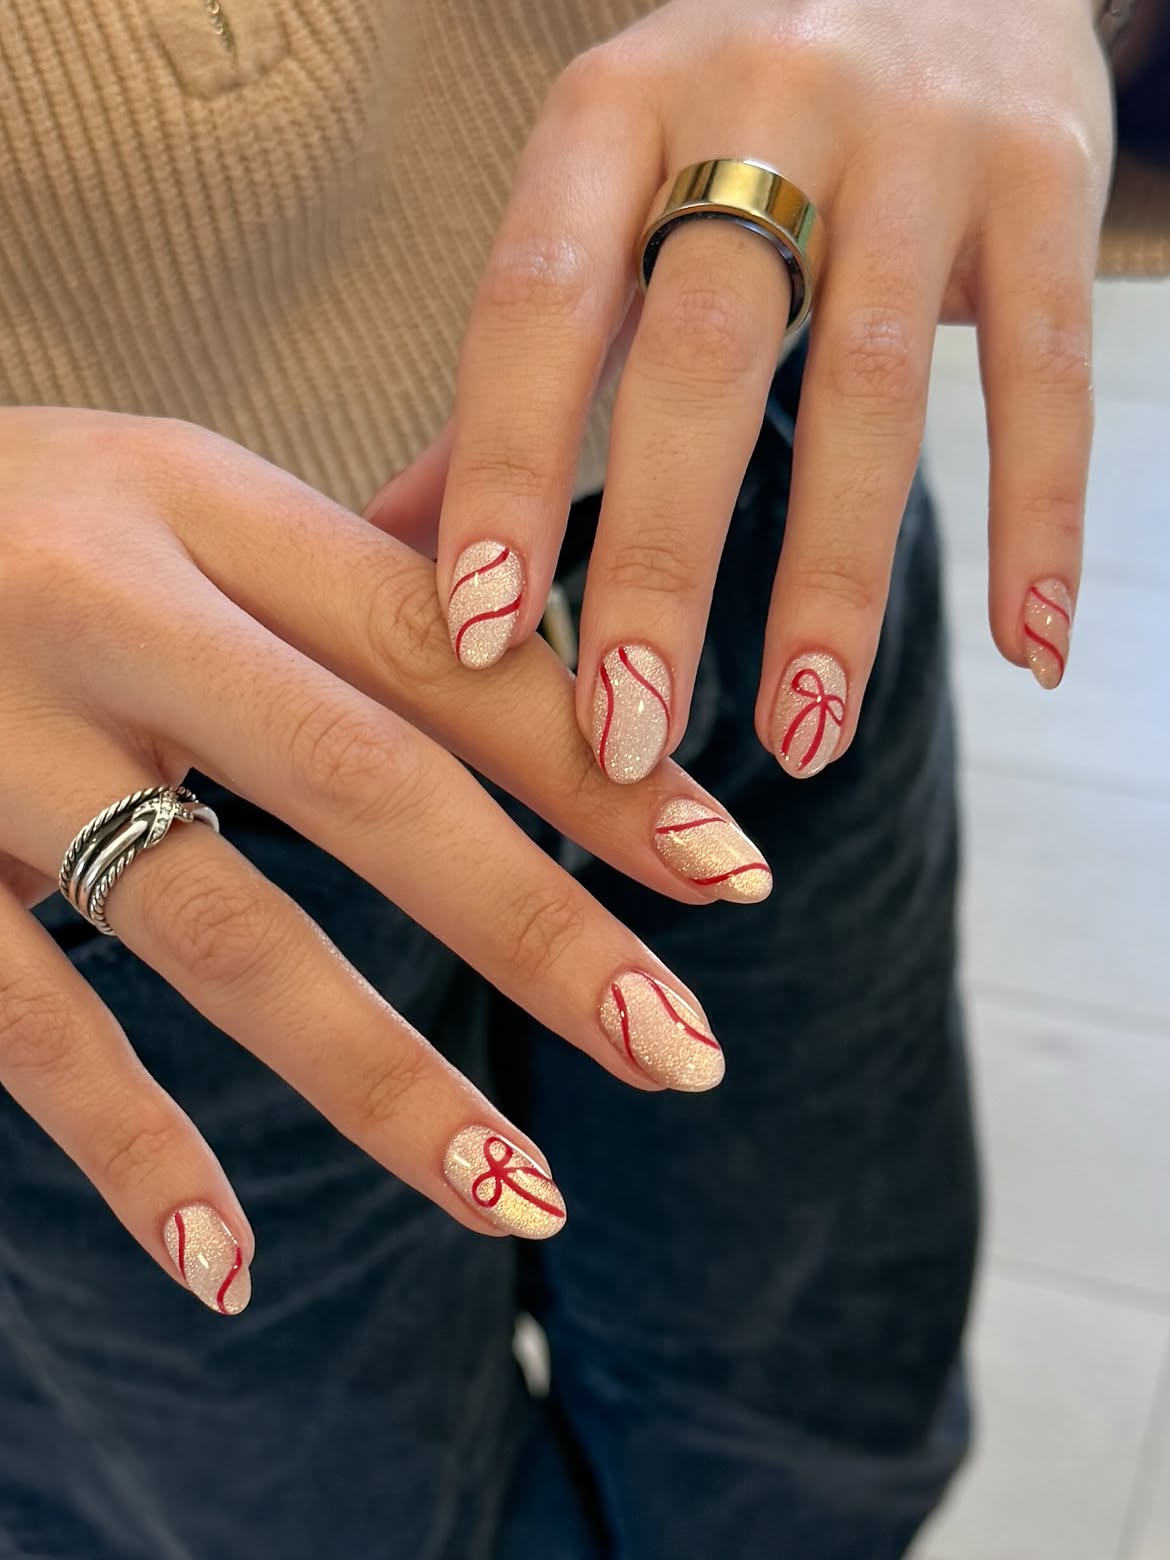
Fine red ribbon lines turn a champagne shimmer manicure into a wrapped gift theme. The soft sparkle creates a warm base, while glossy red curves move across the nails like loose strands of ribbon.
Two nails carry simple bow outlines, giving the set clear Christmas character without placing a bow on every finger. The remaining nails use long curved strokes, which help the design feel connected across both hands. Medium oval nails soften the graphic lines and leave enough room for the bows to stay readable.
Keep the red lines narrow and slightly different on each nail. Thick or identical curves could make this delicate design feel crowded. The strongest detail comes from the contrast between the bright red artwork and the softly glowing base.
How to balance the ribbon details
Leave open space around each red curve so the shimmer remains visible.
Change the direction of the ribbon line across neighboring nails.
Reserve the bow shapes for a small number of accent nails.
If you love festive manicures but never have much time, these 15 Quick Christmas Nails for Busy Women are full of simple holiday ideas that still look polished.
4. Frosted Taupe Nails with Fine White Bows
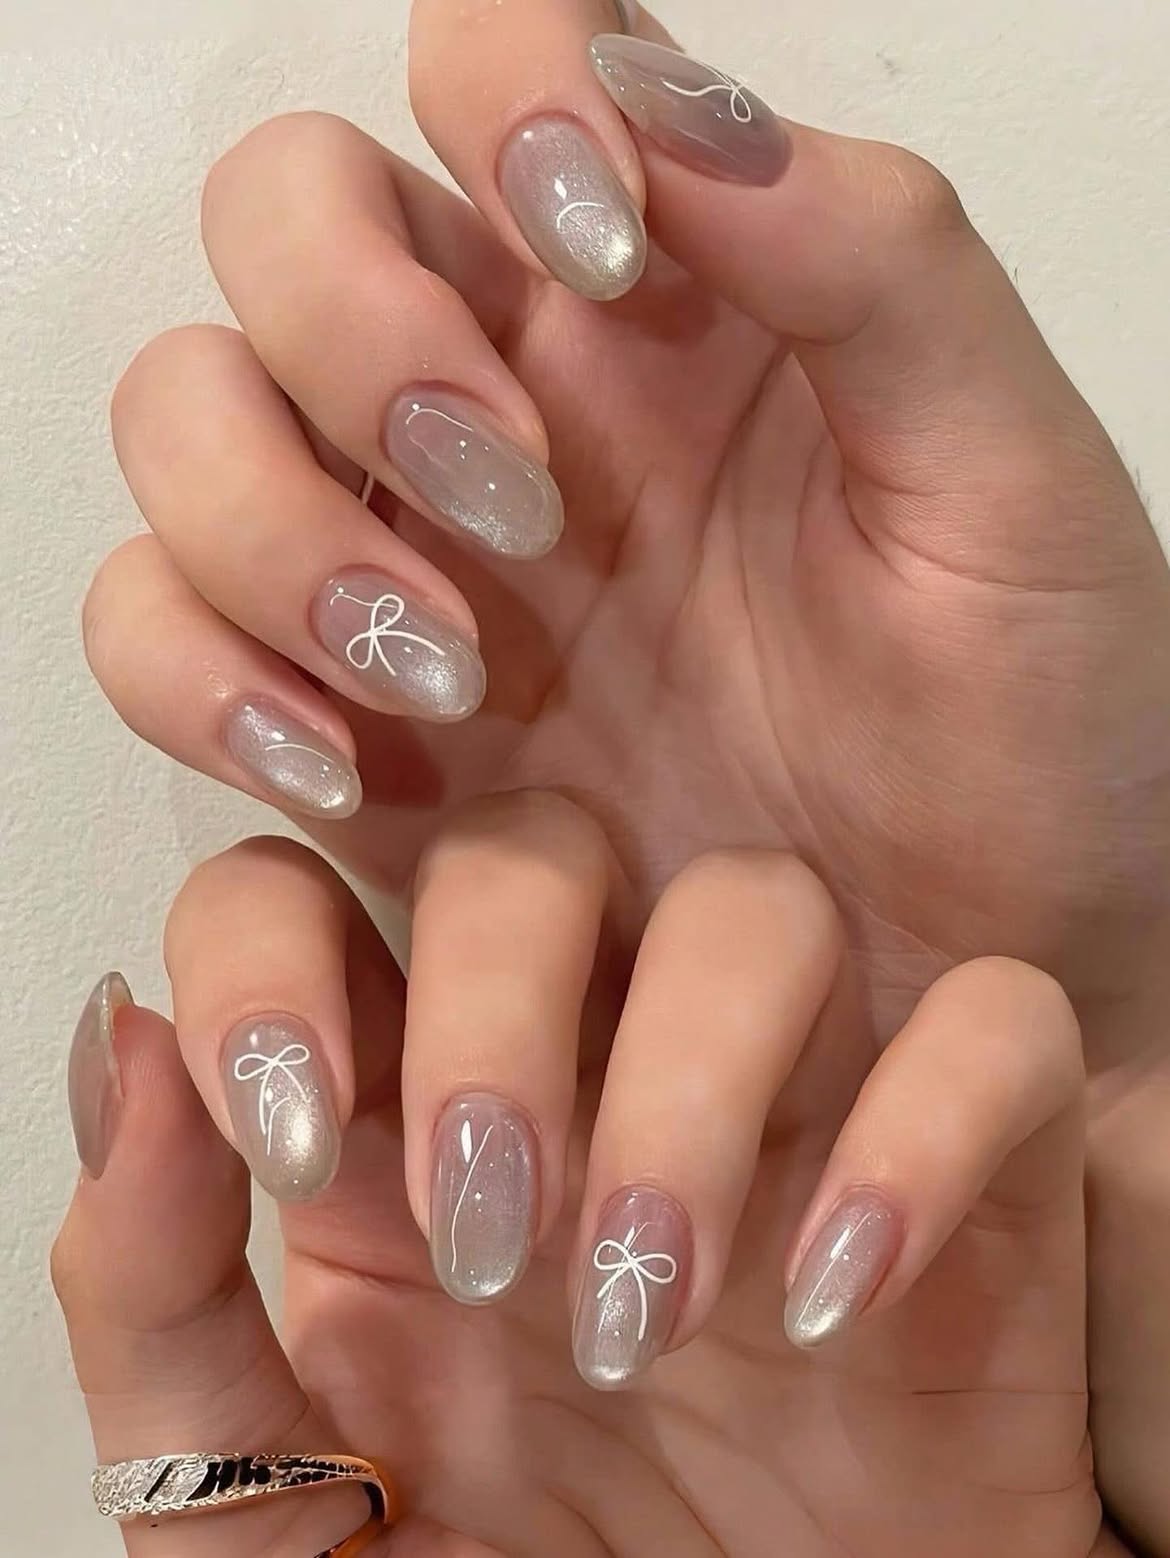
Cool taupe polish gives this Christmas manicure a quiet, snowy mood. Silvery shimmer gathers across the surface and catches the light without covering the translucent neutral base. Fine white bows appear on selected nails, while delicate curves and tiny dots decorate the rest.
Neutral base: The soft taupe color keeps the manicure refined and easy to pair with winter clothing.
Light placement: Concentrated shimmer near the tips and centers creates a frosted glow instead of a heavy glitter finish.
Minimal artwork: Repeating the same thin white line across the set connects every nail, even though only a few carry full bow shapes.
The longer oval shape gives each curve enough room to flow while keeping the finished set graceful and uncluttered.
💡 Application Tip
Use a very fine liner brush for the bows and curved accents. Keep the loops open and the ribbon tails narrow so the white artwork does not hide the silvery taupe base.
5. Scattered Gold Foil on Glossy Blush Almond Nails
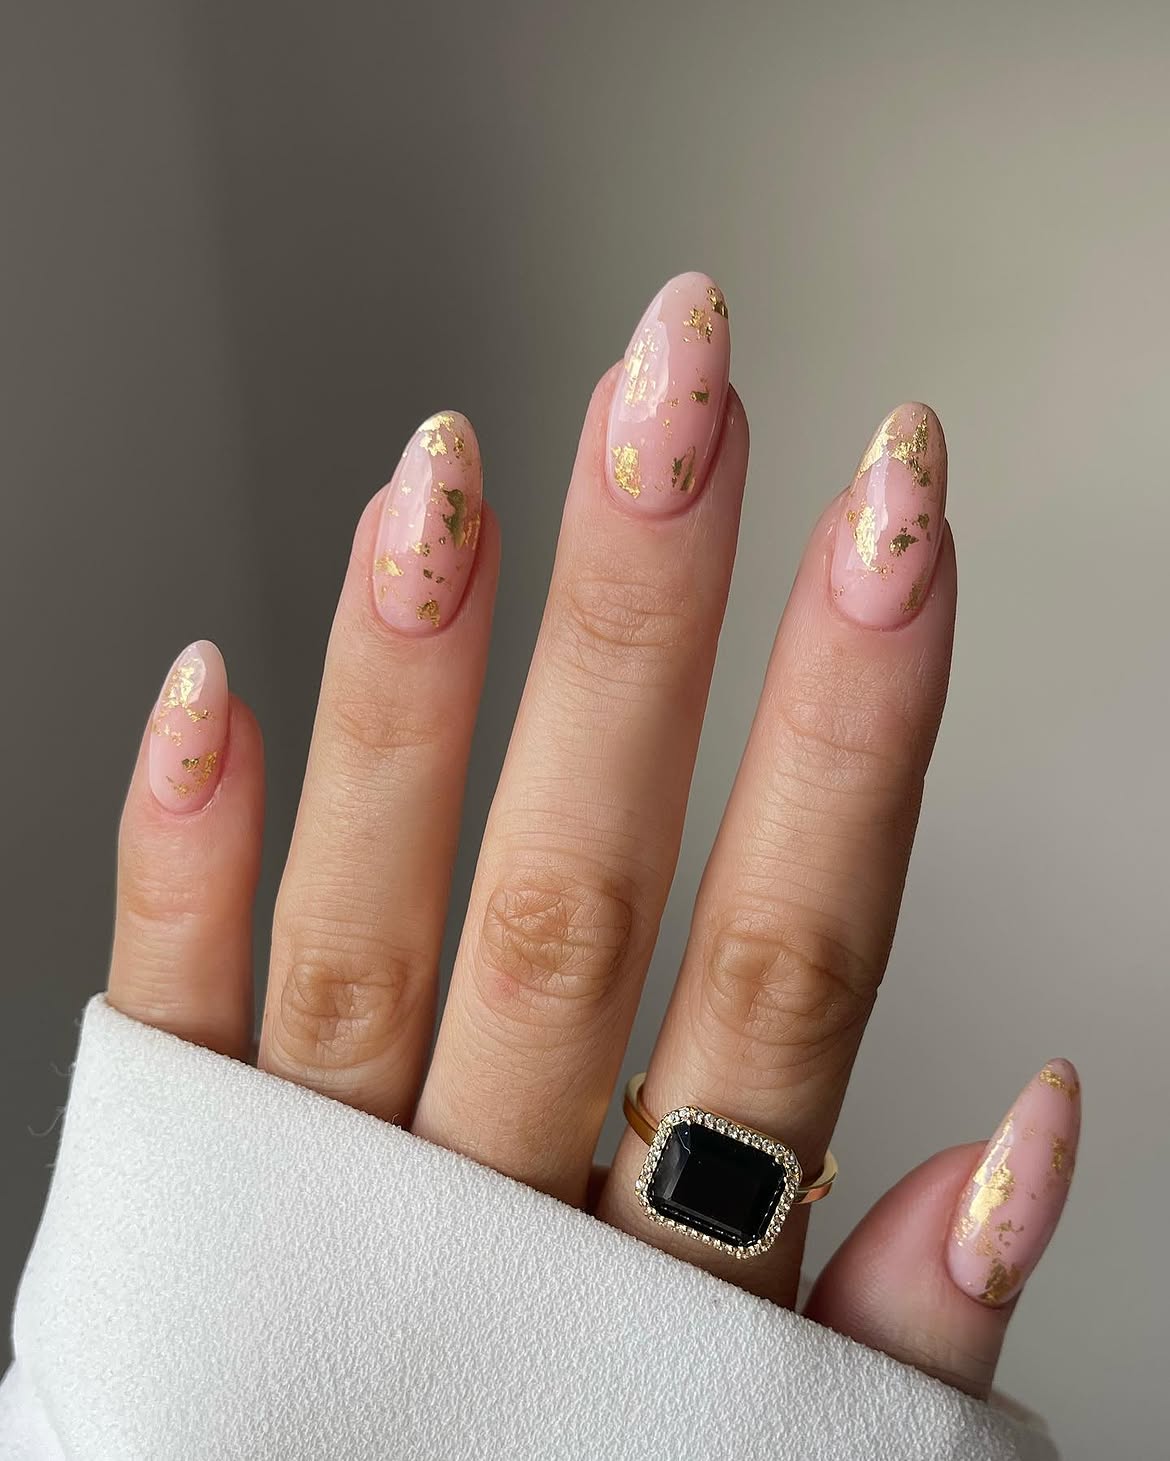
Barely there pink and scattered gold foil create an elegant option for minimalist Christmas nails. The translucent blush base keeps the manicure soft, while the metallic fragments bring in enough shine for holiday dinners and evening events.
The foil follows no strict pattern. Some nails have tiny flecks through the center, while others carry larger pieces near the tips and sides. This uneven placement makes the design feel natural rather than stamped. Warm side lighting also catches the raised metallic texture and shows how it changes as the hand moves.
Leave visible gaps between the foil pieces so the pink base can breathe. Too much gold would hide the delicate color and remove the airy quality that makes this manicure work.
Recreate this gold foil look
6. Red Holiday French Tips with Tiny Pink Hearts
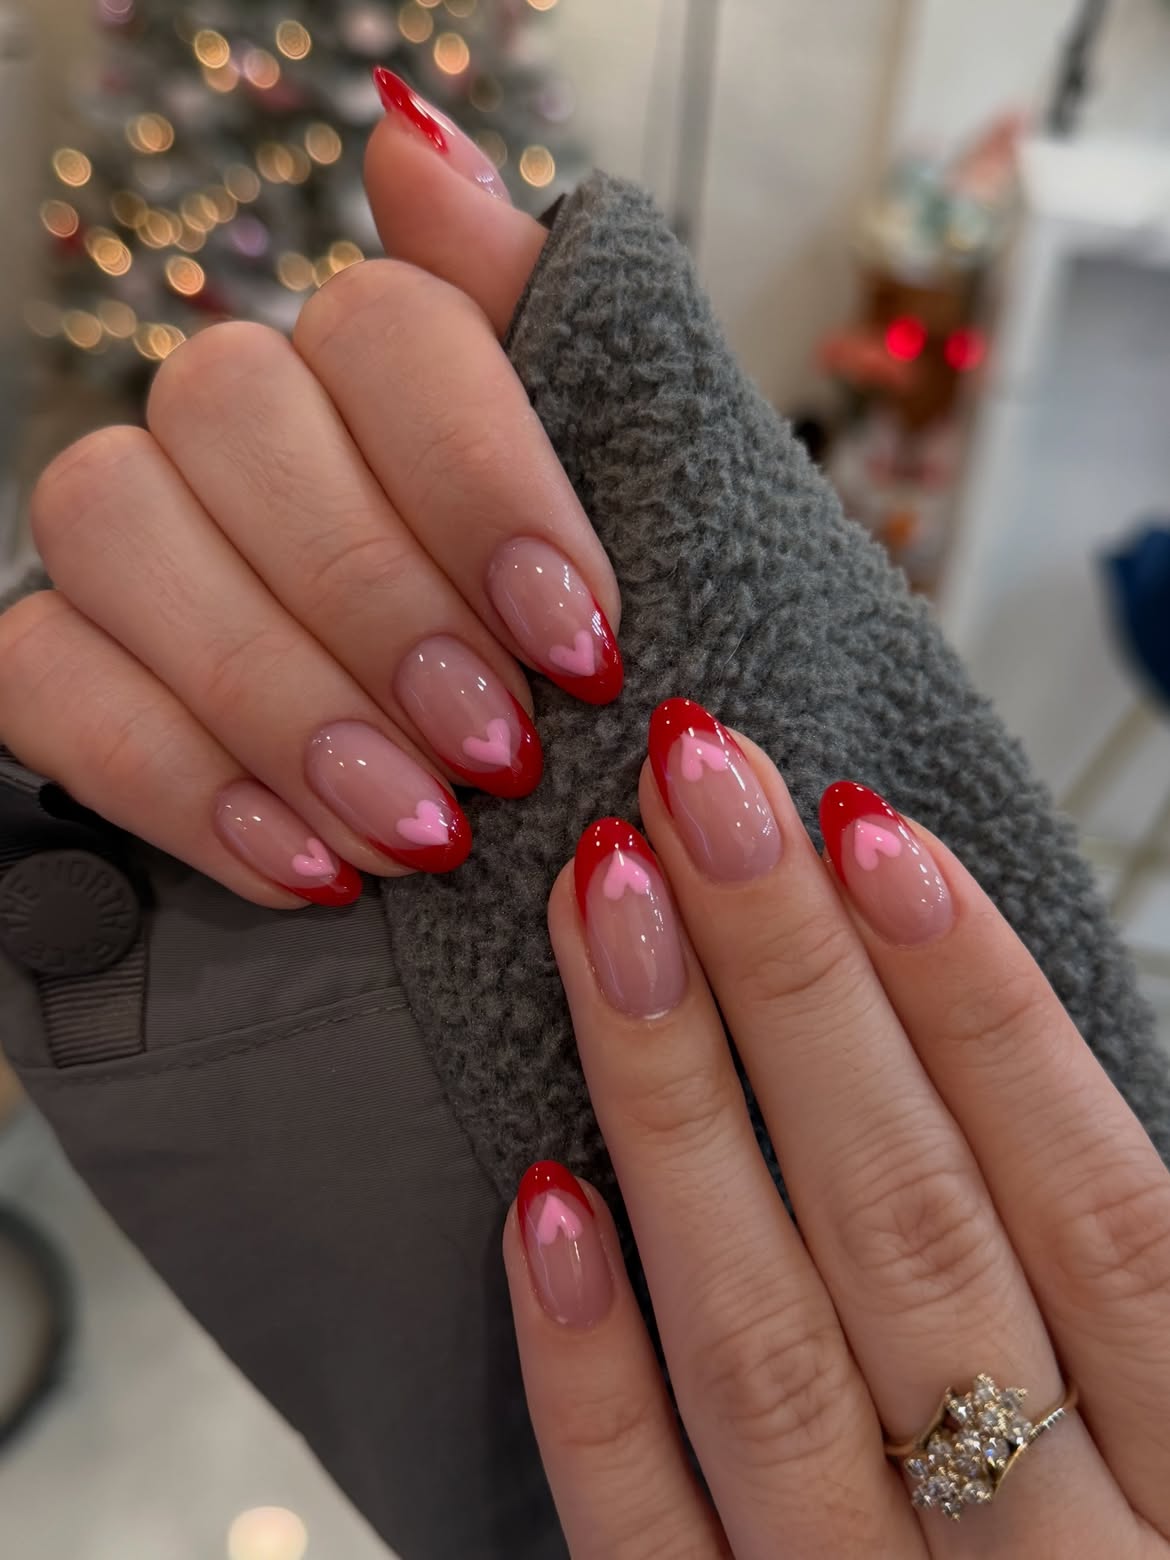
Bright red tips frame each almond nail, while a single soft pink heart relaxes the classic French shape. The warm red suits Christmas styling, and the lighter pink adds a playful note without covering the natural base.
Why it stays minimal: Most of the nail plate remains clear beneath a glossy nude layer. Each nail repeats only two details, one red tip and one small heart. The curved tips follow the almond shape, helping the color look clean from every angle.
Keep the red tip thickness consistent across the set, but place the hearts slightly off center. This small shift gives the manicure a hand painted quality. Choose a pale pink for the hearts so they remain visible against the deeper red edges.
Follow the natural curve of the almond tips.
Leave clear space around each pink heart.
Avoid oversized hearts that hide the nude base.
Do not add extra glitter or dots that compete with the simple motif.
7. Pink and Green Polka Dots for a Playful Holiday Look
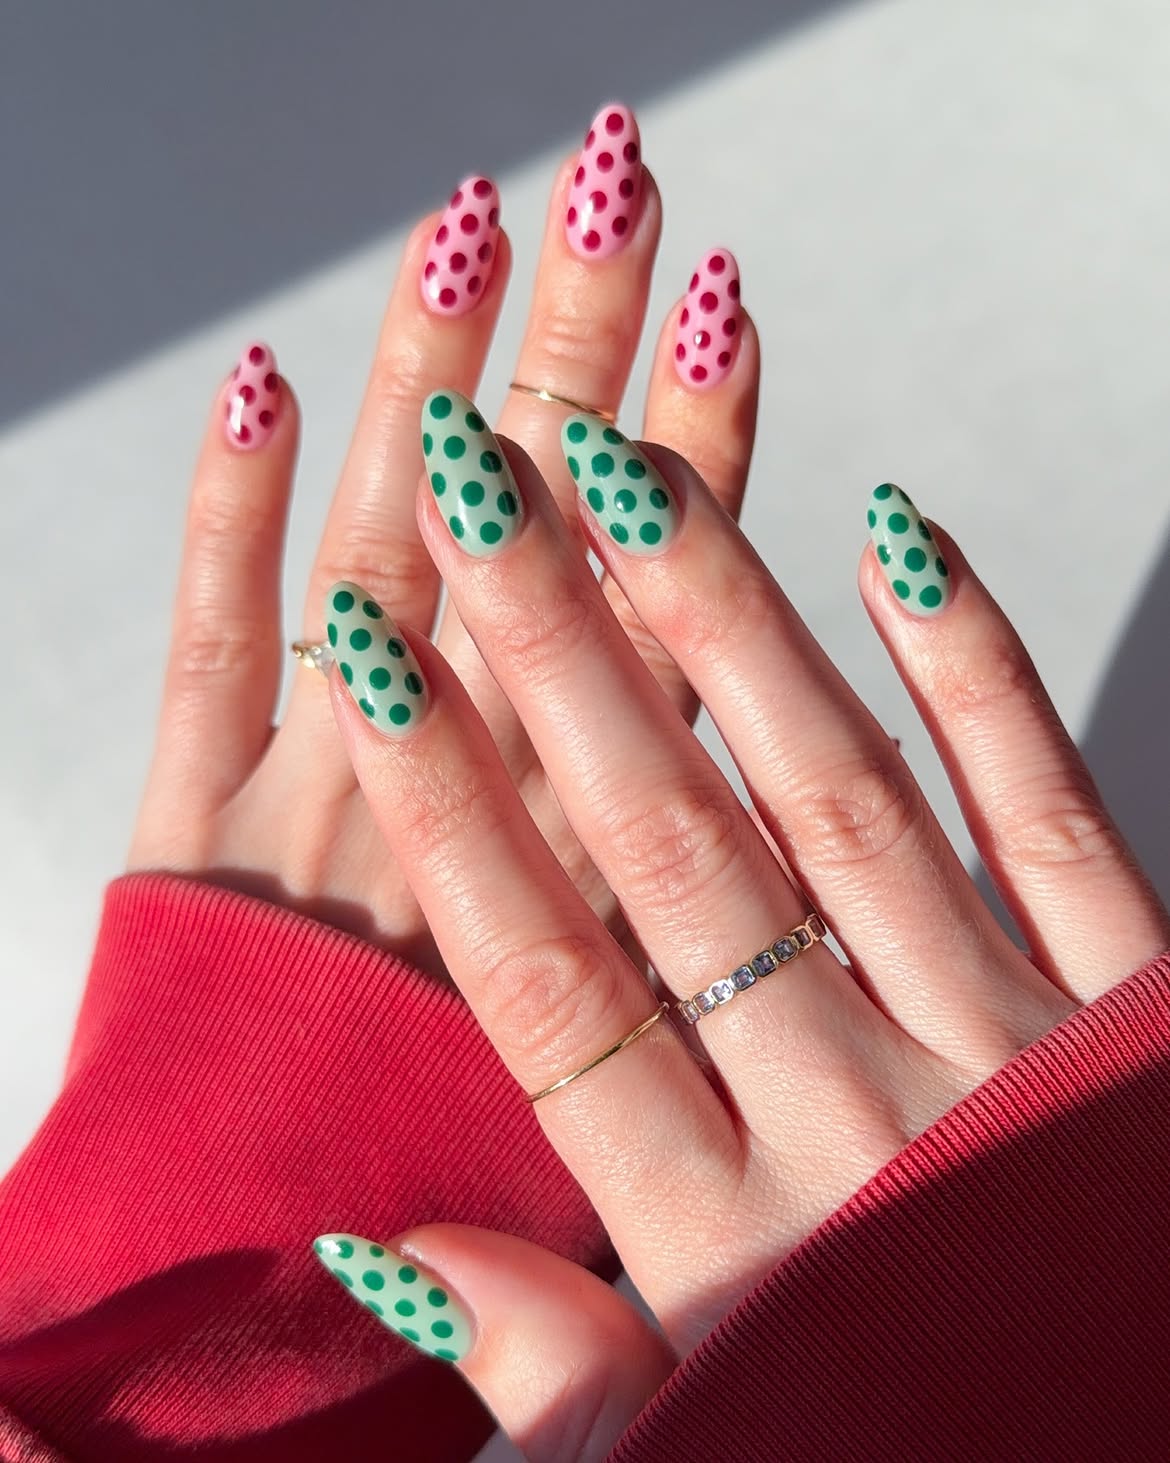
Two contrasting polka dot palettes give this manicure a cheerful Christmas color story. One hand uses a bubblegum pink base with deep berry dots. The other changes to soft mint with rich green dots. Repeating the same pattern across both hands keeps the set connected even though the colors differ.
Pink hand: The brighter combination feels sweet and candy inspired.
Green hand: The cooler palette brings a fresh seasonal note and balances the stronger pink.
Clean spacing is what keeps the pattern readable. Each dot has enough background color around it, and the rounded shapes follow the long almond nails without making them appear crowded. Use a dotting tool in two sizes to create slight variation while keeping the overall placement controlled.
8. Holly Inspired Cuticle Accents on Milky Short Nails
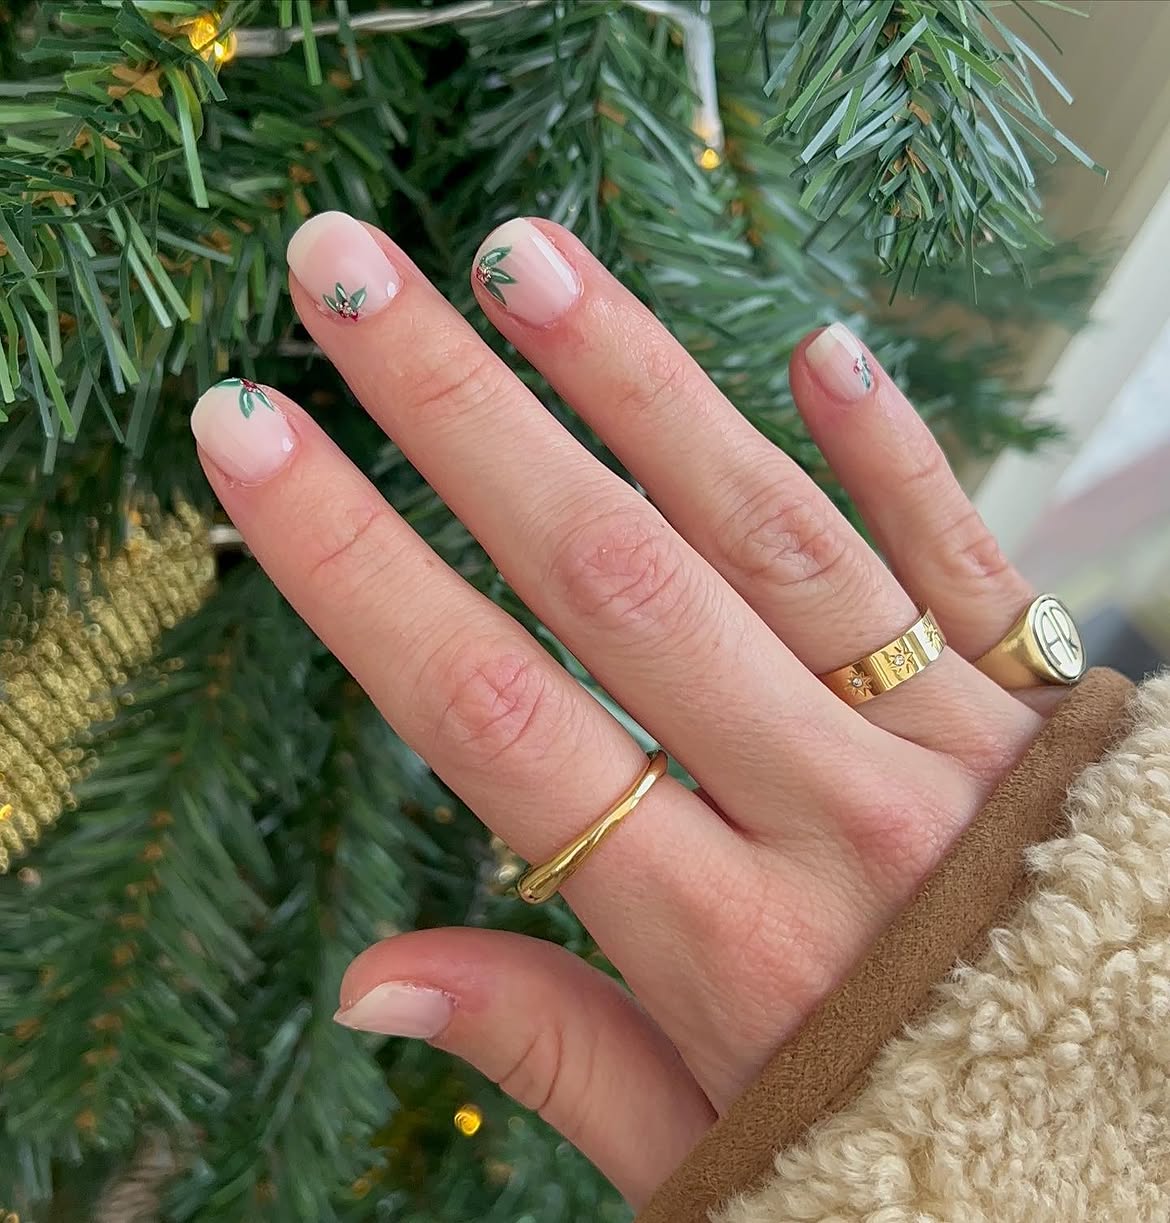
Instead of decorating every tip, this set tucks miniature greenery near the cuticles and side edges. A milky blush base keeps the short squoval nails clean, while tiny green leaves and red berry dots suggest holly without becoming full illustrations.
Placement does the work here. Some accents sit low near the cuticle, others climb along one side, and one nail carries a narrow white tip. These small changes make each nail distinct while the limited color palette holds the set together.
Choose one corner on each nail and keep most of the surface bare. That open space allows the tiny artwork to stand out. It also makes the design practical for short nails, where larger wreaths or bows could quickly feel crowded.
A plain milky manicure looks clean but carries little seasonal detail.
Tiny leaves and berry dots near the edges add Christmas character while preserving the open base.
9. Forest Green Nails with Gold Stars and a Fine Line Tree
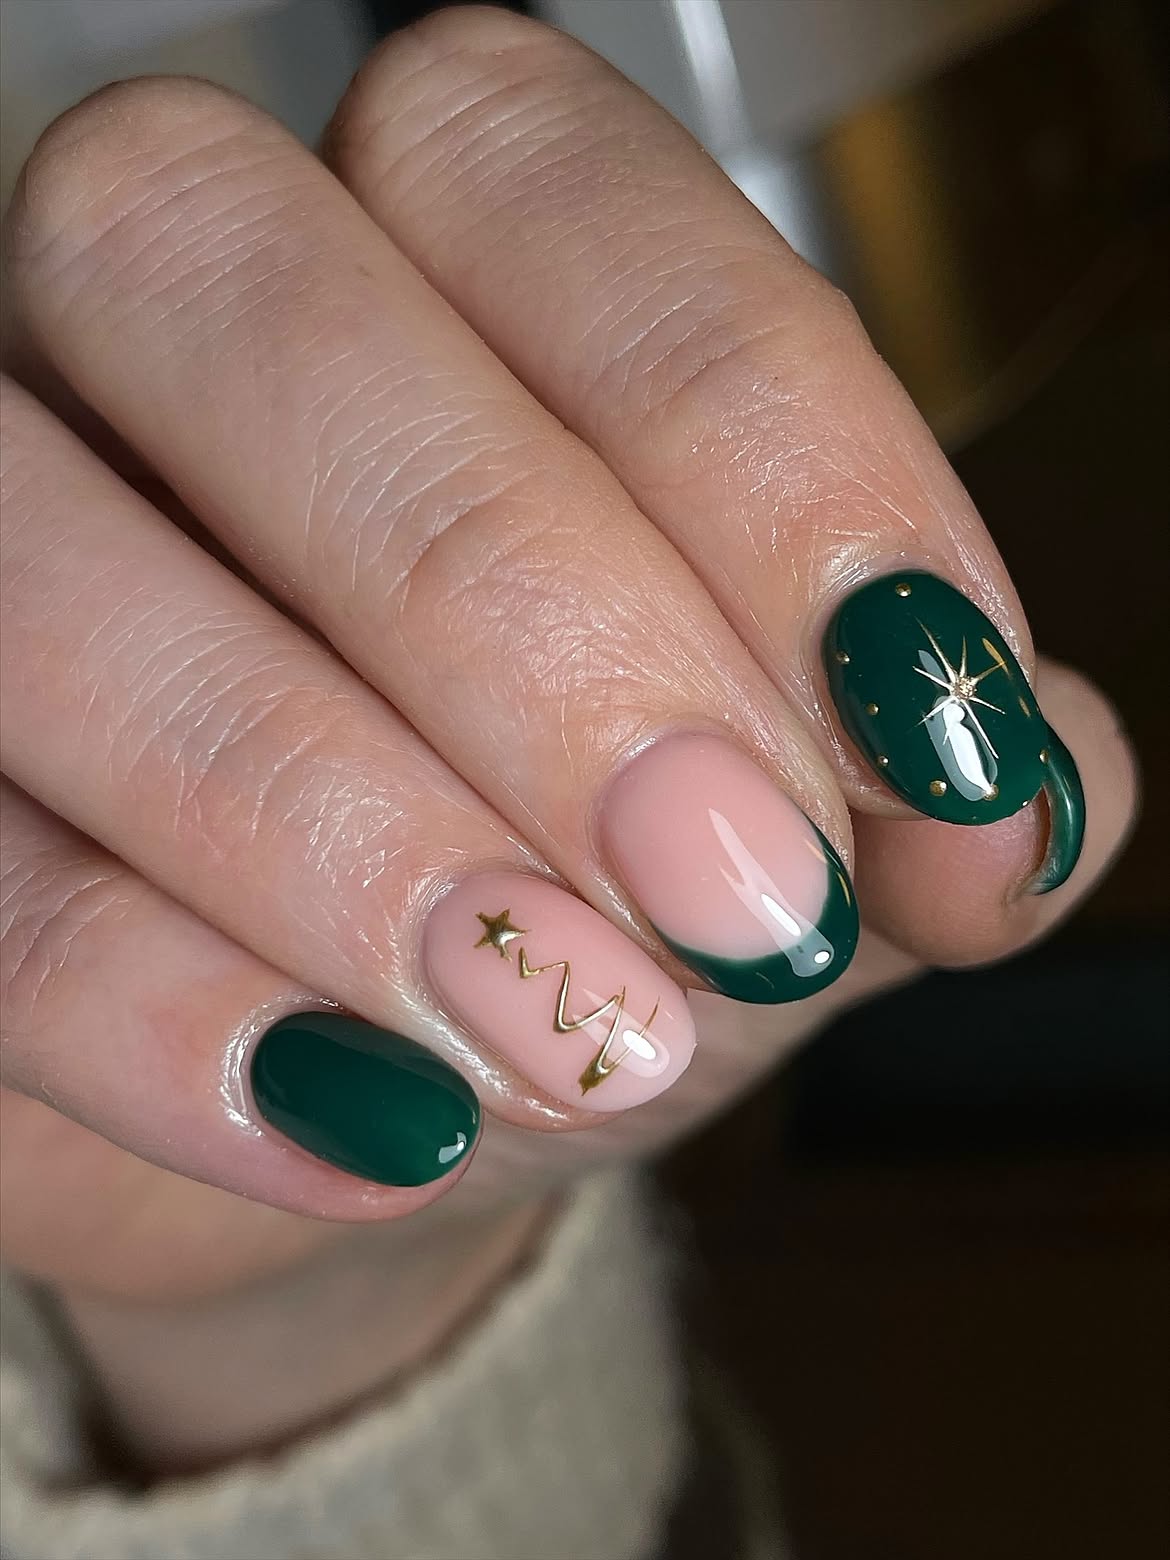
Forest green, blush pink, and fine gold details create a compact Christmas set with several motifs but little clutter. Each short rounded nail carries a clear role, so the manicure feels planned rather than busy.
Solid green anchor: Plain green polish gives the decorative nails a strong background and keeps the palette grounded.
Fine line tree: A slim gold zigzag forms a simple Christmas tree across the blush accent nail. The tiny star at the top makes the shape readable without extra ornaments.
Starry accent: One green nail carries a metallic starburst surrounded by small gold dots. Another uses an uneven green tip over blush pink, linking the two main colors.
Keep the metallic details small so the deep green remains the strongest part of the design.
Repeat forest green on a solid nail and a curved tip, then reserve gold for one small motif on each accent nail.
For more holiday manicure ideas you can recreate with basic tools, check out these 16 Easy Christmas Nails to Do at Home before choosing your next look.
10. Red Gift Bow Nails with Glitter and French Tips
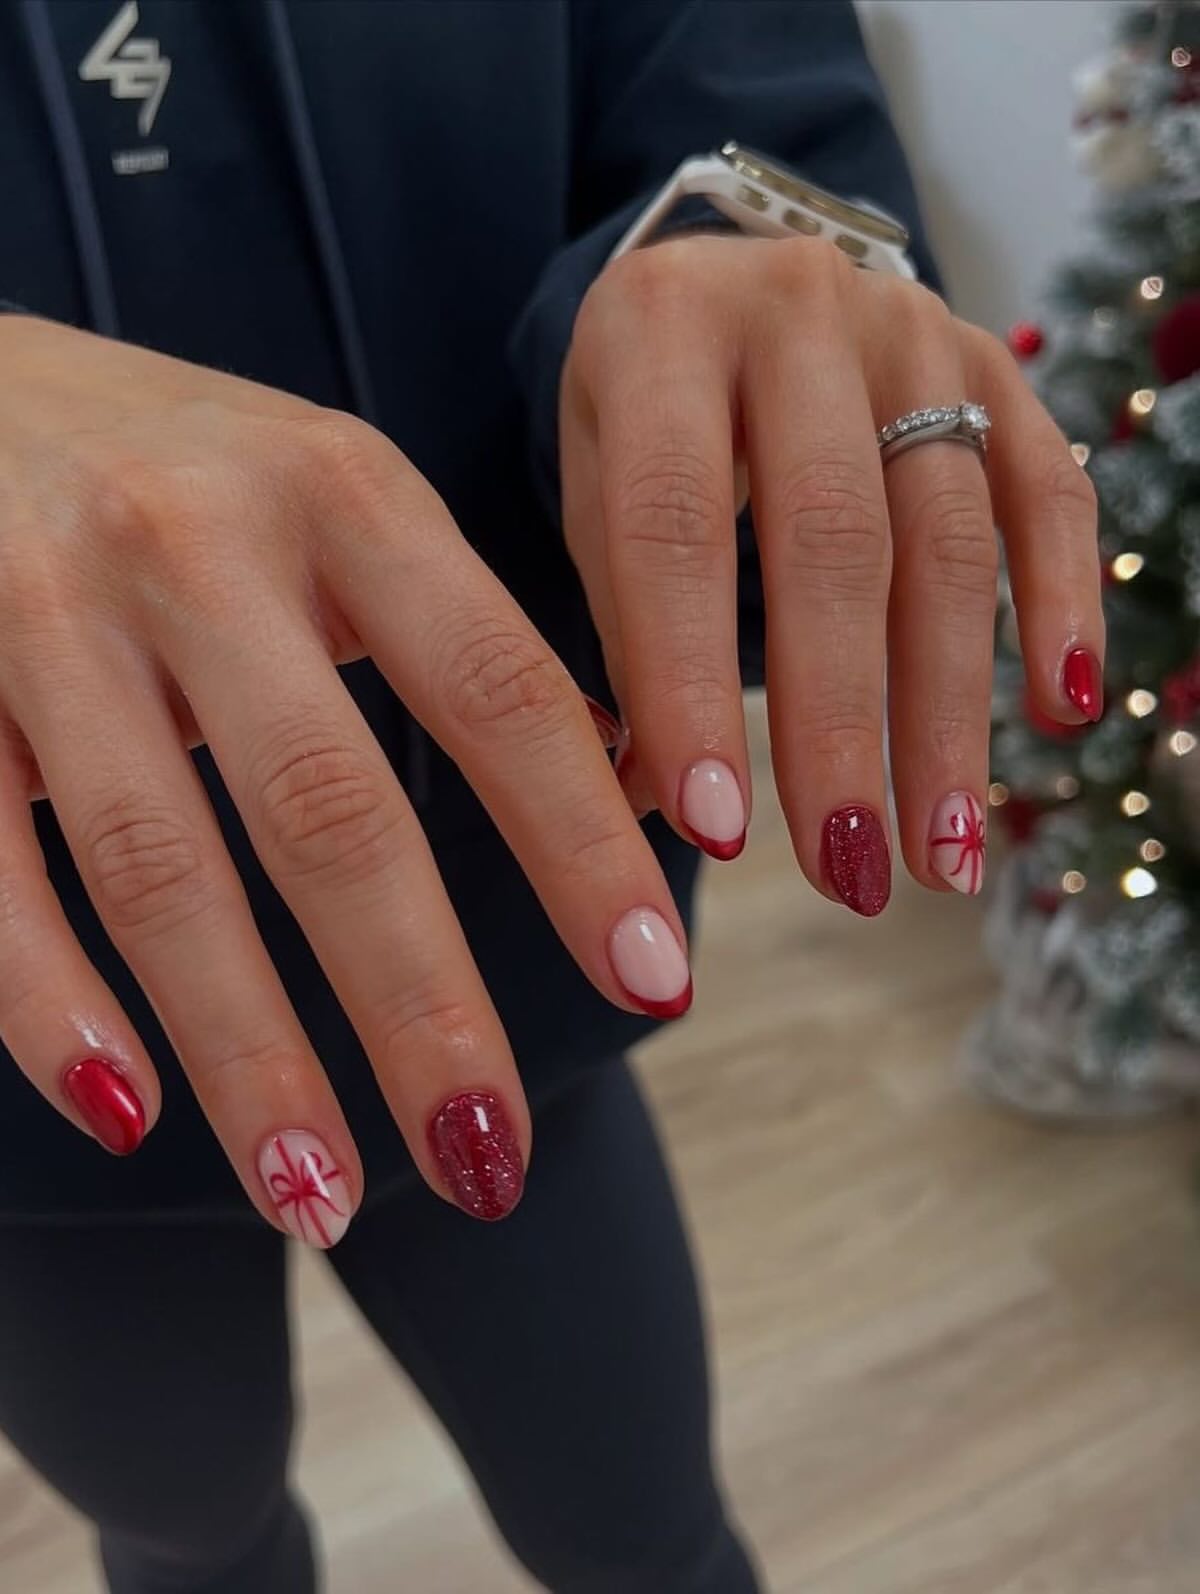
A four part rotation makes classic red feel varied across both hands. The manicure moves between glossy red, red glitter, blush nails with curved red tips, and pale accent nails painted with slim gift ribbons.
Each finish has a clear purpose. Solid red adds clean color, while glitter catches the light. The French tips preserve open space, and the bow nails carry the strongest Christmas detail. Since every element stays within the same red color family, the design looks coordinated rather than crowded.
For a quieter version, keep the ribbon artwork on one nail per hand and match the French tip color to the solid polish. The medium oval shape softens the bright red edges and gives the ribbon lines enough room to cross neatly.
- ▸Solid glossy red for the color anchor.
- ▸Red glitter for concentrated holiday shine.
- ▸Curved red French tips for open space.
- ▸Fine ribbon artwork for the gift theme.
11. White Sweater Texture with Glossy Holly French Nails
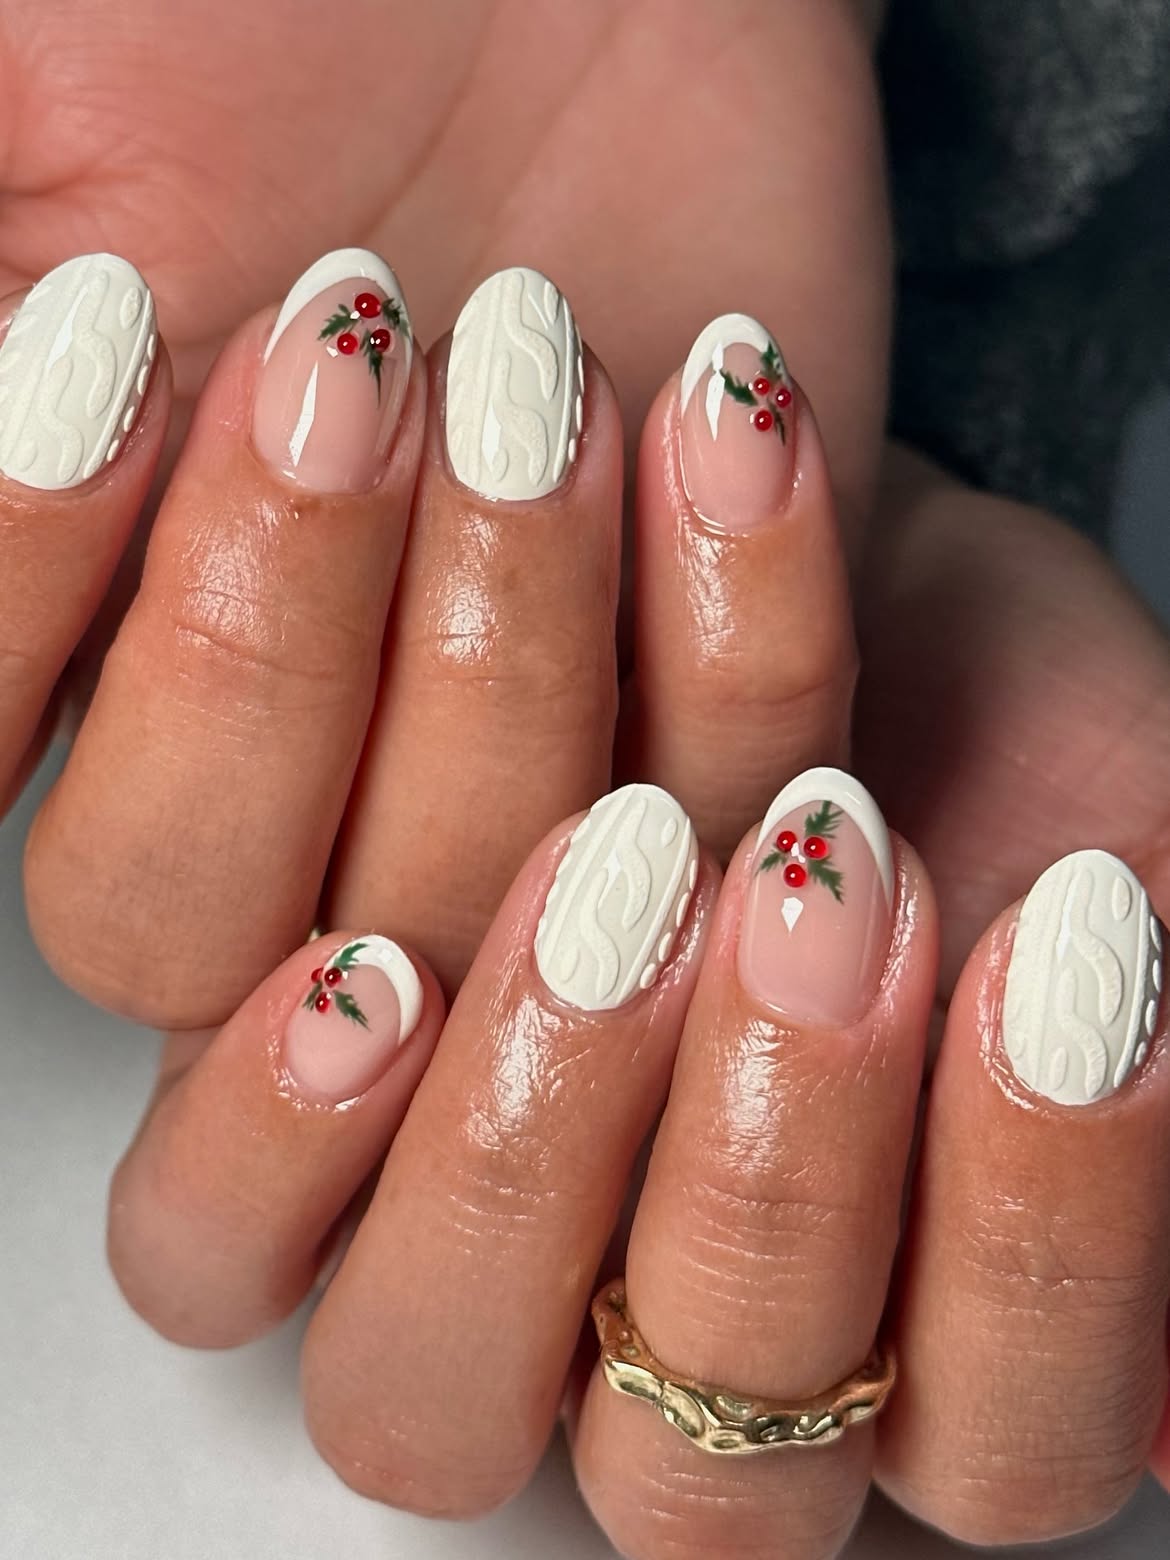
Raised cable knit texture gives the white accent nails the look of a winter sweater. The remaining nails use a glossy blush base, soft white French curves, and small holly sprigs formed from green leaves and red berry dots.
The finish contrast is the clever part. Matte white texture absorbs the light, while the smooth nude nails reflect it. Alternating the two finishes stops the white pattern from feeling heavy. The short rounded shape also keeps the raised details compact and wearable.
Ask for the knit pattern on only a few nails. If every nail carried thick texture, the delicate berries would lose attention. Seal the holly nails with gloss, but keep the sweater nails softly matte so both surfaces remain distinct.
12. Glossy Red Square Nails with Crystal Curves and a Bow
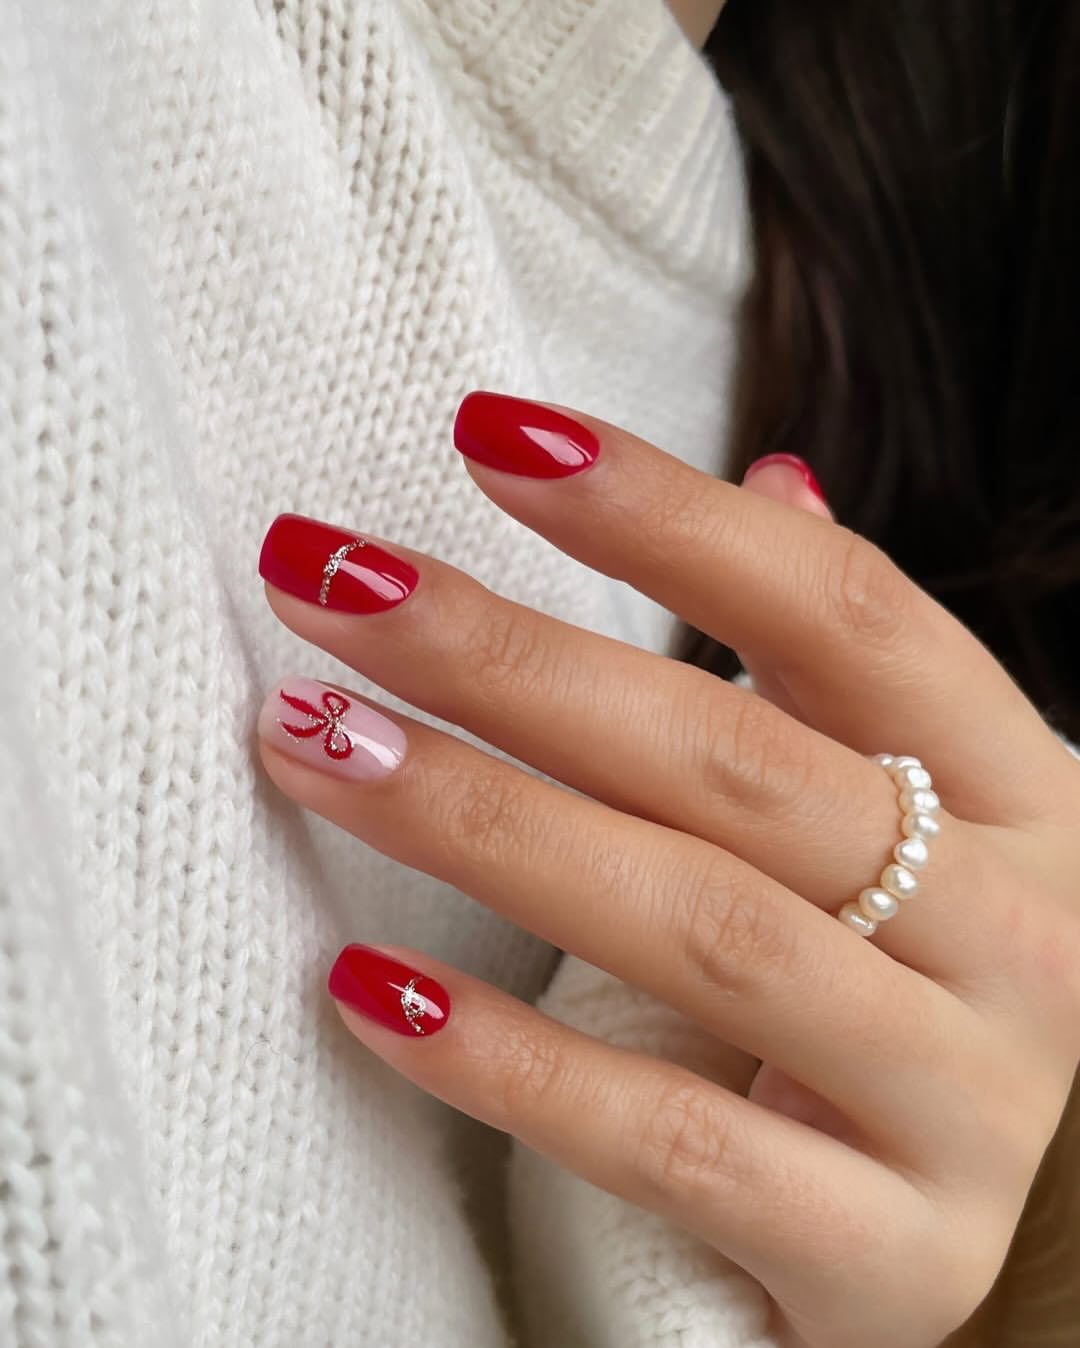
Small silver crystal curves give this glossy red manicure a jewelry inspired finish. Most nails are covered in rich cherry red, while tiny stones form short arcs and diagonal accents that catch the light without hiding the color.
A pale blush accent nail changes the rhythm with a red ribbon bow edged in sparkle. Keeping the bow on one nail gives it enough attention, while the smaller crystal details connect it to the rest of the set.
Scale keeps the manicure refined. Each embellishment covers only a small part of the nail, allowing the clean square shape and smooth red polish to remain visible. Use one illustrated accent, then repeat small curved stone placements across the other nails for a balanced holiday result.
📌 Good To Know
Place the stones in short curves near one edge of the nail. Long crystal bands can compete with the bow and make short square nails appear crowded.
13. Red Glitter Outline Nails with One Ribbon Accent
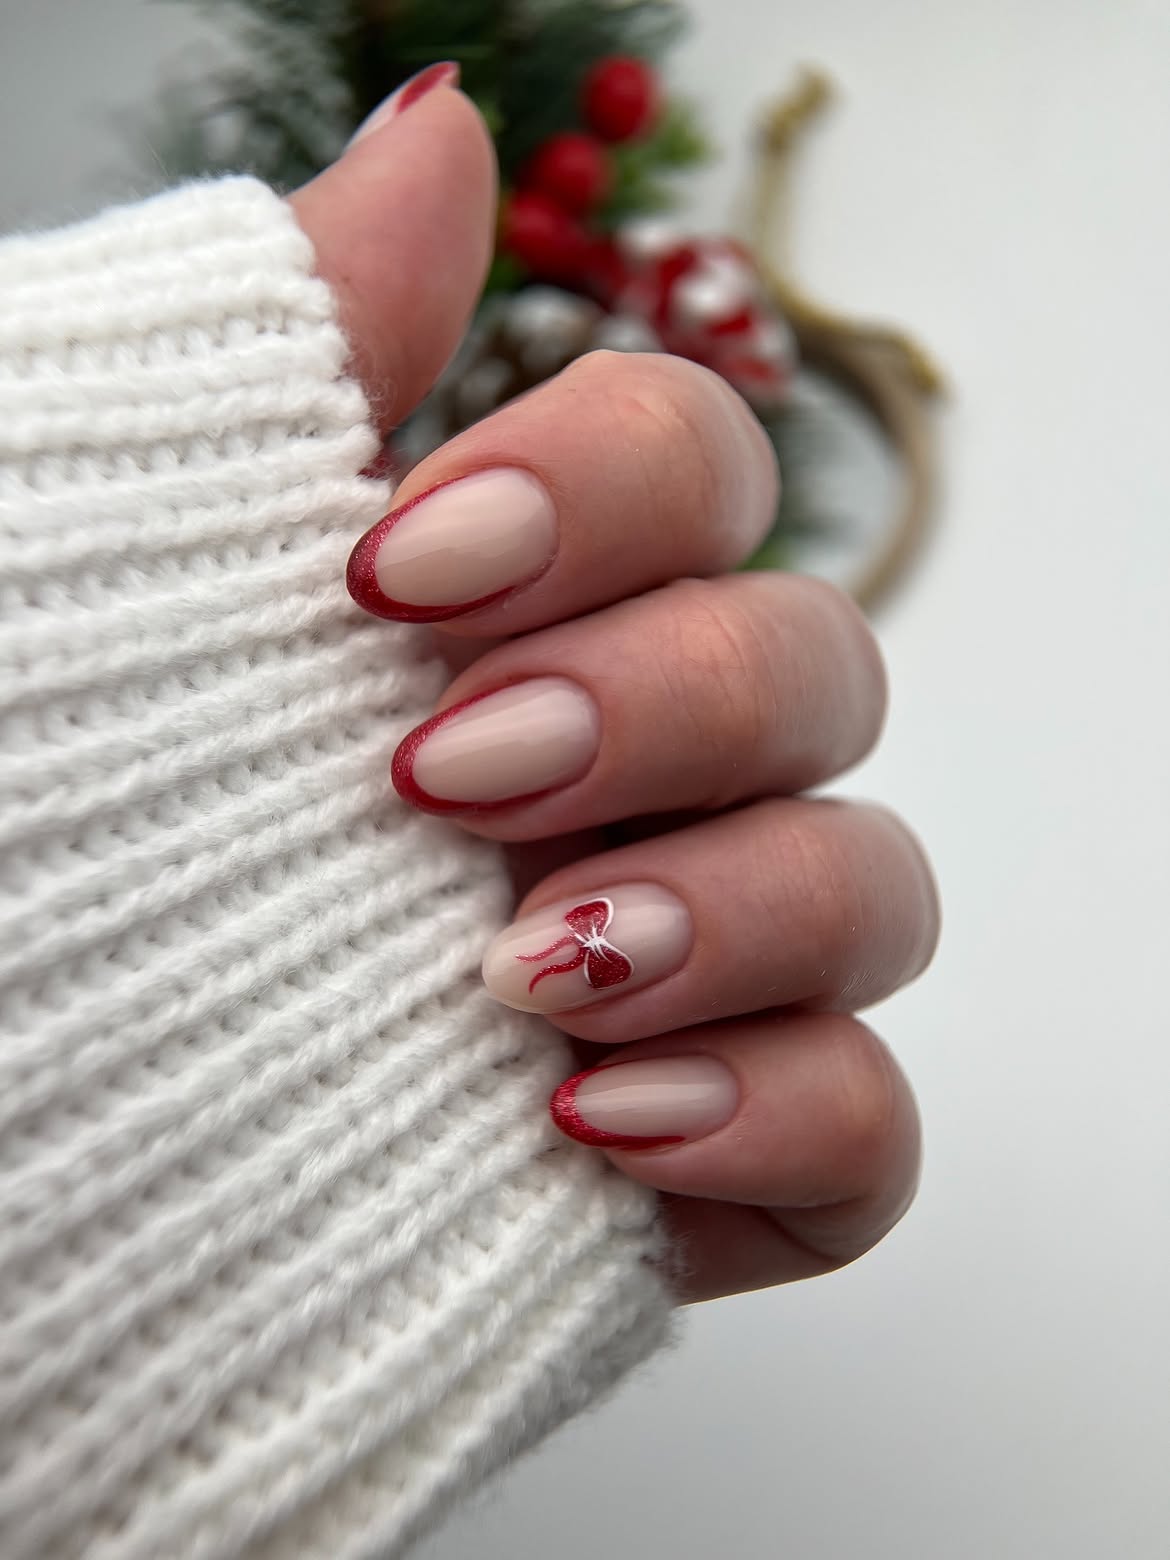
A slim red glitter border traces the edge of each nude almond nail, creating a lighter alternative to a filled French tip. The color follows the curved sides as well as the free edge, making each nail appear neatly framed.
One accent nail replaces the border with a small red bow tied together by fine white lines. Keeping the same milky nude base across the whole set allows the ribbon detail to stand out without disturbing the clean look.
The narrow outline is the key. If the line becomes too wide, it will look like a regular red tip and cover more of the soft base. Use a fine brush and build the glitter slowly to keep the curve smooth on both sides.
Build the outlined glitter look
Begin with a smooth milky nude base.
Trace red glitter around the tip and outer side edges.
Reserve one nail for a small ribbon with a fine white center.
14. Blush Celestial Nails with Crystal Starbursts
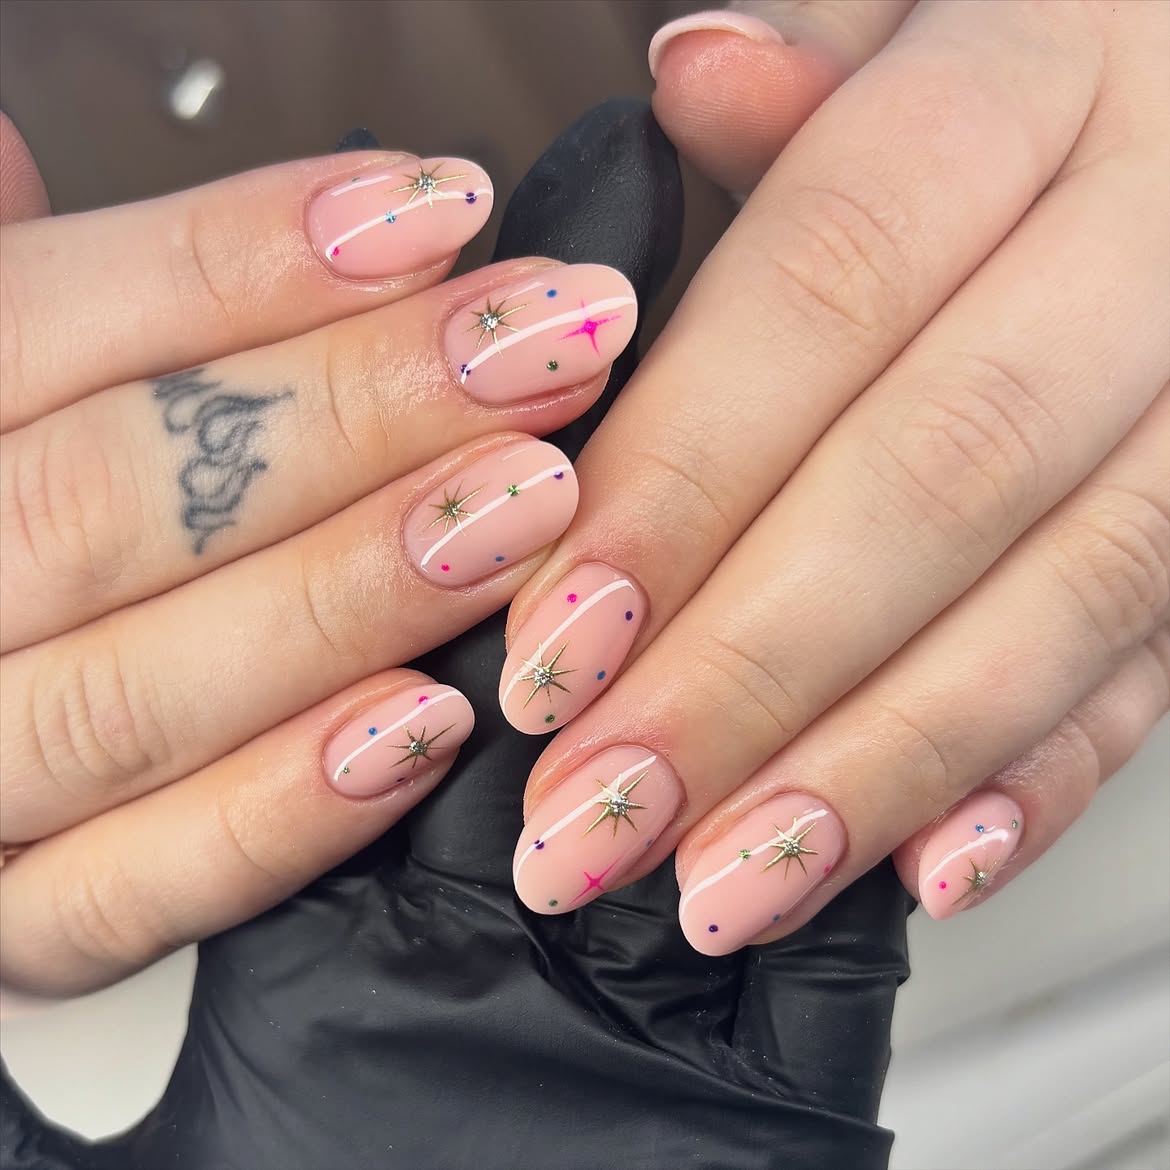
Celestial sparkle gives this blush manicure a festive mood without relying on classic holly or candy stripes. Each softly rounded nail begins with a translucent pink base, then receives one slim white curve that travels diagonally across the surface. Fine gold starbursts add the main glimmer, while tiny blue, green, pink, and purple dots create a light confetti effect.
The restrained spacing keeps the design aligned with minimalist Christmas nails. Leave plenty of bare blush visible and vary the placement of the stars from nail to nail so the set feels balanced instead of repeated. Use a fine liner brush for the white arcs and place the smallest crystals with a wax pencil. A glossy top coat smooths the accents and makes the metallic points look especially crisp under evening light.
15. Deep Burgundy Nails with Blush Ribbon Accents
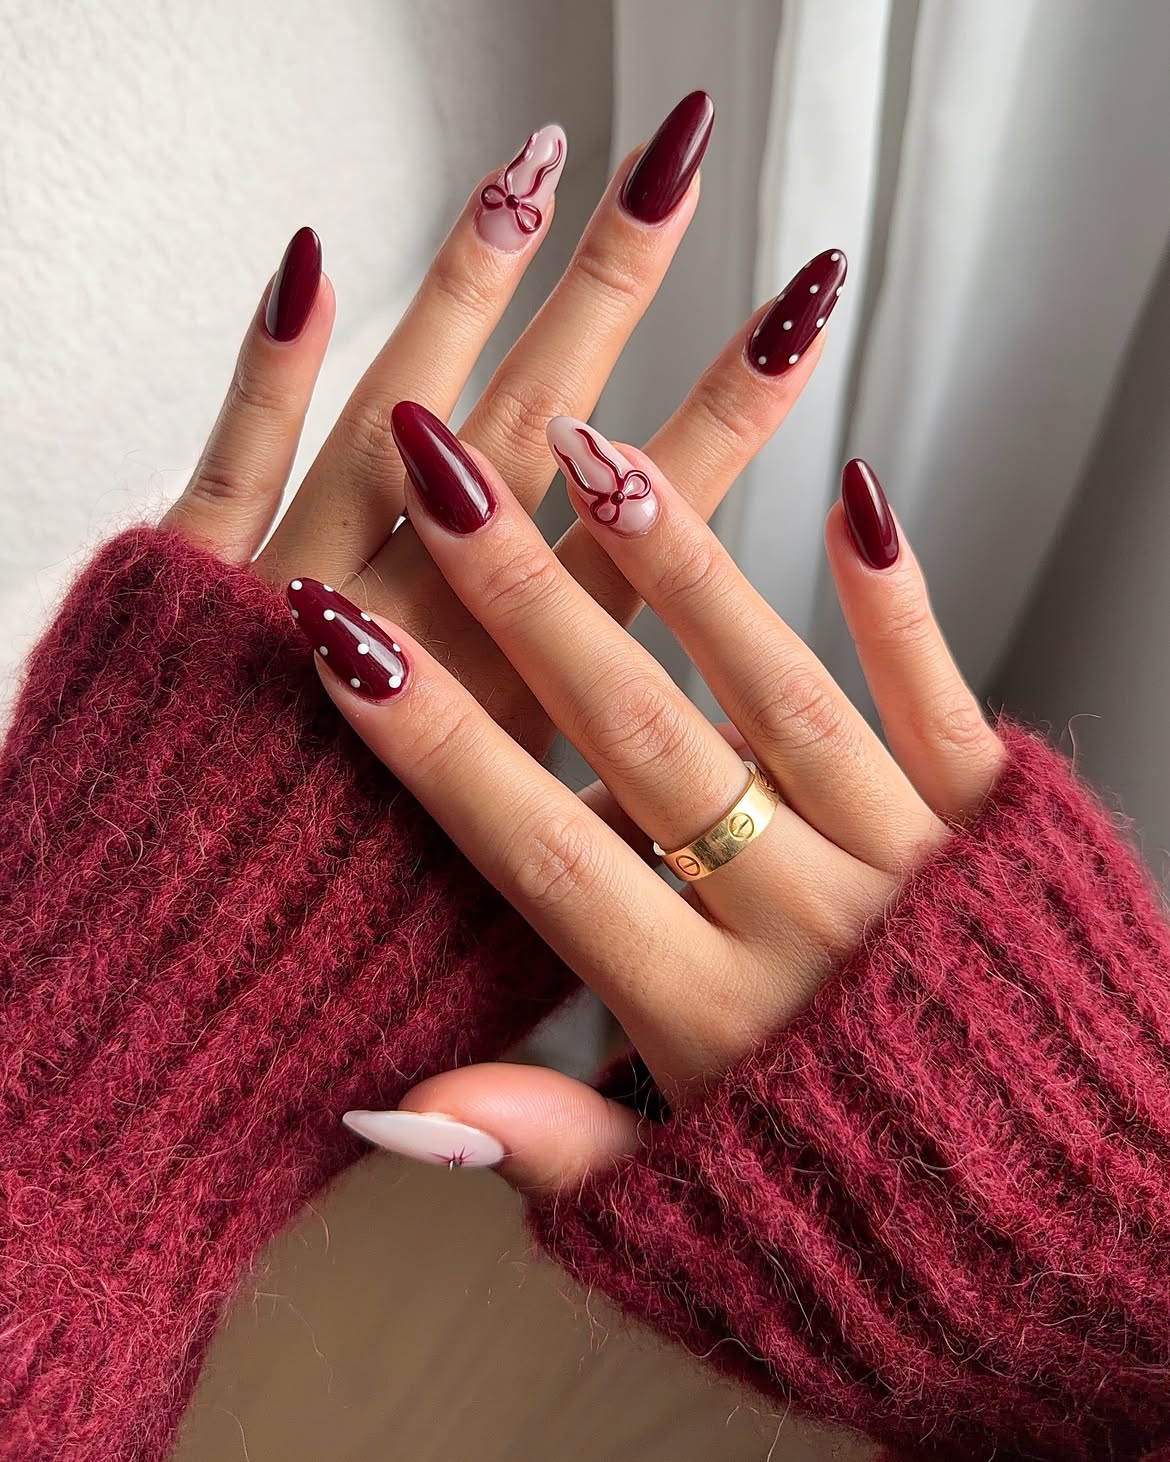
Deep burgundy creates instant holiday drama, yet the manicure stays refined because the decorative details are carefully spaced. Most nails carry a smooth, glossy wine shade that looks especially graceful on the elongated almond shape.
Two pale blush accent nails feature narrow burgundy lines flowing into small raised bows, giving the design a gift wrapped theme without covering every nail. White dots on selected burgundy nails resemble neat strands of winter lights and soften the darker color.
To keep this idea within minimalist Christmas nails, limit dimensional art to one accent nail on each hand and repeat the burgundy tone throughout the set. Build each bow with thick gel, cure it in short stages, then outline the loops with a fine brush. Use a small dotting tool for evenly sized white accents. A glassy top coat ties every detail together.
16. Milky Shimmer Nails with Tiny Christmas Motifs
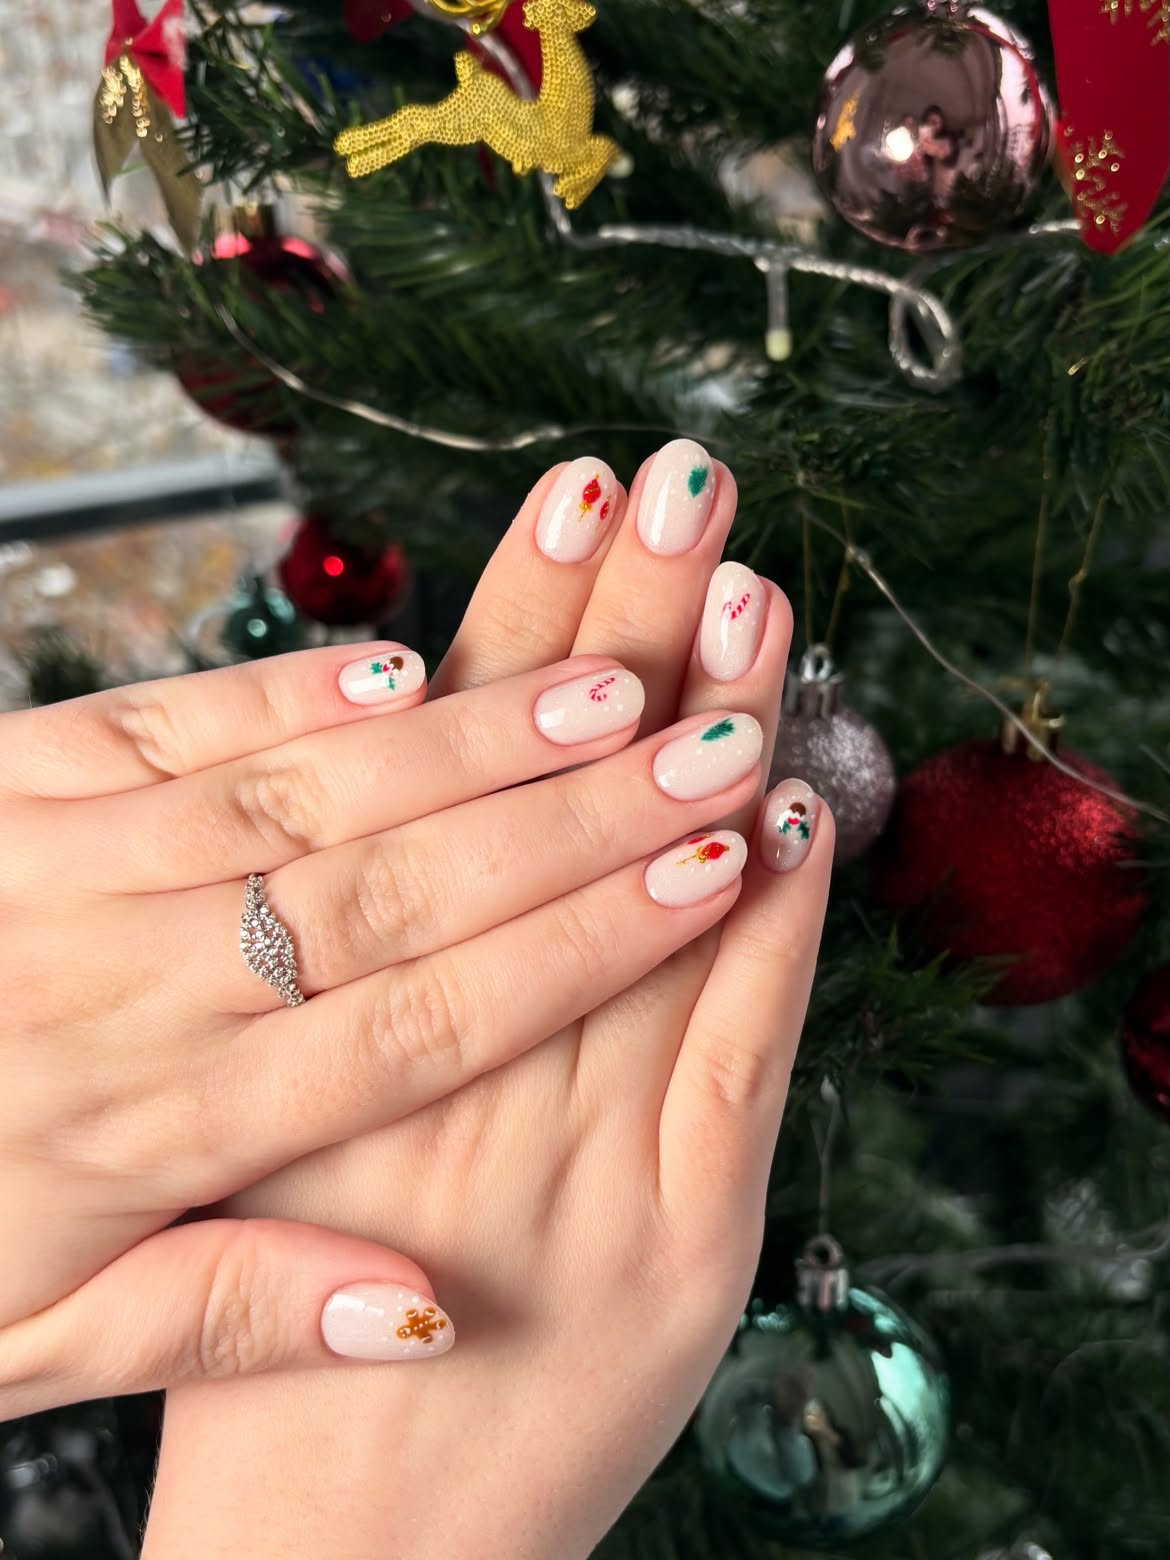
Miniature holiday symbols turn a soft milky manicure into a cheerful seasonal set while preserving plenty of clean space. The short oval nails have a translucent white base with subtle shimmer, creating a snowy backdrop for tiny candy canes, evergreen trees, holly sprigs, ornaments, and a gingerbread figure. Each motif occupies only a small portion of the nail, so the mix feels playful rather than crowded.
These minimalist Christmas nails work best when every illustration shares the same compact scale and simple color palette. Place most motifs near the tip or side instead of centering every design. A detail brush handles the fine stripes and greenery, while a dotting tool creates berries, buttons, and ornaments. Finish with a thin glossy coat to protect the artwork without softening the delicate lines.
- ✓Choose a sheer milky base with delicate shimmer.
- ✓Keep every festive motif small and simply shaped.
- ✓Repeat red and green accents across both hands.
- ✓Leave open space around each miniature illustration.